
Why Your House Feels Humid When Humidity Is Normal

A house can feel humid even when your humidity readings look normal. This usually happens when cold surfaces cause micro-condensation, airflow is poor, or the AC isn’t running long enough to remove moisture. Sometimes the issue is a single room creating its own humidity that never shows up on the whole-home hygrometer. Fixing airflow, runtime, and small moisture sources usually restores comfort quickly.

House Feels Humid But Humidity Is Not High

It’s confusing when your home feels sticky, clammy, or “muggy,” but your humidity monitor says everything is normal. You’re not imagining it — your home really can feel humid even when humidity isn’t high. This problem usually comes down to airflow, temperature balance, or hidden moisture sources that don’t show up on the hygrometer.

Let’s walk through why this happens, how to check for the root cause, and what quick fixes make your home feel dry again.

Why Your Home Can Feel Humid Even With Normal Humidity

The number on your humidity monitor doesn’t tell the whole story. Comfort also depends on surface temperatures, ventilation, and how long your AC runs.

Mini-case example: A reader wrote saying their living room felt sticky all evening even though their Govee hygrometer showed 44%. The issue wasn’t humidity — their AC was shutting off too quickly to remove moisture.
Infographic showing reasons a home feels humid, with rounded boxes explaining condensation, poor airflow, AC short cycling, and local moisture sources.

1. Cold Surfaces Cause a Damp Sensation

When floors, windows, or walls stay cooler than the surrounding air, tiny amounts of condensation form. You may not see it, but your skin feels it as humidity.

  • Cold tile floors
  • Shaded or north-facing rooms
  • Poorly insulated exterior walls

2. Poor Airflow Makes the Air Feel Heavy

Even with perfect humidity, stagnant air traps moisture around your skin. Closed doors, blocked vents, and low HVAC airflow all add to the problem.

Running ceiling fans or temporarily switching your HVAC fan to ON helps break up the heavy feeling.

3. AC Cooling the Home Too Quickly

Your air conditioner removes moisture the longer it runs. If it cools too fast, it shuts off before it can dry the air. A smart thermostat such as a Honeywell Home thermostat can help extend runtime and improve whole-home comfort.

4. Small Moisture Sources in One Room

One room might feel humid even if the house does not. Small moisture sources can affect local comfort without raising whole-home humidity.

  • Showering without ventilation
  • Boiling water or dishwashing
  • Indoor drying racks
  • Slow plumbing drips under sinks

Infographic showing reasons a home feels humid, with rounded boxes explaining condensation, poor airflow, AC short cycling, and local moisture sources.

Quick Fixes That Usually Work Fast

Most people solve the “humid feeling” with one or two simple changes.

Increase Air Circulation

Use a ceiling fan, open interior doors, or run a small circulator. Even a compact table fan removes the heavy feeling quickly.

Give Your AC More Runtime

If your AC is short cycling, letting it run longer dries the air better. Smart thermostats — including options from Honeywell Home — help manage this automatically.

Ventilate High-Moisture Areas

Bathroom fans, kitchen range hoods, and even opening a window for a few minutes can prevent humidity from collecting in one room.

Check for Damp Items

A wet bathmat, towel, spilled water, or a slow drip can make a room feel humid without affecting the whole house.

Checklist graphic with blue check icons showing sample items in a clean minimalist style.

Helpful Products That Actually Fix This

These simple tools make diagnosing and fixing the problem easier. Links below go to examples on Amazon.

1. A More Accurate Hygrometer

Reliable sensors from brands like Govee, ThermoPro, and AcuRite help you confirm what’s really happening.

Example: Govee digital hygrometer on Amazon

2. Small Room Dehumidifier

If just one room feels damp, a compact unit from Black+Decker, hOmeLabs, or Frigidaire dries it quickly.

Example: Black+Decker small-room dehumidifier

3. Smart Thermostat

Smart thermostats like Honeywell Home, Nest, and Ecobee help prevent short cycling so your AC actually removes moisture.

Example: Honeywell Home smart thermostat

Wrap-up: A humid-feeling home doesn’t always mean high humidity. Most of the time, the cause is airflow, cold surfaces, or short AC cycles. With a few simple adjustments — and maybe a useful tool or two — your home can feel dry and comfortable again.

Why Your Room Smells Musty (Even With No Mold Visible)

If your room smells musty but you can’t find any mold, don’t assume the worst. In many homes, the cause is something simpler—high humidity, damp carpet padding, poor airflow, or an air conditioner that isn’t removing enough moisture. You can usually narrow down the source in just a few minutes by paying attention to when and where the smell is strongest.

Quick Diagnosis: Where Is the Smell Strongest?

Choose the situation that sounds most like yours to jump to the most likely cause.

Why Does My Room Smell Musty if There’s No Visible Mold?

A musty smell can make you think the worst.

The good news is that a musty smell doesn’t always mean you have a mold problem. In many homes, the odor is caused by excess moisture, poor airflow, or damp materials that haven’t had a chance to dry completely.

Many homeowners immediately assume mold is growing behind the walls, under the floor, or somewhere they can’t see. Sometimes that’s true. But surprisingly often, the source turns out to be something much simpler.

The smell may be coming from a damp carpet pad, a closet with poor airflow, an air conditioner that isn’t removing enough moisture, or even furniture that has slowly absorbed humidity over time.

Before you start tearing into drywall or calling a mold inspector, use the diagnostic choices above and pay attention to where and when the odor is strongest.

Diagnostic guide showing how to identify the source of a musty smell based on where and when it occurs

Why a Room Can Smell Musty Without Visible Mold

One of the biggest misconceptions about musty odors is that mold must be visible before it creates a smell.

In reality, the odor often appears first.

Building materials, carpet padding, furniture, clothing, insulation, and dust can all absorb moisture. As that moisture lingers, it creates the familiar earthy smell most people associate with mold.

In some cases, mold has not started growing yet. The room simply is not drying out properly. In other cases, microbial growth may be hidden inside carpet padding, wall cavities, furniture, or other materials where it cannot be seen easily.

The Most Common Sources of Musty Smells

Infographic showing common causes of musty room odors including humidity, carpet moisture, HVAC issues, closets, furniture, and hidden leaks

1. High Humidity Is Quietly Feeding the Problem

If you don’t own a hygrometer, you’re guessing.

Many homes spend weeks above 60% relative humidity without the homeowner realizing it. At those levels, carpet, furniture, bedding, drywall, and other porous materials begin absorbing moisture from the air.

The room may never feel wet. Nothing may look damp. Yet the smell continues getting worse.

A simple humidity reading can often solve the mystery in less than a minute.

Indoor humidity above about 60% allows fabrics, carpet, drywall, and wood to slowly absorb moisture—even when nothing actually feels wet.

If humidity is consistently high, aim to bring it down to approximately 40% to 50%. You can learn more in our guide to dealing with humidity above 60% inside the house.

Return to the top

2. The Carpet Looks Fine—but the Padding Doesn’t

One of the most common hidden sources of musty odors is the carpet pad underneath.

Small spills, pet accidents, wet shoes, steam cleaning, or even high humidity can leave moisture trapped below the surface.

The carpet itself may feel completely dry.

The padding underneath may not be.

A clue is when the smell is strongest near the floor or becomes more noticeable after walking across the room.

Check along carpet edges, near exterior walls, around windows, and anywhere a spill or leak may have occurred. If possible, lift a small corner of the carpet to inspect the padding underneath.

Return to the top

3. Your Air Conditioner May Be Part of the Problem

Many people notice the smell only after the air conditioner starts running.

This can happen when:

  • The evaporator coil stays damp.
  • The condensate drain is partially clogged.
  • The HVAC filter restricts airflow.
  • The system is oversized and short-cycles.
  • Moisture or dust has collected inside the drain pan or ductwork.

When moisture isn’t removed properly, stale odors can circulate through the room every time the system turns on.

If the smell appears mainly during HVAC operation, check the air filter, condensate drain, drain pan, and visible portions of the evaporator coil. A system that repeatedly smells musty may need professional cleaning or maintenance.

Return to the top

4. Closets Create Perfect Conditions for Musty Odors

Closets often have poor airflow, limited sunlight, and lots of absorbent materials.

Clothing, cardboard boxes, shoes, blankets, and stored items slowly collect moisture over time.

The result is stagnant air and a musty smell that seems to appear out of nowhere.

If the odor is strongest when opening a closet door, airflow is often the issue.

Remove damp or tightly packed items, replace cardboard storage boxes with plastic containers, and leave the closet door open periodically. A small moisture absorber can also help in a confined space.

Return to the top

5. Furniture and Mattresses Can Hold Moisture for Months

Upholstered furniture acts like a sponge.

Mattresses, couches, pillows, and fabric-covered furniture absorb moisture from the air every day.

Bedrooms are particularly vulnerable because people release moisture into the air while sleeping.

If a bedroom smells musty but the rest of the house seems fine, the furniture itself may be contributing to the problem.

Pull furniture away from exterior walls, inspect underneath mattresses and cushions, and allow air to circulate around upholstered items. Check for dampness, staining, or odor that becomes stronger when you press or move the material.

Return to the top

6. Hidden Moisture Behind Walls or Flooring

Sometimes the smell really is coming from somewhere you can’t see.

Small plumbing leaks, condensation inside wall cavities, roof leaks, or water intrusion around windows can keep building materials damp for months.

This becomes more likely when the musty smell worsens after rain or is concentrated near one exterior wall, window, ceiling, or section of flooring.

Warning signs include:

  • Odors near one specific wall.
  • Musty smells that become worse after rain.
  • Water stains or discoloration.
  • Peeling or bubbling paint.
  • Soft drywall.
  • Warping floors, baseboards, or trim.
  • Condensation around windows.

This is usually the point where further investigation becomes worthwhile. A moisture meter, plumbing inspection, roof inspection, or professional assessment may be necessary when the source cannot be located visually.

Return to the top

What to Do Next

Before buying products or scheduling repairs, try these three simple checks:

  1. Measure the humidity in the room.
  2. Determine where the smell is strongest.
  3. Pay attention to when the smell appears.

Those three observations solve the mystery in a surprising number of homes.

Once you know where the odor is coming from, fixing it becomes much easier.

Checklist graphic showing quick fixes to remove a musty smell from a room

Quick Fixes for Musty Smells

1. Run a Dehumidifier

A dehumidifier pulls moisture out of the room quickly and is often the fastest way to eliminate a musty odor caused by excess humidity.

Keeping indoor humidity between approximately 40% and 50% helps building materials and furniture dry while making it harder for the smell to return.

A dehumidifier can reduce the odor, but it will not repair an active plumbing leak, roof leak, or other continuing source of water.

2. Improve Airflow

Open doors, crack a window when outdoor humidity is low, or run a fan to keep air moving.

Stagnant air allows moisture to linger and odors to grow stronger. Pull furniture a few inches away from walls and avoid packing closets so tightly that air cannot circulate.

3. Replace or Clean Your HVAC Filter

A dirty filter restricts airflow and can contribute to humidity problems.

Replacing the filter is one of the easiest and least expensive troubleshooting steps, especially when the odor appears after the air conditioner turns on.

4. Use Moisture Absorbers in Small Spaces

Products such as DampRid can help in closets, storage areas, bathrooms, and other small locations where airflow is limited.

Moisture absorbers are best for confined spaces. They generally cannot remove enough moisture to correct a humidity problem affecting an entire room.

5. Deep Clean Carpet and Check the Padding

If carpet is the source, an enzyme cleaner or carpet extraction machine may help remove trapped odors.

Use as little moisture as necessary and allow plenty of drying time afterward. Over-wetting the carpet can push additional water into the padding and make the odor worse.

If the padding remains damp, badly stained, or strongly odorous, replacement may be more effective than repeated surface cleaning.

6. Inspect the AC Coil and Condensate System

Dirty evaporator coils, drain pans, and condensate lines can stay damp and produce stale odors.

Check that the condensate drain is flowing freely and that water is not collecting inside the drain pan. Professional HVAC maintenance may be necessary when the odor repeatedly returns or when the coil is difficult to access safely.

Can a Room Smell Musty Even if There Isn’t Any Mold?

Yes. High humidity, damp carpet padding, furniture, closets, dust, and moisture absorbed by building materials can all create a musty odor even when no mold is visible.

However, the absence of visible mold does not prove that no mold is present. Growth can sometimes remain hidden underneath flooring, behind walls, inside HVAC components, or within other damp materials.

Finding and correcting the source of excess moisture is the most important first step.

How to Prevent Musty Odors

  • Keep indoor humidity between approximately 40% and 50%.
  • Run your air conditioner or dehumidifier during humid weather.
  • Replace HVAC filters on schedule.
  • Do not block supply or return vents.
  • Keep furniture slightly away from exterior walls.
  • Avoid drying laundry indoors whenever possible.
  • Leave closet doors open occasionally to improve airflow.
  • Store clothing and fabrics only after they are completely dry.
  • Address plumbing leaks, roof leaks, and spills promptly.
  • Dry wet carpet and building materials as quickly as possible.

When Should You Be Concerned?

A musty smell by itself doesn’t always mean you have a serious mold problem.

However, you should investigate further if:

  • The smell continues getting stronger.
  • You notice staining, discoloration, or damp materials.
  • The odor returns immediately after cleaning.
  • The smell is concentrated near one wall, window, ceiling, or section of flooring.
  • The room recently experienced a leak, flood, or plumbing problem.
  • The smell becomes noticeably worse after rain.
  • Drywall, flooring, or trim feels soft or appears warped.
  • People experience symptoms that occur mainly while spending time in that room.

At that point, hidden moisture becomes much more likely. Further investigation may be necessary to identify and correct the source rather than simply covering the odor.

Related Reading

UV Lights vs. UV Air Purifiers in Your HVAC: What’s the Difference and Which One Do You Need?

UV Lights vs. UV Air Purifiers in Your HVAC: What’s the Difference?

Indoor air quality has become a major concern for homeowners. Modern homes are tightly sealed for energy efficiency, but that also means dust, allergens, odors, mold spores, and other pollutants can stay trapped indoors.

Your HVAC system moves air through the entire house, which makes it one of the best places to improve indoor air quality. But there is one big point of confusion: a standard HVAC UV coil light and an in-duct UV air purifier are not the same thing.

They both use ultraviolet technology, but they solve different problems. Choosing the wrong one can mean spending money on equipment that does not fix the issue you actually care about.

The good news is that choosing between them is pretty simple once you know what problem you are trying to solve.

The Core Difference in One Sentence:

A coil UV light helps keep the inside of your HVAC system clean, while an in-duct UV air purifier helps treat the air moving through your home.

Who This Article Is For

This guide is for homeowners trying to decide whether they need a simple UV light installed near the AC coil or a whole-house air purifier installed in the ductwork.

If your main problem is a musty smell from the vents, mold on the coil, or dirty HVAC equipment, you may only need a coil UV light. If your main concern is allergies, pet odors, cooking smells, smoke odors, or cleaner air throughout the whole house, an in-duct purifier is usually the better fit.

1. HVAC Coil UV Lights: Designed to Protect the Equipment

Coil UV lights, often called HVAC UV lights, are installed inside the air handler. They are usually mounted so the UV-C light shines directly on the evaporator coil and drain pan.

This matters because your AC coil is often cold, damp, and dark. That makes it one of the easiest places for mold, mildew, algae, and biological buildup to grow inside the system.

  • How it works: The UV-C light shines on the coil and nearby surfaces. It helps damage mold and bacteria so they cannot keep growing on those surfaces.
  • What it is good for: Reducing mold growth on the coil, helping with musty vent odors, and keeping the HVAC system cleaner.
  • The limitation: A coil UV light mostly treats the surfaces it shines on. It is not designed to clean all the air moving through your home.

For a deeper look at this specific use, see Does UV Light Really Kill Mold in HVAC?

2. In-Duct UV Air Purifiers: Designed to Treat the Air You Breathe

An in-duct UV air purifier is different. Instead of only shining on the coil, it is installed in the ductwork so it can treat air as it moves through the HVAC system.

These systems are usually aimed at whole-house air quality problems such as odors, airborne particles, bacteria, viruses, mold spores, and VOCs. Some models combine UV light with ionization, plasma, or other active air treatment technology.

It’s important to remember that no single technology solves every indoor air quality problem. Organizations such as ASHRAE recommend a layered approach that combines proper ventilation, effective filtration, humidity control, and air-cleaning technologies when appropriate.

  • How it works: Air passes through the duct system and across the purifier. Depending on the model, the purifier may use UV light, ionization, or other technology to reduce certain airborne pollutants.
  • What it is good for: Whole-home odor control, allergy support, reducing airborne irritants, and improving the way the air feels throughout the house.
  • The limitation: It costs more than a basic coil UV light and should usually be installed by an HVAC professional.

The Hidden Advantage Over Portable Air Purifiers

Portable air purifiers usually clean one room at a time. An in-duct air purifier uses your existing HVAC system to help treat air moving to the bedrooms, living room, bathrooms, and other areas of the house without adding extra machines in every room.

Side-by-Side Comparison: Which Problems Do They Solve?

The easiest way to choose between a coil UV light and a UV air purifier is to start with the problem you are trying to fix.

Air Quality Problem Coil UV Light In-Duct UV Air Purifier
Mold or slime on AC coils ✅ Best fit ➖ Not the main purpose
Musty smell from vents ✅ Often helps ✅ Often helps
Pet odors ➖ Not designed for this ✅ Better fit
Cooking odors ➖ Not designed for this ✅ Better fit
Allergy or asthma triggers ➖ Limited help ✅ Better fit
Airborne bacteria or viruses ➖ Surface-focused ✅ Better fit
Whole-house air freshness ➖ Limited ✅ Best fit


Quick Decision Guide: Which One Should You Buy?

Decision tree showing when to choose a UV coil light, a whole-house UV air purifier, or both based on mold, musty odors, allergies, pet odors, and indoor air quality concerns.If you are still unsure, use this simple decision guide.

Choose a coil UV light if:

  • Your AC has a musty smell when it starts.
  • Your evaporator coil keeps getting dirty or moldy.
  • You live in a humid climate.
  • You want the lower-cost option.
  • Your main goal is protecting the HVAC equipment.

Choose an in-duct UV air purifier if:

  • You want cleaner air throughout the whole house.
  • You have pet odors, cooking odors, smoke odors, or stale air.
  • Your family deals with allergies or asthma triggers.
  • You want something more powerful than a room air purifier.
  • Your main goal is improving the air you breathe.

Choose both if:

  • You want the coil protected and the air treated.
  • You have both musty HVAC odors and whole-house air quality problems.
  • You want the most complete setup and are comfortable with the higher cost.

Should You Upgrade to a Whole-Home Purifier?

uv-light-vs-uv-air-purifier-family-clean-airIf your main goals are allergy relief, odor reduction, and better air from room to room, a basic coil UV light may not be enough. That is where an in-duct air purifier makes more sense.

One of the best-known whole-house systems is the REME HALO Whole Home In-Duct Air Purifier. It combines UV technology with ionization to help reduce airborne particles, odors, and certain microorganisms moving through the HVAC system.

The main advantage is coverage. Instead of buying several portable air purifiers for different rooms, an in-duct purifier works with the central HVAC system you already have.

The tradeoff is cost and installation. These systems usually require a higher upfront investment and should be installed by a qualified HVAC contractor.

Safety: Coil UV Lights vs. UV Air Purifiers

Both coil UV lights and in-duct UV air purifiers are designed to operate inside the HVAC system, away from people and pets. The main safety concerns are installation, servicing, and choosing the right type of device.

  • Do not look directly at UV-C light. UV-C can irritate or damage eyes and skin. The power should be turned off before opening HVAC access panels.
  • Use proper placement. UV lights should be aimed at coils, drain pans, or the air stream, not directly at wiring, plastic parts, filters, or flexible duct for long periods.
  • Ask about ozone. Some air purification technologies can produce small amounts of ozone. If anyone in the home has asthma, COPD, or chemical sensitivity, ask for a low-ozone or no-ozone option.
  • Use professional installation. A good installer can place the device correctly, wire it safely, and make sure it only runs when appropriate.

Installed correctly, these systems are meant to treat HVAC surfaces and moving air — not people directly.

Cost vs. Long-Term Maintenance

Cost is usually the final deciding factor. Coil UV lights and whole-home UV air purifiers sit in different price ranges because they perform different jobs.

  • Coil UV lights: Usually the lower-cost option. Many basic systems fall in the hundreds of dollars, with replacement bulbs needed about once a year.
  • UV air purifiers: Usually more expensive upfront. Systems like the REME HALO also require replacement cells, often every 18 to 24 months depending on the model and usage.
  • Both together: This is the most complete setup, but also the most expensive. The coil light helps keep the HVAC equipment clean, while the in-duct purifier helps treat air throughout the home.
System Typical Cost Main Purpose Maintenance
Coil UV Light $150–$500 Helps keep coils and drain pans cleaner Replace bulb about every 12 months
In-Duct UV Air Purifier $500–$1,200+ Helps treat air moving through the home Replace purifier cell about every 18–24 months

Which One Is Right for You?

If your problem is mostly inside the HVAC system — mold on the coil, slime buildup, or a musty smell from the vents — start with a coil UV light.

If your problem is inside the living space — pet odors, cooking odors, stale air, allergy triggers, or wanting cleaner air throughout the whole house — an in-duct UV air purifier is usually the better choice.

If you have both problems, the two systems can work together. The coil light protects the equipment, and the purifier helps treat the air moving through the ductwork.

Final Thoughts

The difference between a UV light and a UV air purifier comes down to what you want the system to do.

A coil UV light is mainly an HVAC maintenance tool. It helps control growth on the evaporator coil and drain pan.

An in-duct UV air purifier is a whole-house air quality upgrade. It is better suited for odors, airborne irritants, and cleaner-smelling air throughout the home.

Before buying either one, decide whether you are trying to clean the HVAC equipment or improve the air in the rooms. That one decision usually tells you which system makes the most sense.

What to Read Next

Frequently Asked Questions

What is the main difference between a UV light and a UV air purifier?

A UV light usually refers to a coil light that shines on HVAC surfaces like the evaporator coil and drain pan. A UV air purifier is designed to treat air moving through the ductwork.

Does a coil UV light clean the air?

Not in the same way an air purifier does. A coil UV light mainly treats the surfaces it shines on. It may help with musty odors caused by coil growth, but it is not designed as a whole-house air cleaner.

Do UV air purifiers remove dust or pet hair?

No. UV air purifiers are not physical filters. You still need a good HVAC filter to capture dust, pet hair, and larger particles.

Can I install both a coil UV light and a UV air purifier?

Yes. Many homeowners use both. The coil UV light helps keep the HVAC equipment cleaner, while the in-duct purifier helps treat air moving through the house.

Are HVAC UV systems safe?

They can be safe when installed correctly inside the HVAC system. The UV light should not be exposed to people or pets, and the system should be turned off before service panels are opened.

Which one is better for allergies?

An in-duct UV air purifier is usually the better choice for allergy concerns because it is aimed at air moving through the home. A coil UV light is more focused on preventing growth inside the HVAC equipment.

Which one is better for musty AC smells?

A coil UV light is often the better first choice if the smell is coming from mold, mildew, or biological growth on the evaporator coil or drain pan.

Ozone Generator Sizing Guide: What Size You Need for Smoke, Mold, Pets, or Skunk

Ozone Generator Sizing Guide: Find the Right Size for Any Room or Problem

Trying to figure out how powerful of an ozone machine you need? Whether you’re clearing out cigarette smoke, cooking odors, or something much worse, the right ozone generator size makes all the difference. Too small, and you’ll be running it for hours without results. Too large, and you could end up with lingering ozone long after the job is done.

This guide walks you through the numbers, the expectations, and the safety tips — so you can choose the right size with confidence.

Disclaimer: This guide is for informational use only. Never use an ozone generator in an occupied space. Always follow manufacturer instructions and allow time for ozone to dissipate before reentry.

Infographic showing how to calculate the required ozone output by multiplying room square footage by 0.5 to 1 mg/h."❓ How Strong of an Ozone Generator Do I Really Need?

Answer: Match output to your room size: about 1,000 mg/h per 100–150 sq ft. For stubborn odors like smoke or skunk, scale up or plan on multiple treatments.

Room Size Chart (with Output Range)

Room Type Square Footage Suggested Output
Closet, Bathroom, Small Bedroom 100–200 sq ft 1,000–3,000 mg/h
Living Room, Kitchen, Office 200–500 sq ft 3,000–7,000 mg/h
Basement, Garage, Open Concept Space 500–1,000+ sq ft 8,000–12,000+ mg/h

❓ Can I Use Too Much Ozone?

Answer: Yes — but the danger comes from reentering too soon. Larger generators release more ozone faster, but ozone naturally decays within 30–90 minutes. Always allow time and ventilate after treatment.
Because the machine’s output level affects how quickly the air becomes safe again, you can find more detailed re-entry timelines in our guide on how long to wait after using an ozone generator

Rule of Thumb: Wait 1 hour for every hour of ozone treatment — or 2 hours if using a high-output machine.
Timeline showing ozone treatment process from machine startup, ozone decay phase, to safe reentry with ventilation icon."

What Does Ozone Smell Like?

Dark blue safety graphic with warning symbol showing the safe ozone concentration limit of 0.08 ppm or below."
One of the first things people notice during or after a treatment is the distinct smell of ozone. It’s often described as sharp, clean, and slightly metallic — similar to chlorine, an electric spark, or the air after a lightning storm.

This smell is perfectly normal. It’s a sign that ozone was generated and is still active in the air. If you can still smell ozone, it’s not safe to reenter the room just yet. Let the space air out fully and wait until the scent fades to a barely noticeable level or disappears entirely.

Don’t worry if the smell lingers longer than expected. Factors like low ventilation, soft furnishings, or high output machines can extend the time it takes for ozone to fully break down. Just crack a window and use a fan to help speed it up.

❓ Can I Treat the Whole House at Once?

Answer: Technically yes, but it’s usually not the best approach. Treating one room at a time gives you better control and deeper results. If you do treat the whole house, keep interior doors open and use fans to help ozone circulate.

Pro Tip: Ozone doesn’t flow like air freshener — it needs time, circulation, and space to reach problem areas.
Visual safety guide showing icons for no people or pets, use a timer, post warning signs, ventilate the area, and follow instructions."

Ceiling Height Makes a Big Difference

Most ozone sizing guides only consider floor space — but ceiling height matters too. Why? Because ozone fills the entire volume of a room, not just the surface area. The more vertical space you have, the more ozone you’ll need to fill it effectively.

As a quick reference, multiply your room’s square footage by the ceiling height to get the total cubic feet. A 300 sq ft room with 8-foot ceilings = 2,400 cubic feet. But if that same room has 12-foot ceilings, you’re working with 3,600 cubic feet — 50% more airspace to treat.

Rule of thumb: If your ceilings are over 10 feet tall, increase your ozone output by 25–50%, or plan on longer treatment times. This ensures ozone can reach the upper corners of the room effectively.

Flat design showing recommended ozone treatment time with hourglass icon and the text 'About 30 minutes.'"Small vs Medium vs Large Ozone Generators: What to Expect

Ozone machines are rated in milligrams per hour (mg/h). That number tells you how much ozone the machine puts out — but it doesn’t always tell you what results you’ll get. Here’s what you can expect from each size:

🔸 Small Units: 1,000–3,000 mg/h

  • Best for: Closets, small bedrooms, cars, pantries
  • Room size: Up to 200 sq ft
  • Treatment time: 30–60 minutes
  • What to expect: Light odors removed in one session; stronger odors may require 2–3 cycles
  • Bonus: Great for small containers or odor-proof boxes (treat shoes, books, or clothes)

🔸 Medium Units: 3,000–7,000 mg/h

  • Best for: Bedrooms, kitchens, offices, mild smoke damage
  • Room size: 200–500 sq ft
  • Treatment time: 1–2 hours
  • What to expect: Handles most odors in one or two sessions; easy to carry and store
  • Common use: Landlords, car detailers, Airbnb hosts

🔸 Large Units: 8,000–12,000+ mg/h

  • Best for: Basements, open floorplans, large living rooms
  • Room size: 500–1,000+ sq ft
  • Treatment time: 2–4 hours (longer for severe odors)
  • What to expect: Strong ozone smell afterward; may need extra ventilation time
  • Caution: Overkill for small rooms — always follow wait-time safety instructions

Portable vs. Professional Ozone Generators

Not all ozone machines are built the same. While most consumer-grade units are marketed by their output — like 5,000 or 10,000 mg/h — there are important differences between portable models and commercial-grade machines.

Portable units are typically lightweight, made with plastic or thin aluminum casings, and designed for short cycles in single rooms or cars. These are great for DIY odor removal projects at home.
If you are ready to see which specific models we recommend for these types of home projects, you can read our full breakdown of the best ozone generators currently on the market.
Professional ozone generators tend to have metal housings, stronger internal fans, better heat sinks, and often include multi-stage timers, fan speed settings, and ozone plate controls. They’re built to withstand longer runtimes, and some are rated for treating very large spaces or entire buildings.

Also, be cautious with extremely cheap models — especially those sold by unfamiliar brands with questionable mg/h claims. Look for third-party reviews, real product specs, and a manufacturer that actually publishes safety documentation.

If you’re still unsure whether renting or purchasing is best for your situation, this guide explains when ozone machine rental is the right choice

❓ What Size Ozone Generator Should I Use for My Car?

Answer: A 3,000–5,000 mg/h unit is usually enough for cars, trucks, and RVs. Run it with windows up and a small fan inside to help circulate ozone through seats and vents. Most treatments take 30–60 minutes, but tough odors may require a second session.

Reminder: Never sit in the car during treatment — and air it out for at least 30 minutes after ozone use.

Match the Ozone Size to the Problem You’re Solving
Infographic showing recommended ozone generator sizes for various odor problems, including cigarette smoke, pet odor, mold, fire damage, car interiors, and skunk, with matching mg/h output ranges."

Room size is important — but so is the type of odor or contamination you’re dealing with. Here’s a quick guide:

🚬 Cigarette Smoke

  • Best size: 5,000–10,000 mg/h
  • Use notes: May need multiple treatments

🐾 Pet Odors

  • Best size: 3,000–5,000 mg/h
  • Use notes: Use in areas where pets sleep or mark

🦠 Moldy or Musty Smell

  • Best size: 5,000–10,000 mg/h
  • Use notes: For odor only — does not kill mold in walls or materials

🦨 Skunk Odor

  • Best size: 10,000–12,000+ mg/h
  • Use notes: May require multiple high-output treatments

🔥 Fire/Smoke Damage

  • Best size: 10,000–20,000 mg/h
  • Use notes: Use only for odor; not for cleanup or restoration

🚗 Cars, Vans, and RVs

  • Best size: 3,000–5,000 mg/h
  • Use notes: Short cycles with a fan inside help spread ozone

Ozone Works Best After You Clean the Source

Ozone is excellent at removing odors — but it can’t replace cleaning. Think of it as the final step after you’ve removed the source of the smell.

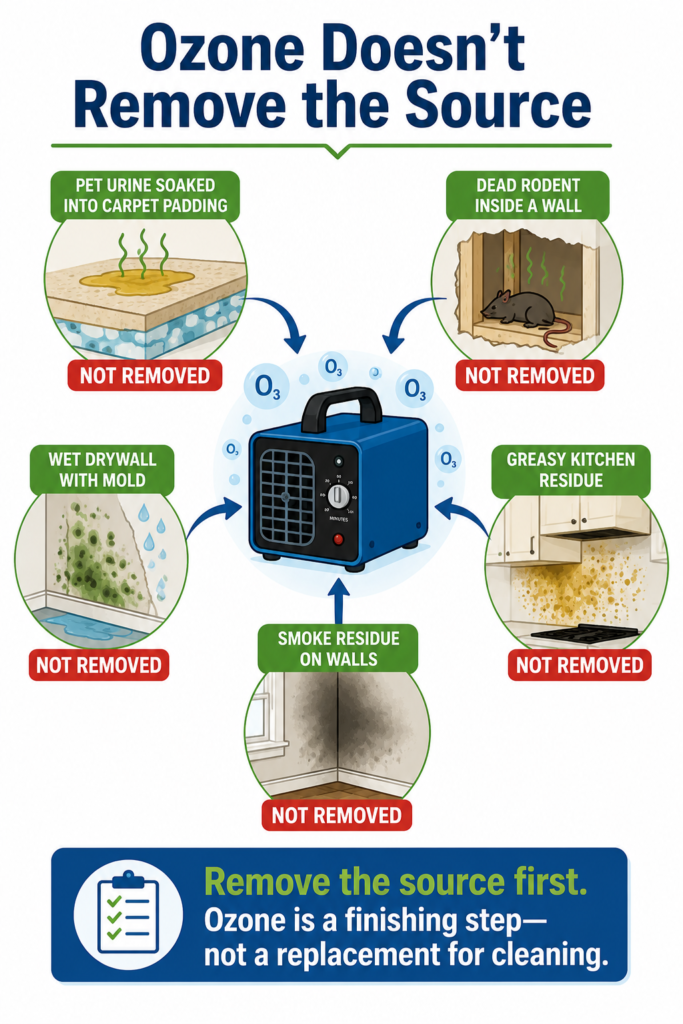
If you’re treating smoke odor, for example, ozone can neutralize the lingering particles in the air and surface fabrics. But it won’t remove sticky tar or nicotine residue left on walls or inside furniture. The same goes for pet odors soaked into carpet pads or mold behind drywall — if the source remains, the smell may return.
Remember, ozone’s size and power don’t make it a pest solution — even strong units can’t reach bed bugs. Here’s why.

Before using an ozone generator, always clean as much as you can first. Vacuum, wipe down surfaces, remove soft items if possible, and address any visible mold or soot. Ozone is most effective in a clean, dry, and sealed environment.

❓ Can I Run the Ozone Generator More Than Once?

Answer: Yes — and for stubborn odors, you’ll probably need to. It’s perfectly safe to run multiple ozone cycles as long as you allow time for the ozone to decay between treatments.

Tip: Run one cycle, wait 2–4 hours, ventilate, then repeat. You’ll get better results and keep it safe.

Dark blue safety graphic with warning symbol showing the safe ozone concentration limit of 0.08 ppm or below."Ozone Safety: What You Need to Know Before You Plug It In

✅ Do:

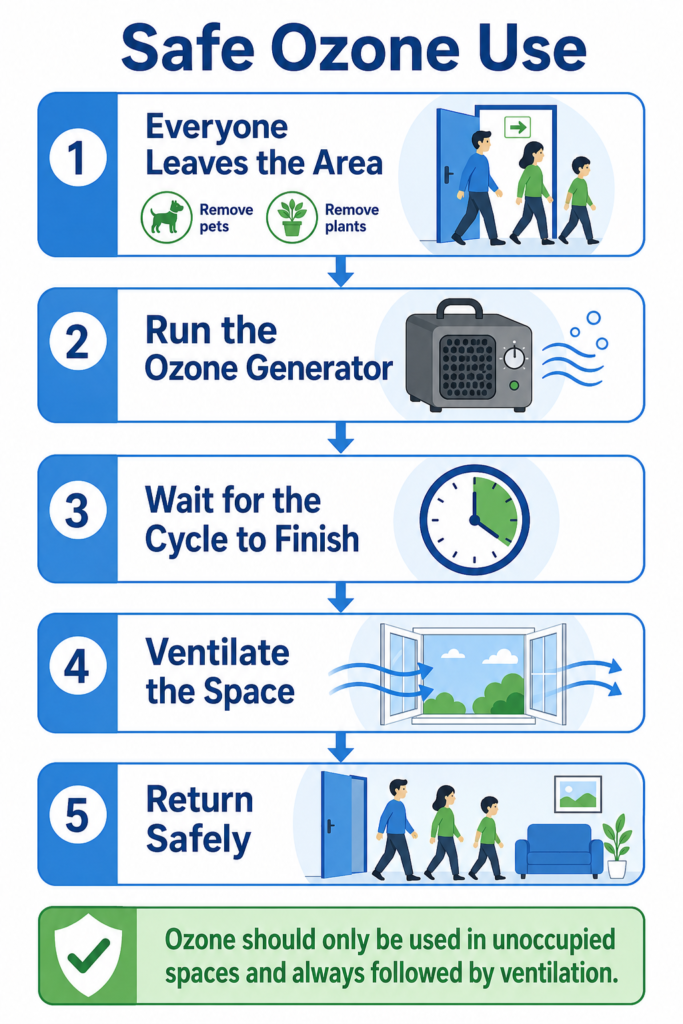
  • Leave the room completely during treatment
  • Post a warning sign on doors
  • Wait 1–2 hours after cycle ends
  • Use fans to help ventilation
  • Start small — you can repeat if needed

❌ Don’t:

  • Use ozone around people, pets, or plants
  • Use near fish tanks or sealed food
  • Run it in a shared space without notifying others
  • Assume “more ozone” means better results
  • Rush reentry — always allow time to air out

Important: Ozone machines are not medical devices or professional restoration tools. Always use in unoccupied spaces and follow safety guidelines carefully.

📚 Want to Go Deeper?

These guides cover ozone safety, deeper system strategies, and when to consider alternatives to ozone treatment.

Still wondering What ozone smells like? Learn why people describe ozone as smelling like chlorine, electricity, thunderstorms, and even burnt electronics.

Questions to Ask Before Buying a UV Light for Your HVAC

Before buying a UV light for your HVAC system, ask about its compatibility with your unit, the type of UV technology used, maintenance needs, installation location, safety features, and whether it targets surface microbes, airborne contaminants, or both. Understanding these factors ensures you choose a system that actually improves your air quality without wasting money or risking safety.

Before diving in, it helps to understand the pros and cons of UV light in HVAC systems to decide if it’s worth the investment. If you’re unsure whether your home really needs one, this quick decision guide can help you figure that out.

🎯 Read the full guide here:

Pros and Cons of UV Light in HVAC – Are the Benefits Worth the Cost?

Questions to Ask Before Buying a UV Light for Your HVAC

UV lights can be powerful tools for improving air quality and stopping mold—but not every system is the same. And not every home needs one. Asking the right questions before you buy can save you money, time, and frustration. Here are the essential things to consider—along with some real-world insights from people who’ve already installed them.

1. Is My HVAC System Compatible?

Not all HVAC systems are designed to support a UV light. Some older systems may lack the physical space or access points needed to install one safely. Others may use plastic or coated components that UV light can damage over time.

Mini-case: One homeowner had a UV light installed, only to find out weeks later that it was discoloring a plastic housing near the coil. The unit had to be moved—doubling the installation cost.

Ask your HVAC tech: “Can my air handler safely support a UV light? Are there materials inside that UV might damage?”

It’s also worth confirming whether the system runs often enough for the UV light to be effective. If your HVAC only runs seasonally or for short bursts, the UV exposure might not be strong enough to kill microbes efficiently.

If mold control is your primary goal, you’ll want to understand how UV light actually kills mold and where placement matters most.

2. What Type of UV System Do I Need?

There are two primary types of UV systems: coil sterilization and air sterilization. Knowing the difference helps ensure you’re solving the right problem in your home.

Coil sterilization units sit near the evaporator coil and focus on killing mold and bacteria growing on wet surfaces. These are ideal for homes dealing with musty odors, known moisture issues, or visible mold in the system.

Air sterilization units are installed in the return or supply duct and treat the moving air itself. These systems are better for reducing airborne bacteria, viruses, and odors—but they need proper placement and airflow to work effectively.

Case in point: A homeowner in Arizona chose an air sterilizer thinking it would kill mold. The air was cleaner, but the mold on the coil kept coming back. They later installed a second UV light specifically for coil treatment—and finally got results.

Ask yourself: “Am I trying to stop mold at the source—or clean the air as it moves through my house?” Knowing your goal will help you (or your installer) pick the right system the first time.

For a clearer comparison of coil UV lights vs. whole-house air purifiers like the REME HALO, see our full side-by-side guide.

3. Where Should the UV Light Be Installed?

Placement makes a big difference in how well a UV system works. A poorly positioned UV light might do very little—while the right placement can make all the difference in air quality and mold control.

Example: One homeowner had their UV light placed too far from the evaporator coil. Months later, mold returned because the UV light wasn’t targeting the moist surface where spores were growing. A simple repositioning near the coil fixed the issue.

For coil sterilization, the UV light should shine directly on the evaporator coil and drip pan area—places where mold and biofilm like to grow. For air sterilization systems, placement in the supply or return plenum gives the light enough exposure time to treat the air before it enters living spaces.

Ask your installer: “Will this position give the UV light enough exposure time to be effective? Will it hit the areas most prone to microbial growth?” A few extra inches in the right direction can make a big impact.

Placement is one of the biggest factors in performance. Here’s what research shows about UV positioning and mold prevention.

4. How Much Maintenance Will It Need?

UV lights aren’t just plug-and-play forever. Like lightbulbs, they dim over time—even before they burn out. Most systems need the lamp replaced about once a year to remain effective. Some require cleaning, especially in dusty environments where particles can block UV output.

Case in point: A homeowner in a rural area installed a UV light and forgot about it. Two years later, the light was still on—but lab testing showed it had lost almost all its effectiveness. They hadn’t realized UV strength fades with age.

Ask the seller or installer how often the bulb needs to be replaced, whether it’s easy to access, and if there’s an indicator to alert you when it’s time. Some systems have built-in timers or replacement alerts, while others rely entirely on you remembering to change the lamp manually.

Ask before buying: “What’s the replacement schedule and cost? Will I get a reminder when it’s time to change the lamp?”

5. Is It Safe for My Home and Family?

UV light is powerful—and while that’s great for killing microbes, it also means it can be harmful if misused. Direct exposure to UV-C light can damage skin and eyes, so safety features and proper placement are critical.

Example: One technician recalled a service call where a homeowner had removed the cover to inspect their UV system—without turning it off. They experienced temporary eye irritation, similar to a sunburn. The system had no safety interlock to shut the bulb off automatically.

Look for systems with protective housings, safety switches, and manufacturer guidelines that prevent accidental exposure. Some even include viewing windows with filters so you can safely check if the lamp is on.

Ask the installer: “Does this system have automatic shutoff or protective shielding? Can it be safely serviced without direct exposure to the UV light?”

6. Should I Consider an Advanced UV Air Purifier Like REME HALO?

If you’re looking for more than just mold control, you might consider an advanced UV-based air purifier like the REME HALO. These systems combine UV-C light with other technologies such as ionization or hydrogen peroxide plasma to target a broader range of pollutants—including odors, airborne particles, and even viruses.

Unlike basic UV lights that target surfaces or duct air, the REME HALO and similar devices are designed to purify the air throughout your home continuously. They’re installed in the ductwork and operate automatically when your HVAC system runs.

Scenerio: A family dealing with allergies and lingering pet odors had tried everything from filters to portable purifiers. After installing a REME HALO, they noticed a significant improvement in both smell and breathing comfort within a few days.

Ask yourself: “Do I need basic mold control—or am I looking for an all-in-one indoor air solution?” While more expensive, a system like the REME HALO may be worth it for households with allergy concerns, pets, or higher air quality demands.

And because these units are installed directly in the ductwork, they treat the air as it’s being distributed throughout the entire house. Your HVAC system becomes more than just heating and cooling—it becomes the delivery system for whole-home air purification. No need for multiple standalone units or constant filter changes in every room. Just clean, treated air moving with every cycle.

Before you invest in an advanced system, compare how UV air purifiers differ from basic UV lights so you know which fits your situation best.

Safety Questions to Ask Before You Buy

Even if an HVAC UV light sounds great on paper, the safety details matter just as much as the marketing claims. A few targeted questions can help you avoid equipment that’s poorly shielded, installed in the wrong place, or more irritating than helpful for sensitive lungs.

  • “Is this model ozone-free or low-ozone?” Ask for documentation. If anyone in your home has asthma, COPD, or chemical sensitivities, lean toward ozone-free options.
  • “How is the UV lamp shielded from accidental exposure?” Your installer should describe housings, baffles, or interlocks that prevent raw UV light from shining out when panels are opened.
  • “Does the unit have a door switch or safety interlock?” Many modern units shut off automatically when the service panel is removed—an important layer of protection for DIY inspections and future technicians.
  • “Will the light shine directly on plastics, wire insulation, or flex duct?” Long-term UV exposure can fade or weaken some materials. The lamp should primarily target coils, pans, or the airstream.
  • “What safety guidelines should we follow during service?” Your tech should spell out simple rules like shutting off power, avoiding direct viewing of the bulb, and using basic eye/skin protection when needed.

A quick safety conversation up front helps ensure the UV system quietly does its job inside the cabinet—without creating new risks for your family or your equipment.

Illustrated checklist of safety questions to ask before installing a UV light in your HVAC system

Cost Questions to Ask About HVAC UV Lights

Two UV systems can look similar on a quote but have very different long-term costs. Before you sign off, it’s worth digging into the full price picture—equipment, installation, and ongoing upkeep.

  • “What’s the installed price, all-in?” Ask for a total that includes the device, labor, any new electrical work, and permit fees if required.
  • “How much are replacement bulbs or cells—and how often do they need changing?” A cheaper unit with pricey bulbs every 9–12 months can cost more over five years than a premium unit with longer-life components.
  • “Is there a warranty on both parts and labor?” Some warranties cover only the lamp, not the transformer, housing, or installer’s time if something fails early.
  • “How much extra will I pay in electricity?” Most UV systems draw very little power, but your installer should still be able to estimate yearly operating cost.
  • “Will we need any extra coil cleaning or duct work up front?” If existing mold is heavy, there may be a one-time cleaning fee before UV can effectively prevent regrowth.

When you add those answers together, you’ll have a clearer sense of the true 3–5 year cost—so you can compare UV options against each other and against buying multiple portable purifiers.

Homeowner comparing equipment, installation, and maintenance costs for different HVAC UV light options

Air conditioning breakConclusion: Let Your HVAC Do More Than Just Heat and Cool

At its core, your HVAC system is already the one appliance in your home that moves air to every room. That makes it the perfect candidate for distributing clean, purified air—if it’s equipped with the right tools. Whether you opt for a simple UV light to stop mold on your coils or go all-in with an advanced system like the REME HALO, you’re turning your HVAC into a whole-house air purifier.

And unlike portable air purifiers that treat one room at a time, this approach works silently and continuously. Every time your system kicks on, it’s doing more than adjusting the temperature—it’s improving the air you breathe.

The key is asking the right questions before you buy. Make sure the unit is compatible, properly placed, maintained, and safe. From there, you can enjoy cleaner air, fewer allergens, and peace of mind knowing your system is working smarter—not just harder.

Frequently Asked Questions

Can a UV light completely eliminate mold from my HVAC system?
UV light is highly effective at preventing mold growth on surfaces like coils and drip pans, but it won’t clean existing buildup or reach every nook inside ductwork. It works best as a preventative measure.
Will a UV light help with allergies?
Yes. By reducing mold, bacteria, and other airborne irritants, UV lights can help ease allergy symptoms, especially when combined with a good HVAC filter.
How long does a UV bulb last?
Most UV-C bulbs need replacing about once a year, even if they’re still glowing. Their germ-killing power fades over time.
Is it safe to install a UV light myself?
It’s safer and more effective to have a professional install it. Poor placement or incorrect wiring can reduce effectiveness or expose you to UV radiation.
What’s the difference between a UV coil cleaner and something like the REME HALO?
Coil cleaners focus on preventing mold on surfaces inside your HVAC. Units like the REME HALO go further—actively purifying the air through ionization and plasma generation as it moves through your ducts.
Will the UV light add ozone to my air?
Some older or cheaper UV systems may produce trace amounts of ozone. Look for systems labeled “ozone-free” if you’re concerned, or ask your installer about ozone-safe models.

What to Read Next

Do You Really Need a UV Light in Your HVAC System? Here’s How to Tell

The idea of killing germs and mold with UV light inside your HVAC system sounds like something out of science fiction—but it’s real, and it’s available for homeowners. UV-C lights are marketed as powerful tools to improve indoor air quality, eliminate odors, and keep your HVAC system clean.

🎯 Read the full guide here:

Pros and Cons of UV Light in HVAC – Are the Benefits Worth the Cost?

But here’s the truth: UV light isn’t a magic cure-all, and it’s not right for every home.

If you’ve seen UV systems advertised and are wondering if they’re worth it, this article will help you decide. We’ll break down what these systems really do, when they’re most helpful, and when your money might be better spent elsewhere.

A UV light in your HVAC system may be necessary if your home experiences mold growth, musty odors, or indoor air quality issues. These systems use UV-C light to kill mold, bacteria, and viruses that can grow inside your air handler and be circulated through your ductwork. They don’t replace filters but can reduce microbial contaminants and improve HVAC efficiency when installed correctly.”

If you’re comparing different types of systems, see how UV lights differ from UV air purifiers before you decide which fits your home.

A bright purple and Blue UV light.Why Your HVAC System May Need a UV Light

Some homes have mold problems you can see—and others have mold you don’t notice until you smell it in the air or feel it in your lungs. The HVAC system, as it turns out, can be a perfect place for that mold to grow.

Here’s why:

  • Moisture is always present. During cooling cycles, warm air hits the cold evaporator coil, causing condensation. That moisture collects and drips into a drain pan—but even small blockages can cause standing water.
  • It’s dark and enclosed. Mold doesn’t need sunlight—it thrives in the dark, and the inside of your air handler and ductwork is basically a year-round mold resort.
  • There’s organic material to feed on. Dust, skin cells, pollen, and pet dander all get sucked into the system and settle onto coils and drain pans, feeding microbial growth.

When all three conditions are met, mold and bacteria start multiplying—and the HVAC system begins circulating spores throughout your home. One homeowner described it as “a dirty sock smell that just wouldn’t go away no matter how much we cleaned.” It turned out the problem wasn’t the house—it was the air system.

Then It Becomes a Delivery System

The trouble isn’t just mold growth—it’s the **spread**. Air moving over a contaminated coil picks up spores, and that air goes to every room with a vent. People often don’t realize it, but if the mold is in the HVAC, it’s *everywhere.*

UV lights are typically installed near the coil and drain pan to stop this cycle at the source. If installed properly, they help prevent the growth of mold and bacteria right where it starts.

For a deeper look at how UV light actually destroys mold and bacteria inside HVAC systems, see our mold control guide here.

Think of UV as a disinfectant—not a vacuum or filter.

A girl sneezing because of dirty air coming from the AC.Signs You Might Benefit from a UV Light in Your HVAC

Sometimes it’s obvious that your home’s air could be cleaner. Other times, it’s subtle—just a faint odor or a cough that won’t go away. Here are some real-world situations where homeowners found UV lights made a noticeable difference:

  • You smell mustiness when the HVAC kicks on.

If you’ve ever walked into your home and caught that “wet basement” smell—especially after the air conditioner starts—you might be smelling mold inside your system. One homeowner in Tennessee described it as “a musty whiff every time the air came on, like old gym clothes.” After installing a UV light above their coil, the smell was gone within a few days.

  • Your home has a history of mold, moisture, or water damage.

Homes with basements, crawl spaces, or poor ventilation are often high-risk for mold. One couple in Florida had no idea mold had started growing on their HVAC coils until a technician opened it up and found a layer of black growth. A UV lamp helped stop further mold from forming and made their air feel noticeably fresher.

  • Someone in your home has asthma or immune issues.

UV systems are often recommended for households with high-risk individuals. By neutralizing airborne microbes like bacteria and mold spores, UV light may help reduce triggers for allergies, asthma, or respiratory infections.

  • You’re battling fine airborne particles or odors.

While UV doesn’t trap particles, advanced systems like the REME HALO use ionization to clump small particles together, making them easier for your filter to catch. This can help reduce odors, smoke, and invisible airborne dust.

  • You want better long-term performance from your HVAC system.

Even if your air seems fine, microbial buildup on coils can silently drag down efficiency. One HVAC tech mentioned a client whose energy bill dropped after UV was installed—not because the light was magic, but because the coil was finally staying clean.

Before buying, go through this 8-question checklist to make sure the system you’re looking at matches your goals and home setup.

When a UV Light Might Not Be Necessary

On the flip side, there are situations where a UV light may not give you the results you’re hoping for. Here are a few examples where it may not be worth the investment:

  • Your main problem is dust or pet hair—UV won’t fix that.

These are physical particles, and UV doesn’t remove them. You’ll get better results by upgrading your air filter to a high-efficiency MERV or HEPA option.

  • You don’t have a central HVAC system.

If you use baseboard heaters, window AC units, or mini-splits, UV systems designed for ductwork won’t apply. Portable purifiers may be the better solution.

  • Your HVAC is dry and has no mold history.

If a technician has checked and your coil is clean, with no sign of moisture buildup or mold, UV might be an unnecessary expense.

  • You’re highly sensitive to ozone.

Some older or cheaper UV systems may emit trace amounts of ozone. If you have respiratory issues, be sure to choose ozone-free models—or skip UV altogether.

  • You’re looking for a no-maintenance solution.

UV lights require annual bulb changes and occasional cleanings. If you want a “set it and forget it” fix, a passive filter system might better fit your lifestyle.

Safety: Do You Really Want UV Light in Your HVAC?

Before you decide you “need” a UV light, it’s worth checking how it will behave in a real home—not just in a brochure. Most modern systems are designed to be safe when installed correctly, but there are a few details homeowners should understand up front.

  • UV stays inside the cabinet. In a proper install, the UV-C lamp is mounted inside the air handler or ductwork, with light aimed at coils, pans, or the airstream—not into the room. You should never see bare UV light shining out of a vent.
  • The biggest risk is direct exposure during service. Looking directly at a live UV-C bulb can irritate eyes and skin. That’s why panels should only be opened with power shut off and, ideally, by a tech wearing basic eye protection.
  • Some systems can create trace ozone. Many newer units are designed as “ozone-free” or “low ozone,” but it’s still smart to ask—especially if anyone in your home has asthma, COPD, or chemical sensitivities.
  • UV and materials don’t always mix. Long-term UV exposure can fade some plastics or wire jackets if the lamp shines on them directly. A good installer will aim the bulb at coils and pans, not flex duct or wiring.
  • Simple habits keep things safe. Make sure the breaker is off before anyone opens the air handler, don’t stare at the bulb, and follow the manufacturer’s instructions for cleaning and bulb changes.

If your installer can clearly explain how the lamp is shielded, how to shut it off, and what “ozone-free” really means, you’ll know the safety side is being taken seriously—not just the sales pitch.

Diagram showing safe UV light placement inside an HVAC cabinet away from people and sensitive materials

Cost: When Is a UV Light Actually Worth the Money?

Needing a UV light and feeling good about the price are two different questions. A well-chosen system can be a smart long-term fix—but only if the upfront and ongoing costs match what you’re trying to solve.

  • Upfront equipment: Basic coil UV kits usually run in the $150–$400 range. Whole-home UV purifiers and advanced PCO units often land between $500–$1,200, depending on brand and features.
  • Installation: Professional install typically adds $100–$350, more if new electrical work, switches, or access panels are needed.
  • Bulb or cell replacement: UV-C bulbs lose strength over time and often need replacement every 9–12 months. Replacement bulbs or cells usually cost $30–$100+, depending on the system.
  • Electricity use: Most UV lamps draw only 15–30 watts, so the yearly power cost is small—often comparable to running a small light bulb.
  • Compare to your “do nothing” cost: If you’re dealing with repeated coil cleanings, mold remediation, or constant complaints about musty air, the long-term cost of not fixing the problem can easily exceed the price of a UV system.

A simple rule of thumb: if you’ve never had mold issues, odors, or respiratory complaints tied to your HVAC, a UV light is more of a “nice-to-have.” If you’re already fighting those problems, it can move into the “saves us money and headaches over time” category.

Illustration comparing the long-term cost of HVAC UV lights versus repeated cleanings and portable air purifiers

How UV Compares to Other Air Quality Solutions

UV lights are just one piece of the puzzle when it comes to cleaner indoor air. Here’s how they compare to other popular solutions homeowners use to tackle air quality issues:

Solution What It Targets Coverage Best For
UV Light Germs, mold, viruses Whole-house Microbial control in ductwork
MERV/HEPA Filter Dust, pollen, dander Whole-house Allergen and particle removal
Air Purifier Particles, some odors Single room Bedrooms, offices
Dehumidifier Moisture Room or whole-home Mold prevention, comfort
Ionizer Particles, some odors Room or whole-home Boosts filter performance

Each option has pros and cons—including UV. See the full breakdown of costs, lifespan, and benefits here.

A vent showing how UV trated air travels into a house.Final Thoughts: Should You Get a UV Light in Your HVAC System?

By now, you’ve got a full picture—not just of what UV systems do, but who they really help. If you’ve noticed moldy smells, have family members with allergies, or just want to protect your system from microbial buildup, a UV light could be a smart next step.

That said, UV lights aren’t a silver bullet. They don’t filter dust. They don’t eliminate odors on their own. And they work best when combined with a good filter and proper maintenance.

One HVAC installer summed it up perfectly: “It’s not going to clean your whole house—but it’ll clean the part of the air system where most of the trouble starts.”

Bottom line: A UV system can be a valuable investment—but only when paired with good airflow, proper filtration, and a real need for microbial control.

Next step: Read the 8 smart questions to ask before buying a UV light for your HVAC

Quick Takeaway: Do You Need a UV Light in Your HVAC?

  • Best for: Killing mold, bacteria, and viruses inside your HVAC system
  • Won’t do: Remove dust, pet hair, or odors on its own
  • Works well when: You’ve had mold problems or respiratory concerns
  • Skip it if: You don’t have central air or mold issues
  • Pro tip: Combine UV lights with high-quality filters for best results

What to Read Next

Does UV Light Really Kill Mold in HVAC?

strong>Yes, UV light in HVAC systems can kill mold by disrupting its DNA, preventing growth and reproduction. UV-C light is especially effective at neutralizing mold on surfaces like evaporator coils and drain pans, though its effectiveness depends on placement, intensity, and exposure time.

🎯 Read the full guide here:

Pros and Cons of UV Light in HVAC – Are the Benefits Worth the Cost?


How UV Light Fights Mold in Your HVAC System

Ultraviolet (UV) light, particularly UV-C, is increasingly used in HVAC systems to combat mold growth and improve indoor air quality. But how exactly does it work—and how effective is it?

If you’ve already read our article on the Pros and Cons of UV Light in HVAC, this deeper dive explains how UV-C light targets mold, what it can and can’t do, and how to get the most out of your installation.

How UV-C Light Targets Mold

UV-C light operates at a wavelength of around 254 nanometers—just the right range to penetrate and damage the DNA of microorganisms like mold and bacteria. When UV-C light shines on mold:

  • It breaks the mold’s DNA, rendering it unable to reproduce.
  • It kills active spores on exposed surfaces.
  • It halts further growth by sterilizing key moisture zones like coils and pans.

Think of it like a silent air guardian, constantly sterilizing the darkest, dampest corners of your HVAC system where mold would otherwise thrive.

Choosing between a simple coil UV light and a whole-home UV purifier? Before you decide, compare how each works and when to pick one over the other.

Diagram of common mold growth areas inside HVAC systems like coils and drain pans

Where Mold Hides in Your HVAC System

Mold doesn’t grow just anywhere—it needs moisture, darkness, and stagnant air. Unfortunately, your HVAC system provides the perfect recipe in a few key places:

  • Evaporator coils: Constantly damp and cool—prime territory for mold.
  • Drain pans: Collect moisture, especially if clogged or uncleaned.
  • Ductwork and filters: Dust buildup + moisture = mold habitat.

Close-up of UV light mounted above HVAC evaporator coil for mold control

What the Research Says About Mold & UV

Studies from institutions like the CDC and Journal of Applied and Environmental Microbiology have shown that UV-C light can significantly reduce microbial contamination in HVAC systems—especially when used in hospitals and commercial buildings where cleanliness is crucial.

Results vary depending on exposure time and installation quality, but with proper setup, UV-C can reduce mold and bacterial growth by up to 90% on coils and interior surfaces.

Realistic Expectations: What UV Can and Can’t Do

UV light is powerful, but it’s not a miracle worker. Here’s a quick comparison:

✅ What UV Can Do ⚠️ What UV Can’t Do
Kill mold on coils and exposed surfaces Remove mold from hidden ductwork or walls
Prevent mold regrowth when left on 24/7 Disinfect through dust, insulation, or buildup
Improve air quality and HVAC efficiency Replace cleaning, maintenance, or filter changes

Smiling family enjoying clean indoor air from improved HVAC air quality

Case Example: UV Light Made a Long-Term Difference

A homeowner in Arizona noticed a musty odor coming from their vents. A local HVAC technician inspected the system and discovered mold buildup on the evaporator coil and in the drain pan. They cleaned the affected components and installed a UV-C light directed at the coil.

Three months later, a follow-up inspection showed zero mold regrowth. The odor was gone, and the homeowner reported fewer respiratory issues in the house.

Best Practices to Maximize UV Effectiveness

Best Practices to Maximize UV Effectiveness

UV systems only work if they’re installed and maintained properly. Here’s how to make sure you’re getting the most out of yours:

  • Install near the evaporator coil—that’s the prime mold zone.
  • Use a system rated for 24/7 operation—intermittent UV exposure is less effective.
  • Keep the surfaces clean—dirt and debris block UV penetration.
  • Change the bulb every 12 months—UV intensity fades over time.
  • Consider dual-bulb systems—some cover both coil and air stream.
  • Pair with routine filter changes and duct cleaning to maintain optimal airflow and hygiene.

Is UV Mold Treatment in HVAC Safe?

For most homes, a coil-mounted UV light is designed to be “out of sight and out of reach,” safely working inside sealed HVAC equipment. The UV-C lamp shines on coils and pans—not into your living space—so family and pets are not exposed during normal operation.

  • Turn off power before opening panels: Anyone inspecting the air handler should shut off the system first so the UV light switches off before the door opens.
  • Avoid direct eye and skin exposure: UV-C is similar to a welding arc or a tiny tanning bed—safe when contained, but harsh on unprotected eyes and skin at close range.
  • Clean and remove mold safely: If there’s heavy, visible mold, have a pro clean coils and pans first so you’re not scraping or brushing spores into the air without proper protection.
  • Watch for ozone-producing devices: Many modern coil lights are “no ozone,” which is ideal in tight, well-sealed homes or for anyone with asthma or lung issues.
  • Protect nearby plastics and wiring: A good installer will aim the lamp so it bathes the coil—not flex duct or wire insulation—reducing the chance of long-term UV degradation.

In short, UV is very safe when it’s enclosed, correctly positioned, and serviced with basic protective gear. Most safety problems come from DIY installs or working around a live bulb without turning the power off first.

Diagram showing a UV light safely enclosed near an HVAC coil, away from people in the living space

Avoid These Mistakes When Using UV Light in HVAC

    • Installing in the wrong location: Bulbs mounted far from the coil won’t be effective against mold.
    • Not replacing bulbs regularly: Most UV-C bulbs lose effectiveness after 9–12 months even if they still glow.
    • Skipping coil cleaning before install: UV can’t shine through grime or buildup—always clean first.
    • Thinking UV replaces filters: UV only kills microorganisms. It doesn’t remove dust, allergens, or pet hair.

Still unsure if UV is even the right fix for your home? Use our quick decision guide to find out.

How to Choose the Right UV Light for Your System

Not all UV-C systems are created equal. Here’s what to look for:

    • High-output bulbs: Especially important for large or high-humidity homes.
    • Coil-targeted design: Units designed to shine directly on the evaporator coil are most effective.
    • Continuous-operation support: Make sure your system is meant to run 24/7.
    • Easy bulb replacement: Consider systems with accessible bulb access and affordable replacements.
    • Warranty and support: Look for at least a one-year warranty and tech support availability.
    • Run a quick pre-buy checklist: Questions to Ask Before Buying a UV Light so you don’t waste money on the wrong unit.

What Does UV Mold Control Cost in HVAC?

When you’re focused specifically on mold control, most of the cost comes from a coil-targeted UV stick plus any cleaning that needs to happen first.

  • Coil UV light equipment: Simple single-bulb kits typically run about $150–$400 depending on brand and output.
  • Installation: Professional install for a standard residential air handler is often in the $150–$350 range, especially if a new power tap or service switch is needed.
  • Bulb replacement: Plan on a new bulb every 9–12 months at roughly $30–$100 each, depending on the model.
  • Pre-cleaning heavy mold: If coils and pans are badly contaminated, a one-time cleaning or light remediation visit may add $100–$400+ to the project, but UV then helps prevent it from coming back.
  • Ongoing operating cost: Most bulbs draw less power than a standard light bulb, so electricity usually lands in the $10–$20 per year range.

Compared to repeated “emergency” cleanings and lingering musty odors, a properly installed UV system is often a one-time upgrade with predictable yearly bulb costs. In homes that stay dry and mold-free, the payoff is smaller; in homes with recurring coil slime or pan mold, UV can be the difference between a one-time fix and an annual headache.

Chart showing the typical cost breakdown for UV mold control in an HVAC system over several years

FAQ: What People Ask About UV and Mold

Does UV light kill mold spores in the air?

Yes, but only if the spores pass directly through the UV light’s coverage area. Most systems are more effective on surface mold than airborne spores.

How long does it take UV light to kill mold?

It can take a few minutes to several hours depending on the intensity, distance, and exposure time. Continuous operation provides the best results.

Is UV light safe for HVAC systems?

Yes. UV systems are installed inside the air handler and do not emit radiation outside the HVAC cabinet. Just avoid looking at the bulb directly.

Can UV light damage HVAC components?

Not typically. When installed correctly, UV-C light does not harm metal, plastic, or wiring. However, prolonged direct exposure to certain plastics or filters may cause fading or brittleness over time—this is rare with modern systems.

Do UV lights help with allergies or asthma?

They can. By reducing mold, bacteria, and some airborne pathogens, UV lights can improve overall air quality. This may ease symptoms for people sensitive to microbial pollutants, though UV light doesn’t remove dust, pollen, or pet dander.

What maintenance does a UV system need?

The main task is replacing the bulb once a year. Even if it still glows, UV-C effectiveness fades after 9–12 months. It’s also smart to clean the surrounding area to keep dust from blocking the light.

Can I install a UV light in my HVAC system myself?

Some homeowners with experience can install coil-mounted UV kits, but professional installation is recommended. Proper placement, electrical safety, and UV shielding are important for safe and effective operation.

If whole-home relief is the goal, compare UV lights with UV air purifiers to see which fits your symptoms.

Final Thoughts: Is UV Light Worth It for Mold Control?

If mold is a concern in your home—or you simply want to keep your HVAC system cleaner—UV light is a strong long-term investment. It complements your air filter, reduces microbial buildup, and can improve your home’s overall air quality.

Headline image asking if UV light in HVAC really kills mold on coils

It’s not a mold remover, but it’s an excellent mold preventer when used correctly. Combined with proper maintenance, UV light can make a noticeable difference in comfort, odor control, and even health.

What to read next


OdorStop vs MaxBlaster: Which Ozone Generator Should You Buy?

Quick answer: If you want a rugged, high-output machine for fast “shock” treatments in cars, smoke/fire jobs, and severe odors, choose MaxBlaster Pro/Pro-G. If you want a more affordable, beginner-friendly unit with a built-in timer and UV support for routine room resets and hospitality use, choose OdorStop OS3500UV. Always treat in unoccupied spaces and ventilate thoroughly afterward.

OdorStop OS3500UV and MaxBlaster Pro ozone generators side by side for comparison

OdorStop vs. MaxBlaster Ozone Generators: Which Is Better for Your Job?

When you’re searching for an ozone generator, two names will keep popping up: OdorStop and MaxBlaster. They’re the #1 and #2 players on the market, and for good reason. But here’s the thing—just because they’re both at the top doesn’t mean they’re built for the same kind of job. One is designed to be approachable and versatile, the other is built like a powerhouse tool for professionals. Let’s look at what you actually get if you buy one, and how to decide which fits your needs best.

OdorStop OS3500UV — In Plain English

The OdorStop OS3500UV, produced by OdorStop LLC, a U.S.-based company, is the more “appliance-like” option. It’s quiet, reasonably priced, and has a built-in timer and UV lamp that make it easy to run in hotels, Airbnbs, or homes without needing extra gadgets. Imagine you’re an Airbnb host with just a couple of hours before the next check-in. The OdorStop lets you set it, walk away, and know the room will be fresh when the next guest arrives. Think of it as the practical daily driver—great for moderate smoke, musty basements, or routine turnover cleaning where ease of use matters as much as raw power.

MaxBlaster Pro / Pro-G — In Plain English

The MaxBlaster Pro, made by MaxBlaster USA in Cleveland, Ohio, is the pro’s workhorse. It doesn’t bother with fancy controls—it’s built to pump out massive amounts of ozone quickly and reliably. Picture a detailer with three cars lined up in the lot. They don’t have the luxury of running a 3-hour cycle; they need a 20-minute shock treatment that clears out smoke and pet odors fast. That’s where the MaxBlaster earns its reputation. It’s more expensive, but it’s built like a drag racer: designed to win when the job is serious.

Comparison chart showing OdorStop OS3500UV vs MaxBlaster Pro ozone generator features and specs

Side-by-Side Specs (All in One Place)

Feature OdorStop OS3500UV MaxBlaster Pro / Pro-G
Ozone output 150–1,400 mg/h (adjustable) Up to ~15,000 mg/h (Pro-G higher)
Coverage (typ.) Up to ~3,500 sq. ft. ~1,500–6,000 sq. ft.
Fan / Noise 110 CFM / ~30 dB (quiet) 110 CFM / dB not specified
Controls Variable dial + 12-hr timer + Hold Minimal; use external timer kit
UV-C lamp Yes (dual ozone + UV) No (ozone-only)
Maintenance Cleanable plates; affordable replacements Replaceable plate packs; no UV bulb
Build / Weight Aluminum / ~10 lb Rugged steel/aluminum / ~11 lb
Warranty 1-yr parts & labor 1-yr unlimited; 5-yr limited; 10-yr transformer; lifetime trade-in
Typical price $299–$339 $649–$849
Best for Routine room resets; hospitality; prosumers Severe odors; fast shock cycles; pro remediation

Which One Should You Use? (Scenarios)

This is where the real decision happens. Specs aside, here’s how they perform in everyday situations:

🚗 Car Detailing

If you’re a pro detailer dealing with smoke or weed smells, the MaxBlaster is the clear pick—it blasts odors fast. Imagine you’re cleaning out a used car for resale: 20 minutes with the MaxBlaster can make it feel showroom-ready. For a DIY user freshening up a family SUV, the OdorStop works fine with longer runs.

🏚️ Basements & Musty/Moldy Odors

Heavy mold smell? MaxBlaster has the power to shock-treat quickly. Picture a damp basement after a rainy season—it needs serious output. Just a musty smell from stored boxes? OdorStop will handle it over a few hours without overdoing it. For mold health guidance, see the CDC’s mold remediation page, which confirms ozone treats odors but doesn’t replace removal of colonies.

🔥 Smoke / Fire Damage

For serious smoke or fire cleanup, MaxBlaster is the workhorse restoration crews rely on. Imagine walking into a living room with heavy smoke damage after a fire—raw power is what shortens turnaround. The OdorStop can be used for follow-up room resets after heavy cleanup.

Diagram of ozone shock treatment cycle in a hotel room using an ozone generator

🏨 Hotels & Airbnb Turnovers

Need something staff can plug in and walk away from? OdorStop is easier, quieter, and more budget-friendly. Picture an Airbnb host with a last-minute booking: set the timer, walk away, and know the odor will be gone. If you run into a smoking suite or large unit that needs a deep reset, MaxBlaster earns its keep.

Safety Essentials

  • Always run in unoccupied spaces—no people, pets, or plants inside.
  • Ventilate thoroughly with fresh air before re-entry.
  • Ozone removes odors but does not replace full mold remediation.
  • For health and exposure context, see the EPA on ozone generators and OSHA’s ozone limits.
  • These machines fall under Indoor Air Quality (IAQ) topics, where safe use and ventilation are critical.

Verdict

The MaxBlaster is built for professionals: fast, rugged, and made for the toughest jobs. The OdorStop is built for accessibility: affordable, easy to use, and perfect for hotels, rentals, and general home odor problems. Think of it this way—OdorStop is your daily driver, MaxBlaster is the drag racer. Pick the lane you drive in most often.

Expanded FAQs

  • Is ozone safe to breathe? No. Only use in unoccupied spaces and ventilate fully afterward. (See EPA link above.)
  • Does higher output always mean better? Not always—higher output is faster, but overkill for small rooms or cars.
  • Can ozone kill mold? It neutralizes odors but does not remove visible colonies—remediation still needed. (See CDC link above.)
  • How often should I replace ozone plates? Every 1–2 years, or when output noticeably drops.
  • How long should I run an ozone generator? Cars: 20–60 minutes depending on severity; rooms: 1–4 hours; basements: 2–3 hours; always ventilate after.
  • Can I leave furniture and clothes inside during treatment? Yes, but ozone may leave a temporary smell on fabrics—air them out after treatment.
  • What’s the difference between ozone and UV disinfection? Ozone reacts with odors and airborne contaminants; UV light targets microbes in the air and on surfaces. OdorStop combines both, while MaxBlaster focuses purely on ozone power.
  • Do I need an external timer? OdorStop has one built-in. MaxBlaster users should pair it with a heavy-duty external timer for safe, consistent operation.

h2>Read More About Ozone Generators

If you’re researching ozone generators, ozone safety, or ozone treatments for homes and vehicles, these articles may be helpful:

HEPA vs Carbon Filters: What’s the Real Difference and Which Do You Need


HEPA filters capture particles like dust, pollen, smoke, and pet dander, while carbon filters absorb gases, odors, and chemical fumes (VOCs). HEPA is best for allergies and asthma, carbon is best for smells and chemicals — and most air purifiers from brands like Levoit, Dyson, and Blueair combine both so you don’t have to choose.
Infographic showing HEPA filter capturing dust, pollen, mold spores, and smoke particles, while carbon filter absorbs odors, VOCs, and chemicals.

Filter Type Best At Limitations Examples
HEPA (High Efficiency Particulate Air) Capturing particles: dust, pollen, pet dander, mold spores, smoke, PM2.5 Does not remove odors or gases (VOCs, fumes, chemicals) Honeywell HPA300, Coway Mighty, Blueair 211+
Carbon (Activated Carbon) Absorbing gases and odors: cooking smells, pets, cigarette smoke, VOCs Does not capture fine particles like pollen, dust, or mold Austin Air HealthMate, Dyson Purifier Cool Formaldehyde, Levoit Core 400S
HEPA + Carbon Combo Balanced protection: removes both particles and odors/gases Filters must be replaced periodically; can be more expensive Winix 5500-2, Coway Airmega 250, Levoit Core 600S

What Do I Need in an Air Purifier?

When people shop for air purifiers, they usually aren’t comparing lab specs — they’re trying to solve a problem. The key is knowing whether your issue is caused by particles (dust, dander, smoke) or gases and odors (chemicals, cooking, pets). That’s where the HEPA vs carbon difference comes in.

10 Common Reasons People Buy Air Purifiers — and Which Filter Works Best

1. Allergy Relief

Allergies come from particles like pollen, dust, and mold spores. HEPA filters (High Efficiency Particulate Air) are essential here because they trap 99.97% of particles as small as 0.3 microns. That’s why organizations like the Asthma and Allergy Foundation of America (AAFA) certify certain models, such as the Honeywell HPA300 or the Coway AP-1512HH Mighty. Carbon won’t help much with allergies unless odors are also a trigger.

2. Asthma & Respiratory Support

Asthma attacks are often set off by fine particles known as PM2.5. HEPA is the hero filter for asthma because it removes those irritants. Some people also prefer machines like the Blueair 211+, which combine HEPA and carbon, since fumes and odors can worsen respiratory symptoms. The EPA notes that reducing particle exposure indoors is one of the best ways to support lung health.

3. Pet Odors & Dander

Pets create a double problem: dander (particles) and odor (gases). HEPA handles the dander while carbon removes the smell. Popular picks for pet owners include the Winix 5500-2 and the Levoit Core 400S, both of which balance HEPA filtration with a carbon layer.

4. Smoke & Wildfires

Smoke is tricky because it’s both particles (soot, ash) and gases (formaldehyde, benzene). You need HEPA for the particles and carbon for the gases — one filter alone won’t cut it. That’s why wildfire guides from the EPA recommend combo units like the Blueair 211+ Max or the heavy-duty Austin Air HealthMate, which uses thick beds of activated carbon.

5. Chemical Fumes & VOCs

Off-gassing from paint, new furniture, or cleaning products is made of gases called volatile organic compounds (VOCs). Only carbon filtration works here. A HEPA filter alone won’t help. This is where carbon-heavy machines like Austin Air stand out, since they’re designed for VOC removal.

6. Better Sleep

Nighttime symptoms come from allergens (HEPA’s job) and sometimes odors (carbon’s job). If you’re waking up congested or snoring, HEPA is the first fix. Models like the Levoit Core 300 are popular for bedrooms because they run quietly. Carbon is a bonus if smells (pets, cooking, outside air) disturb your rest.

7. Protection from Germs & Illness

HEPA can trap airborne bacteria and viruses that hitch a ride on particles. Brands like Dyson and Winix PlasmaWave add optional technologies (UV, ionization) to boost germ control. Carbon doesn’t affect germs directly, but HEPA makes a noticeable difference during flu season by reducing particles that spread illness.

8. Cooking Smells

Garlic, onions, and fried food leave behind gases and odors. Carbon is what clears the air. HEPA won’t make much difference unless smoke particles are also present. That’s why kitchen-friendly purifiers like the Dyson Purifier Cool Formaldehyde pair HEPA with advanced carbon filters.

9. Pollution & City Living

Traffic and industrial emissions contain both fine particles and gases. The best choice is HEPA + carbon together. Units like the Blueair 411i or the Coway Airmega 250 are marketed specifically for city apartments where pollution levels are high.

10. Peace of Mind

Even without a specific health concern, many families simply want fresher, safer indoor air. That’s why most whole-home purifiers — from Dyson to Levoit — include both HEPA and carbon filters by default, because real-world air problems rarely fall into just one category.

Split infographic showing a HEPA purifier in a bedroom filtering dust and dander, and a carbon purifier in a kitchen removing cooking odors and VOCs.Why Most Air Purifiers Use Both

HEPA and carbon aren’t competitors — they’re teammates. HEPA removes the particles you can see and feel, while carbon targets the odors and gases you smell. If you only use one type, you’re leaving a gap. That’s why the majority of modern air purifiers, from budget-friendly Levoit units to premium Austin Air models, combine both filters in the same machine.

FAQ: Common Problems and Situations Air Purifiers Can Help With

Do air purifiers help with pet allergies and odors?

Yes. HEPA filters capture pet dander, fur, and saliva particles, which are the main triggers for pet allergies. Carbon filters absorb odors from litter boxes, wet dogs, and general pet smell. Popular options include the Levoit Core P350 and the Winix 5500-2, which combine both filters.

Can an air purifier remove wildfire smoke?

Wildfire smoke contains fine particles (PM2.5) and gases like benzene and formaldehyde. HEPA removes the particles, while carbon reduces the gases and odors. The EPA recommends portable HEPA + carbon purifiers, such as the Blueair 211+ or Austin Air HealthMate, during wildfire events.

Do air purifiers help with mold?

Yes. HEPA filters trap airborne mold spores before they can spread. However, no purifier removes mold growing on walls or surfaces — that requires cleaning or remediation. Carbon filters can help reduce the musty smell, but HEPA is the critical defense against spores.

Can air purifiers remove cooking odors?

Yes, if they include carbon. Cooking odors are made of gases and VOCs, which only activated carbon can absorb. HEPA won’t help unless smoke particles are also present. Kitchen-friendly models like the Dyson Purifier Cool Formaldehyde pair HEPA with advanced carbon filters.

Do air purifiers help with pollen?

Absolutely. Pollen grains are particles, and HEPA filters are designed to capture them. This makes air purifiers especially effective in allergy season. Honeywell and Coway Mighty purifiers are often recommended for seasonal pollen relief.

Can an air purifier reduce chemical fumes (VOCs)?

Yes. Volatile organic compounds (VOCs) from paint, carpet, and new furniture are gases. Carbon filters adsorb them, while HEPA cannot. Models like the Austin Air HealthMate are designed for VOC-heavy environments.

Do air purifiers help with dust?

Yes. HEPA filters are the gold standard for dust control, capturing particles as small as 0.3 microns. Carbon doesn’t affect dust. If dust buildup is your main concern, purifiers like the Honeywell HPA300 are effective.

Will an air purifier get rid of cigarette smoke indoors?

Partially. HEPA filters capture visible smoke particles, while carbon filters reduce odors and some chemicals. However, no purifier removes every toxic compound in tobacco smoke. Ventilation and avoiding indoor smoking are still critical.

Do air purifiers help with snoring?

Yes, indirectly. Snoring often worsens with nasal congestion or allergies. HEPA filters reduce dust, pollen, and pet dander, which can open nasal passages and ease snoring. While not a cure, many people notice quieter nights.

Can an air purifier improve sleep quality?

Yes. Cleaner air means fewer nighttime allergy flare-ups and less congestion. Some models, like the Levoit Core 300, also double as white noise machines, creating a soothing hum for deeper rest.
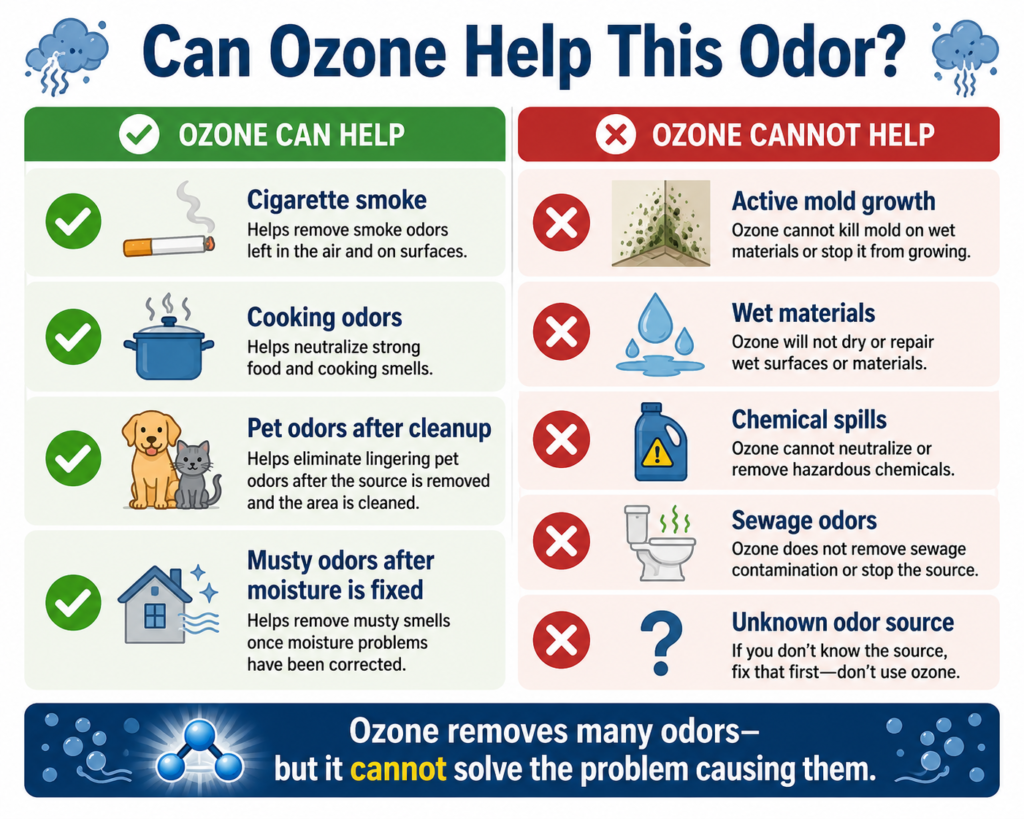
Do air purifiers reduce headaches?

They can. Headaches are often triggered by poor indoor air — especially exposure to VOCs, smoke, or allergens. Carbon filters absorb fumes, while HEPA reduces particle triggers that may cause sinus headaches.

Are air purifiers good for sinus problems?

Yes. HEPA filters capture dust, pollen, and mold spores that irritate sinuses. Carbon helps with odors that aggravate congestion. Together, they create a more sinus-friendly environment.

Are air purifiers safe for babies’ rooms?

Yes — and many parents choose them for nurseries. HEPA filters keep the air free of allergens and dust, while carbon reduces odors from diapers or cleaning products. Quiet models like the Levoit Core 300 or Dyson Purifier Cool are good for baby rooms.

Can an air purifier help with fatigue?

Sometimes. If fatigue is linked to poor indoor air quality — such as exposure to pollutants, smoke, or VOCs — cleaner air can make a difference. People often feel more refreshed after sleeping in a room with a HEPA + carbon purifier.
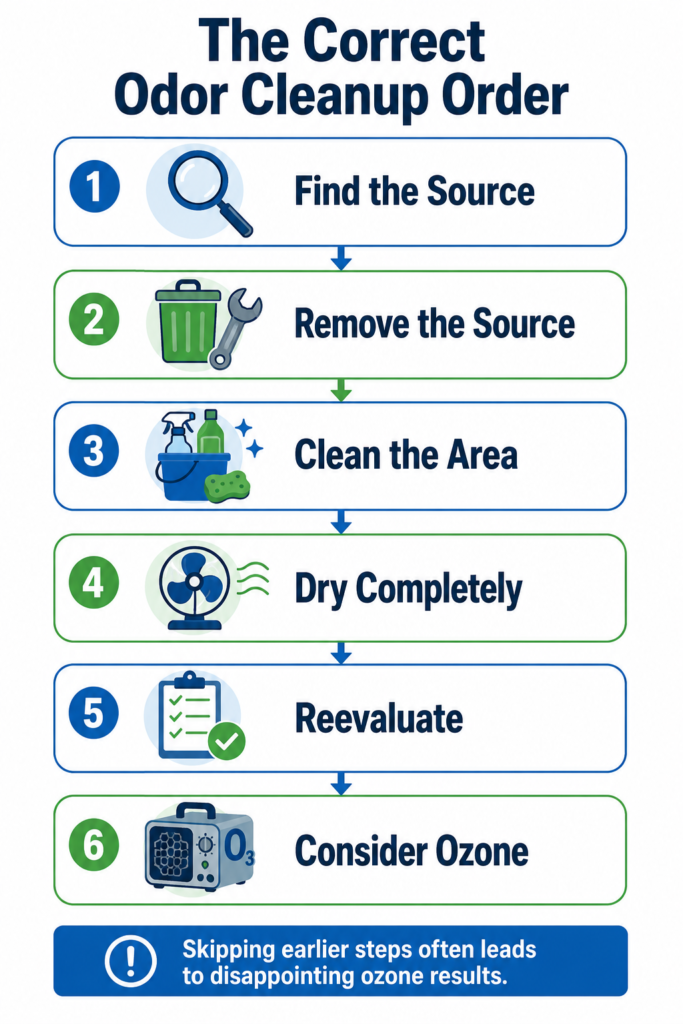
Will an air purifier help with new carpet smell?

Yes. New carpets release VOCs like formaldehyde and styrene. Carbon filters absorb these gases, while HEPA does nothing for odors. Purifiers with strong carbon stages, like the Dyson Formaldehyde series or Austin Air, are best for new carpet installations.

Can an air purifier get rid of paint fumes?

Yes. Paints and finishes release VOCs for days or weeks. Carbon filtration is essential for these gases. HEPA has no effect. That’s why carbon-heavy machines like Austin Air HealthMate or Blueair SmokeStop filters are preferred after painting projects.

Do air purifiers help in craft rooms with glue or resin?

Yes. Carbon filters absorb chemical fumes from adhesives, epoxy, and resin. HEPA captures fine dust or fibers from materials. Many crafters keep a small combo purifier, like the Levoit Core 400S, near their workspace.

Can air purifiers help with woodworking or sewing dust?

Yes — but only as a backup. HEPA filters capture fine sawdust or fabric fibers that escape into the air, making them a good secondary tool. For larger projects, a proper dust collection system is still necessary.

Will an air purifier help after remodeling?

Yes. Remodeling creates both particles (drywall dust, insulation) and gases (paints, adhesives). HEPA removes the particles, while carbon tackles odors and VOCs. That’s why contractors often recommend combo purifiers during and after construction.

Do air purifiers help with asbestos?

HEPA filters can capture airborne asbestos fibers, but the EPA warns that purifiers are only a temporary safeguard. True asbestos problems require professional removal.

Can air purifiers remove lead dust?

Yes. HEPA filters capture airborne lead particles, but purifiers should never replace proper remediation. The CDC recommends certified lead abatement if contamination is present.

Do air purifiers work on radon?

No. Air purifiers cannot remove radon gas. Radon mitigation requires ventilation systems and sealing foundation cracks, as recommended by the EPA.

Do I need both HEPA and carbon filters?

In most homes, yes. HEPA removes particles like dust, pollen, mold, and smoke. Carbon removes gases and odors like VOCs, cooking smells, and pets. That’s why most modern purifiers — from Levoit to Dyson to Austin Air — include both.

Bottom Line: Pick by Problem, Not by Hype

If your air problem is something you can see or feel—dust, pollen, smoke, mold—start with HEPA. If it’s something you can smell—paint, new carpet, pets, cooking—add activated carbon. Most homes need both because real life is a mix of particles and gases. Choose the filter for the problem you have today—and the combo that keeps tomorrow’s surprises covered.

My Wife’s CPAP Broke from Tap Water: Why Distilled Is the Only Safe Choice

No — you should not use tap water in your CPAP machine. Tap water contains minerals, bacteria, and other impurities that can damage the device, leave behind harmful buildup, and even cause respiratory problems. Always use distilled water to keep your CPAP safe and effective.

CPAP humidifier chamber showing mineral buildup from tap water compared to a clean chamber with distilled water.Why You Shouldn’t Use Tap Water in a CPAP

When you set up a CPAP machine at night, it feels natural to just fill the reservoir with whatever water is on hand. But here’s the problem: tap water isn’t pure. It contains minerals like calcium and magnesium, trace metals, and sometimes even chlorine or bacteria. Over time, those tiny impurities can turn into big problems for both your machine and your health.

Organizations like the Sleep Foundation and the American Academy of Sleep Medicine both stress that distilled water is the only safe, long-term choice for CPAP humidifiers.

A Real-World Example: What Happened When My Wife Used Tap Water

My wife got her CPAP through a sleep study, so it wasn’t as simple as running to the store for a replacement when it stopped working. When the machine quit, she had to send it off for repair. They gave her a loaner in the meantime, but even that took a mix-up and extra waiting to sort out. In the end, she went weeks without her own machine, struggling through the hassle of back-and-forth replacements.

Finally, the repair center let us know what had happened: the problem wasn’t a bad motor or faulty electronics — it was the water. The tap water she had been using had left behind so much mineral buildup that it clogged and damaged the system. All of that frustration, time lost, and inconvenience came down to one simple mistake: not using distilled water.

Distilled water and tap water bottles side by side, highlighting the difference in safety for CPAP useWhat Happens If You Use Tap Water?

  • Mineral Buildup: Hard water leaves white, chalky deposits inside the water chamber. Over time, these scale deposits can damage heating elements and block airflow.
  • Bacterial Growth: Tap water is not sterile. Bacteria and mold can grow in the humidifier chamber, then travel into the mask and tubing — straight into your lungs.
  • Bad Smells: Machines can start to smell musty or stale, making it harder to sleep comfortably.
  • Warranty Issues: Manufacturers often state clearly that using anything other than distilled water may void your warranty. The FDA lists distilled water as the standard for safe use in medical devices like CPAPs, BiPAPs, and APAPs.

Repair shops see this all the time — it’s one of the top reasons CPAP machines fail early.

Comparison table showing distilled, tap, bottled, boiled, and filtered water safety for CPAP useWater Types Compared for CPAP Use

Not all water is created equal. Here’s how different types stack up for CPAP safety:

Water Type Safe for CPAP? Notes
Distilled Water ✅ Best choice Removes minerals & bacteria; manufacturer-recommended.
Tap Water ❌ No Mineral deposits, bacteria, mold, and warranty issues.
Bottled/Spring Water ⚠️ Short-term only Often contains minerals; may cause buildup.
Boiled Tap Water ⚠️ Short-term only Kills bacteria but minerals remain; still causes scaling.
Filtered Water ⚠️ Not recommended Reduces some impurities but doesn’t remove minerals completely.

The Cost of Repairs vs. Distilled Water

A gallon of distilled water usually costs between $1 and $2 at most grocery stores. A CPAP repair, on the other hand, can run anywhere from $100 to $300 or more depending on the issue. And if your machine was supplied through a sleep study, the process of getting it fixed can drag out for weeks — leaving you dependent on a loaner machine or, worse, without one at all. That makes distilled water one of the cheapest and smartest forms of protection you can buy.

Why Protecting Your CPAP Matters

CPAP, BiPAP, and APAP machines aren’t just gadgets — they’re life-changing medical devices that keep sleep apnea under control. Going without one for even a few nights can mean poor sleep, daytime fatigue, higher blood pressure, and added strain on the heart. Protecting your machine with distilled water isn’t just about saving money on repairs — it’s about protecting your health every single night.

Quick Checklist: Caring for Your CPAP Humidifier

  • ✔️ Always use distilled water
  • ✔️ Empty the chamber daily
  • ✔️ Wash with mild soap weekly
  • ✔️ Replace the water chamber as recommended
  • ✔️ Inspect tubing and mask regularly for buildup

Following this routine will prevent most problems CPAP users run into — from funky smells to clogged machines.

Health Risks of Using the Wrong Water

It’s not just about protecting the device. Using tap water or letting bacteria grow in your CPAP humidifier can lead to respiratory irritation, sinus infections, and even more serious conditions like pneumonia. The American Lung Association warns that contaminated air sources can worsen chronic respiratory conditions, especially in people already dealing with sleep apnea. For anyone with a compromised immune system, the risks are even higher.

What If You Don’t Have Distilled Water?

Sometimes you might run out of distilled water at night. If you’re in a pinch:

  • Boiled Water: Boil tap water for at least 5 minutes, then let it cool. This removes bacteria but not minerals — so use sparingly.
  • Bottled Water: Safer than tap, but still not ideal because it often contains minerals.
  • Filtered Water: Removes some impurities but still doesn’t equal distilled.

These are temporary solutions only. As soon as possible, switch back to distilled water to avoid long-term problems.

Portable CPAP machine with a small travel bottle of distilled water for safe use while travelingTravel Tips for CPAP Users

If you travel often, it can be tricky to always find distilled water on the road. Here are some ways to stay prepared:

  • ✈️ Pack small bottles of distilled water in your luggage for short trips.
  • 🛒 Order travel-size CPAP water packs online for convenience.
  • 🏠 Invest in a home countertop water distiller if distilled water is hard to find in your area.
  • 📦 Use an Amazon Subscribe & Save option to always have a steady supply delivered to your door.

With a little preparation, you can avoid the temptation to use tap water while away from home.

Lesson Learned: Distilled Water Is Cheap Protection

If you take nothing else away from this article, remember this: distilled water is not just a suggestion — it’s the lifeline of your CPAP machine. My wife’s experience showed how quickly things can snowball: weeks without her own machine, hassle with a loaner, and the frustration of learning that it all came down to tap water. Don’t risk damaging your machine, voiding your warranty, or breathing in harmful bacteria. A $1 jug of distilled water keeps your therapy safe, your machine running longer, and your nights worry-free.

CPAP Water FAQs

Here are some of the most common questions people have about CPAP water use:

What happens if I accidentally used tap water one night?

Don’t panic — one night won’t usually cause major damage. Just empty the chamber in the morning, rinse it well, and switch back to distilled water. Problems come from repeated use of tap water, which leads to buildup and bacterial growth.

Can I use bottled water in my CPAP?

Bottled water is cleaner than tap but often contains minerals, so it’s not a safe long-term replacement. If you’re traveling and can’t find distilled water, bottled can work for a night or two until you get the right water.
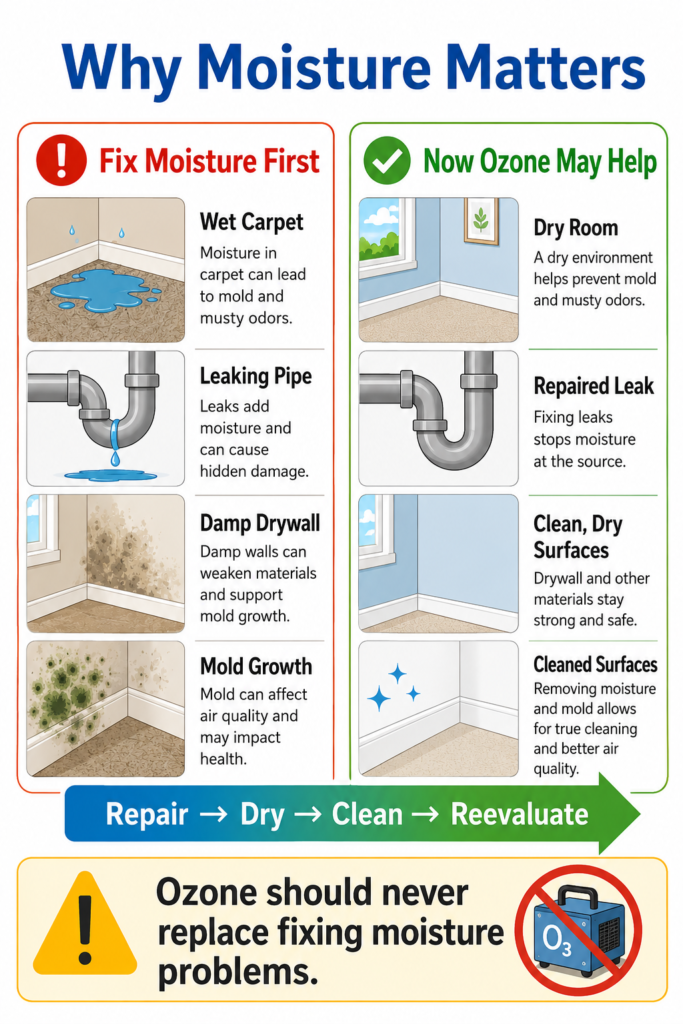
Can I boil tap water to make it safe for my CPAP?

Boiling kills bacteria, but it does not remove minerals. So while boiled water is safer than raw tap water in an emergency, it still risks leaving deposits inside your CPAP over time. Use only as a short-term solution.

How often should I clean my CPAP water chamber?

Most manufacturers recommend rinsing it daily and giving it a thorough wash with mild soap once a week. Regular cleaning prevents buildup and bacteria, even when you’re using distilled water.

What happens if I keep using tap water anyway?

Over time, you’ll likely face mineral scale buildup, musty smells, and possibly mold. Worst case, the machine can fail — just like my wife’s did — leaving you without therapy until it’s repaired or replaced.