What does a humidifier do?
A humidifier adds moisture to dry indoor air, helping relieve dry skin, irritated sinuses, static electricity, and protecting wood furniture and plants. It also supports easier breathing and better sleep.
Welcome to the Complete Humidifier Guide
This guide covers everything you need to know about humidifiers — how they work, which type to choose, where to place them, how to clean them, and which features matter most. Use this guide as a starting point and explore related deep dives on sizing, maintenance, and top models linked throughout.
A humidifier is a device that adds moisture to indoor air to reduce dryness. If you’re dealing with cracked lips, sinus irritation, dry skin, or static electricity, a humidifier can help. This guide covers everything from how humidifiers work to how to choose the right one, use it safely, and maintain it properly — all in one place.
 How Do Humidifiers Work?
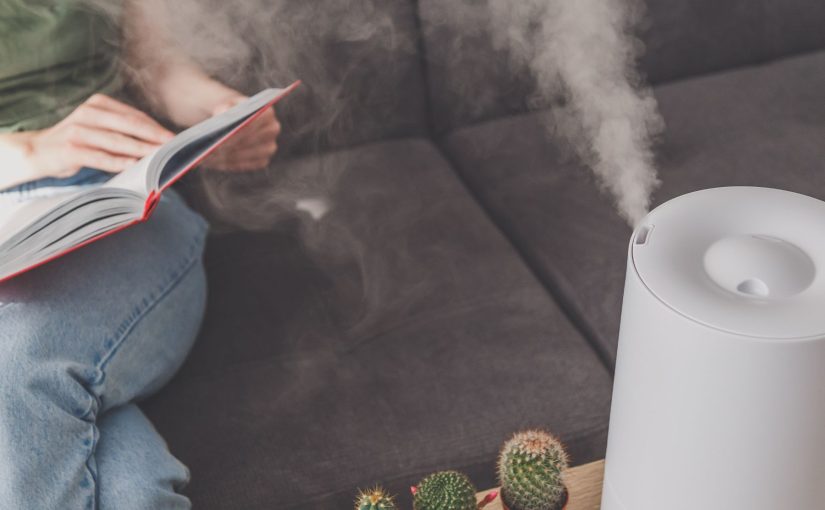
Humidifiers increase the moisture content in the air to improve comfort and health. They work by releasing water vapor or mist into your indoor environment, helping to counteract dry air—especially during colder months when indoor heating systems reduce humidity levels.
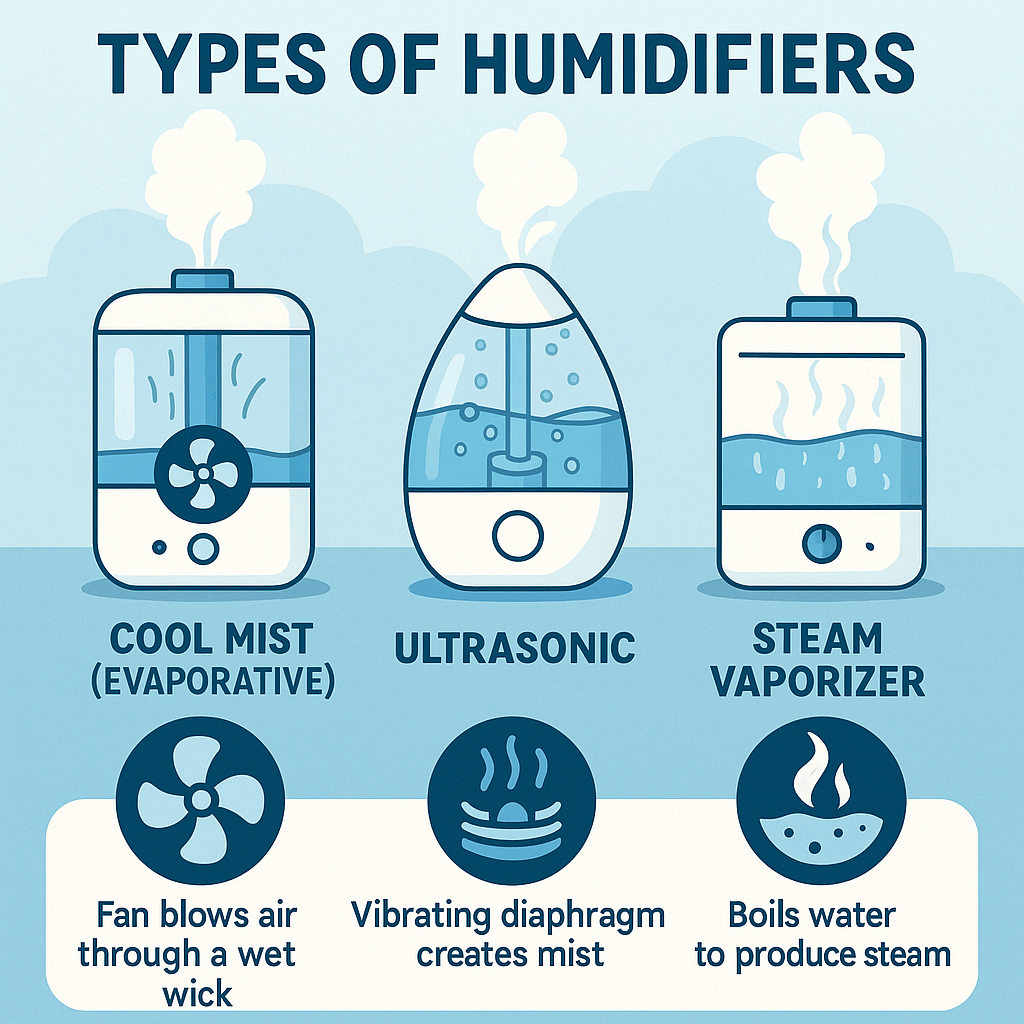
There are several types of humidifiers, each using a different method to disperse moisture:
- Evaporative humidifiers use a wick filter and a fan. Air is blown through the damp wick, causing moisture to evaporate into the room.
- Ultrasonic or impeller humidifiers use high-frequency vibrations to turn water into a fine mist that’s released into the air.
- Steam vaporizer humidifiers boil water to create steam, which is cooled slightly before being released into the room.
The ideal indoor humidity level is typically between 30% and 50%. When air becomes too dry, it can cause a range of problems — including static electricity, dry throat, itchy skin, cracked lips, and even nosebleeds.
Using a humidifier can help relieve breathing issues caused by dry air. This includes symptoms from allergies, asthma, colds, and sinus infections. By keeping nasal passages moist, it also helps loosen mucus and improve congestion.
Dry air doesn’t just affect your health — it also impacts your home. Humidifiers help prevent cracking in wood floors, furniture, and musical instruments. They also reduce peeling wallpaper and protect houseplants that need adequate humidity to thrive.
During the winter, when heating systems are running, humidifiers are especially useful for restoring balance to indoor air. They help maintain comfort, preserve indoor materials, and make the air easier to breathe.
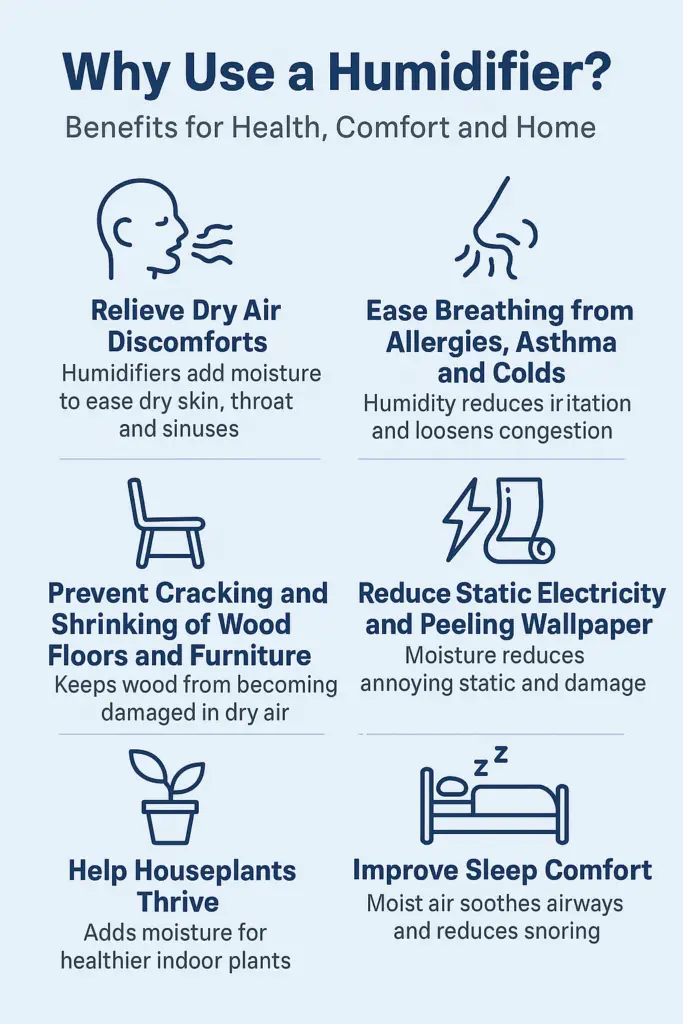
Why Use a Humidifier?
Humidifiers help fix many frustrating problems caused by dry indoor air. If you’ve ever dealt with itchy skin, a dry throat, cracked lips, or sinus irritation during winter, low humidity is likely to blame.
One of the biggest benefits of a humidifier is relief from respiratory discomfort. Dry air can inflame nasal passages and worsen symptoms from colds, allergies, asthma, bronchitis, and sinus infections. By adding moisture, humidifiers loosen mucus, reduce inflammation, and make it easier to breathe.
Humidifiers can improve sleep comfort and reduce snoring. If you wake up congested, coughing, or with a dry mouth, adding moisture to the air while you sleep can help. Babies and children often sleep better when the air isn’t too dry.
Low humidity can damage your home and furnishings over time. Wood flooring and furniture may shrink, crack, or warp when exposed to prolonged dryness. Wallpaper may peel, and static electricity shocks become more common. A humidifier helps preserve materials by stabilizing moisture levels.
Houseplants also benefit from increased humidity levels. Signs of dry air stress in plants include brown leaf tips, drooping leaves, and stunted growth. Running a humidifier near plants mimics their natural environment and helps them thrive.
There’s also some evidence that humidifiers may help reduce the spread of airborne viruses. Maintaining humidity between 40–60% may cause virus droplets to fall out of the air more quickly, reducing transmission risk—especially during flu season.
From better breathing and skin to protecting your home and health, humidifiers offer many everyday benefits. They’re a simple tool that can make a big difference during the dry months.
Types of Humidifiers
There are several main types of humidifiers, and each works differently to add moisture to the air. The best one for you depends on your room size, how quiet you want it to be, and how much maintenance you’re willing to do.
Cool Mist (Evaporative) Humidifiers
Evaporative humidifiers use a wick filter and a fan to release cool moisture into the air. These are among the most common types and do not use heat.
- Pros: Safe around kids, good for large spaces, energy efficient
- Cons: Fan noise, wick filters can grow mold if not cleaned, may leave white dust from minerals
Best for: bedrooms, offices, living rooms
Warm Mist Humidifiers
Warm mist models boil water and release steam into the air. This makes them ideal for colds and congestion, but they do use more energy.
- Pros: Soothing warm vapor, can kill bacteria, helps with congestion
- Cons: Hot steam can be unsafe for kids/pets, mineral buildup, higher electricity usage
Best for: bedrooms (without kids), bathrooms
Ultrasonic Humidifiers
Ultrasonic humidifiers use high-frequency vibrations to create a fine mist. They’re extremely quiet and energy efficient.
- Pros: Very quiet, energy-saving, no filter needed
- Cons: Can release white dust, must be cleaned to prevent mold
Best for: baby rooms, offices, bedrooms
Impeller Humidifiers
Impeller (centrifugal) humidifiers use a spinning disc to fling water into the air as droplets. These are less common but can cover large spaces.
- Pros: High mist output, no heating element, no filters
- Cons: Noisy, high condensation, use a lot of water
Best for: greenhouses, warehouses, large rooms
Whole House Humidifiers
Whole-house models connect to your central HVAC system and humidify every room through the air ducts. They’re ideal for consistent, home-wide humidity.
Best for: entire home humidity control
Portable Personal Humidifiers
These are small units designed for single rooms, desks, or travel. They’re lightweight, simple, and easy to refill.
- Pros: Low cost, easy to move, convenient for personal use
- Cons: Low mist output, frequent refills, not powerful enough for large rooms
Best for: travel, bedrooms, nurseries, desk spaces
Smart Humidifiers
Smart humidifiers connect to Wi-Fi or voice assistants and allow app-based control and monitoring.
- Pros: Remote control, programmable schedules, humidity tracking, alerts
- Cons: Higher cost, app issues, still need manual cleaning
Best for: tech-savvy users, remote management, see more
Top Fill Humidifiers
Top-fill designs make refilling water easy without removing the tank from the base.
- Pros: Mess-free filling, easier to clean, convenient for daily use
- Cons: Must still be cleaned regularly, can be heavy when full
Best for: convenience and frequent use
Tower Humidifiers
Tower humidifiers are tall, floor-standing units with a vertical mist output. They save floor space and often include wheels for mobility.
- Pros: Small footprint, portable, good mist reach
- Cons: Easier to knock over, harder to lift when full
Best for: floor placement, medium to large rooms
Combination Humidifiers with Essential Oil Trays
These humidifiers not only add moisture to the air but also allow you to diffuse essential oils for added aroma and potential wellness benefits. They typically feature a separate tray or compartment for oils so the main water tank stays clean.
- Pros: Dual function (humidifying + aromatherapy), pleasant scents, can help mask odors
- Cons: Some oils can damage plastic parts, potential for overuse of scents, added cleaning required
Best for: users who want humidity and fragrance in one device, living rooms, bedrooms, or relaxation spaces
There’s no one-size-fits-all humidifier — the best choice depends on your room, your health needs, and how hands-on you want to be with maintenance.
Placement Tips for Maximum Efficiency
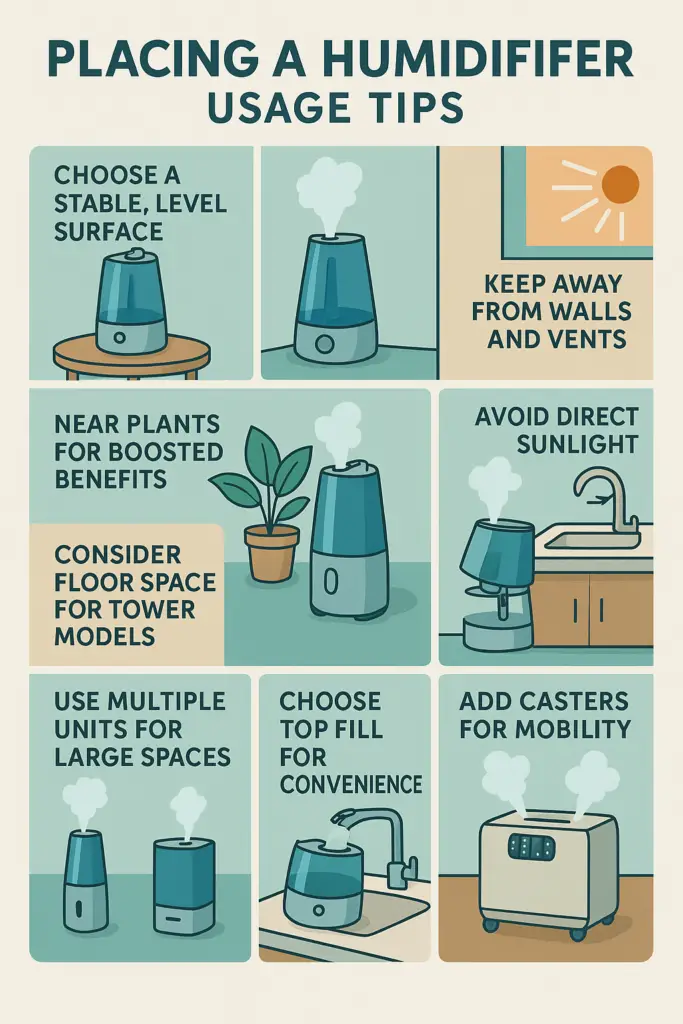
Where you put your humidifier affects how well it works. Proper placement helps the mist circulate evenly, avoids over-saturation in one area, and prevents damage to furniture or electronics.
Choose a stable, level surface. Place the humidifier on a flat, elevated surface like a table, shelf, or stand. Avoid putting it directly on carpet or wood floors, where moisture could cause damage or encourage mold underneath.
Keep it away from walls and vents. Place the unit at least 6–12 inches from any walls so mist can circulate freely. Avoid setting it near heating or air conditioning vents, which can disrupt the mist’s flow or dry the air too quickly.
Adjust the height for best mist dispersal. For ultrasonic and cool mist models, place the unit above furniture but below head level so the mist enters the breathing zone. Warm mist rises more easily, so it can be positioned slightly lower.
Avoid direct sunlight. Sunlight can encourage algae growth inside the tank and discolor the unit. Keep the humidifier in a shaded, well-ventilated area away from windows.
Don’t place it too close to beds or desks. While you want the mist nearby, placing a humidifier too close can cause damp bedding, papers, or condensation buildup. A few feet away is best for comfort and safety.
Put it near houseplants if needed. Plants love humidity. Placing a humidifier nearby can help revive droopy or browning leaves, especially in winter months.
Use multiple units for large rooms. If one humidifier isn’t powerful enough, use two smaller ones on opposite ends of the room. This provides more even moisture distribution without oversaturating one spot.
Top-fill and wheeled units offer placement flexibility. Top-fill designs are easier to refill no matter where you place them. Floor models with wheels (like tower humidifiers) can be moved to the warmest or driest area of the room.
Check your model’s user manual. Some humidifiers have unique airflow needs or safety clearance requirements. Follow any manufacturer-specific guidance to get the most out of your device.
Pro Tip: Aim for placement about 2–4 feet off the floor and at least 6 inches from walls or furniture.
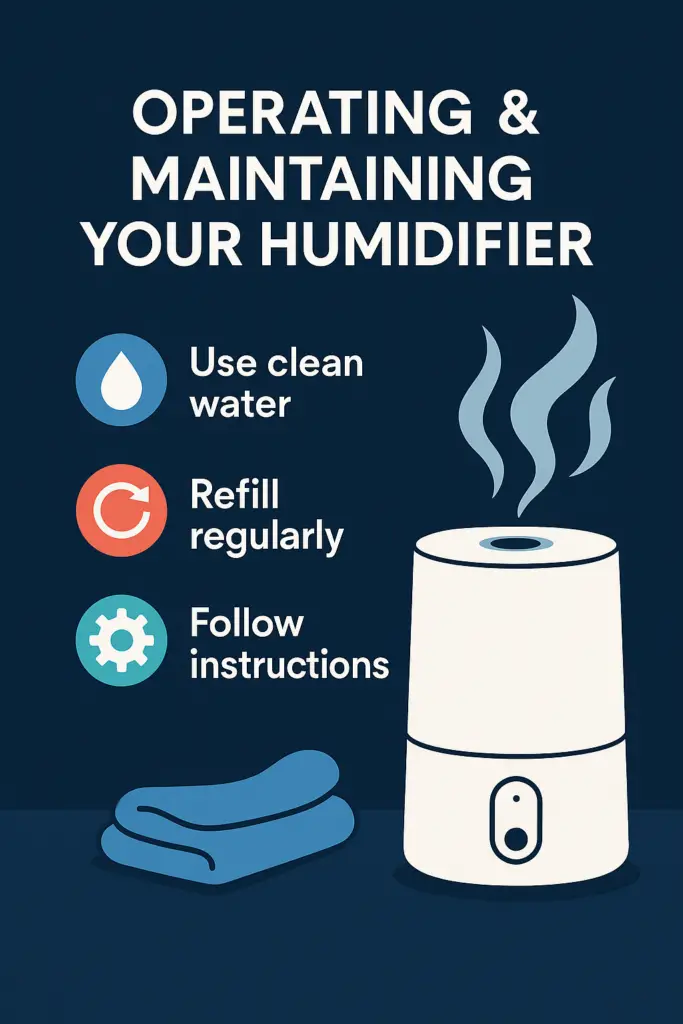
Operating and Maintaining Your Humidifier
To keep your humidifier running efficiently and safely, regular cleaning is a must. Skipping maintenance can lead to mold growth, bacteria buildup, and poor mist output.
🗓️ Daily Tasks
- Check and refill the water tank daily — don’t let it run dry.
- Empty and rinse the tank each day to reduce bacteria buildup.
- Wipe down the exterior with a clean, damp cloth to remove dust or mineral spots.
- Inspect the filter or wick (if applicable) and make sure it’s not moldy or discolored.
🧽 Weekly Maintenance
- Deep clean all parts using a vinegar-water solution (1:1 ratio) to dissolve mineral buildup.
- Disinfect the tank using a mild bleach solution (1 tsp bleach per gallon of water). Let sit, then rinse thoroughly.
- Scrub filters and wicks gently with a soft brush if reusable. Replace if damaged or moldy.
- Clean heating elements (for warm mist models) to remove scale and prevent odor.
📆 Yearly Tasks or End-of-Season Care
- Do a full system cleaning before storing the humidifier at the end of winter.
- Replace filters, wicks, or desiccant packs so they’re fresh for next season.
- Inspect for leaks or cracks in tanks and hoses.
- Store in a dry, cool place to avoid mildew buildup while not in use.
⚠️ Tips to Prevent Mold and Bacteria
- Always use clean, fresh water. Filtered or distilled is best.
- Let parts dry fully between uses — especially inside the tank.
- Don’t leave water standing in the unit when not in use.
- Follow the cleaning steps in your owner’s manual and stick to the schedule.
Consistent maintenance not only extends the life of your humidifier, but it also protects your health. A dirty unit can spread bacteria into the air — so stay on top of cleaning tasks year-round.
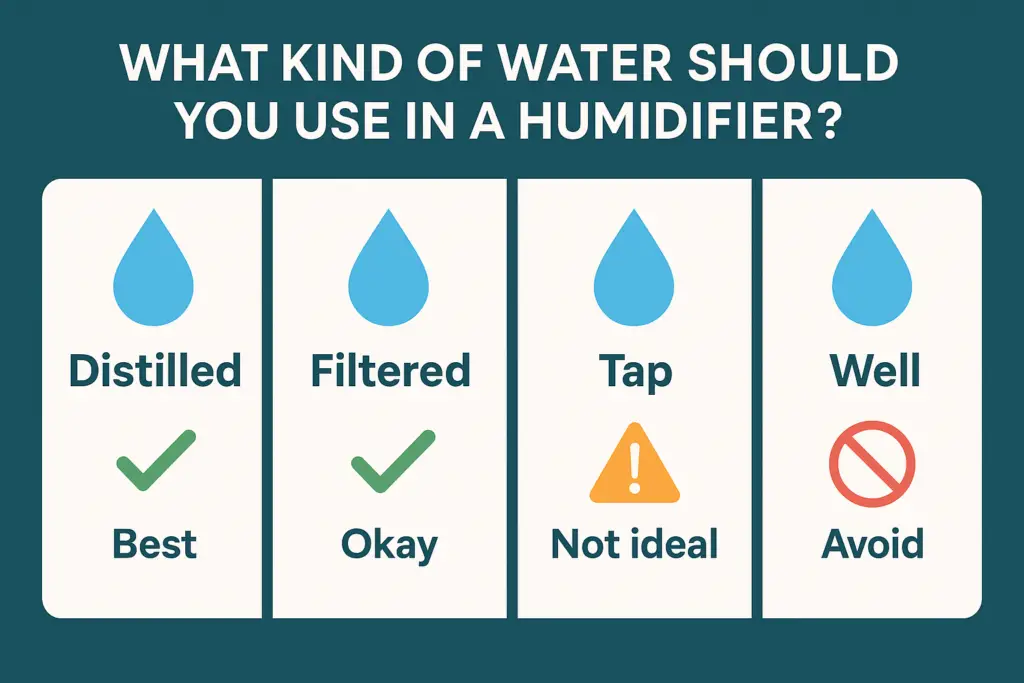
What Kind of Water to Use in a Humidifier
Using the right water in your humidifier helps prevent buildup, extend lifespan, and protect your air quality. Tap water may be convenient, but it’s not always the best option for your machine — or your lungs.
✅ Best Options
- Distilled Water: The gold standard. It’s free of minerals, reduces white dust, and prevents scaling inside the unit.
- Filtered Water: A solid alternative if you don’t have distilled on hand. Use a high-quality carbon or reverse osmosis filter to reduce minerals.
- Bottled Water (Labeled “Purified” or “Demineralized”): Safe to use, especially if labeled as distilled or reverse osmosis-treated.
⚠️ Water to Avoid
- Tap Water: Contains minerals like calcium, magnesium, and silica that can cause white dust, clog parts, and encourage bacteria growth.
- Well Water: Typically high in iron and minerals, making it even more prone to scaling and bacterial contamination. Avoid unless filtered and tested.
- Hot Water: Encourages faster microbial growth and can crack some tanks. Always use cool or room-temperature water.
If you’re seeing white powder near your humidifier, you’re probably using tap water with a high mineral content. That white dust settles on surfaces and may irritate your lungs — especially for people with allergies or asthma.
To keep your air clean and your humidifier running smoothly, stick with distilled or filtered water whenever possible. It’s a small extra step that prevents big problems later.
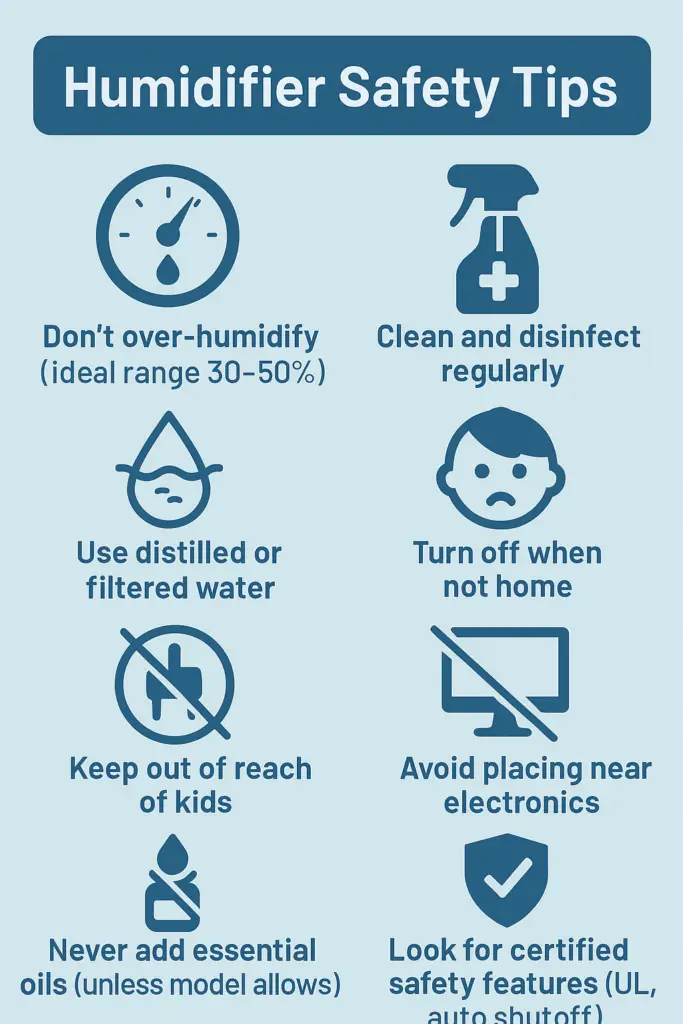
Humidifier Safety Tips and Potential Risks
While humidifiers offer many health benefits, using them incorrectly can create new problems — like mold growth or even burns. Follow these safety tips to protect yourself, your home, and your air quality.
✅ General Safety Guidelines
- Don’t over-humidify your space. Keep indoor humidity between 30–50%. Higher levels encourage mold, dust mites, and condensation on walls and windows.
- Use a hygrometer (or humidifier with built-in sensor) to monitor levels. Adjust mist output accordingly.
- Clean your humidifier regularly. Daily rinsing and weekly disinfecting are critical to avoid harmful bacteria or mold entering the air.
- Always use clean, filtered, or distilled water. Tap and well water can introduce minerals, metals, and contaminants into the air as white dust.
⚠️ Safety for Children and Pets
- Never place a warm mist humidifier near children or pets. The boiling water and steam can cause serious burns if tipped over.
- Position humidifiers where they cannot be knocked over. Use stable surfaces and avoid locations within reach of little hands or tails.
🧯 Electrical and Home Safety
- Turn off the humidifier when you’re not home. This prevents over-humidifying and potential overheating or electrical risks.
- Keep the unit away from electronics and power strips. Moisture from mist can damage components over time.
- Watch for condensation on windows and walls. This can lead to mildew and rot if left unchecked. Reduce mist output or run in intervals.
🚫 What NOT to Do
- Do not add essential oils to the water tank unless your model specifically allows it. Oils can damage components and release harmful VOCs when heated.
- Do not run the unit nonstop without checking the humidity level. “Set-it-and-forget-it” can lead to moisture problems fast.
To use a humidifier safely, think of it like a mini appliance — one that needs proper placement, cleaning, and monitoring. Used responsibly, it can be a major boost to your comfort and air quality.
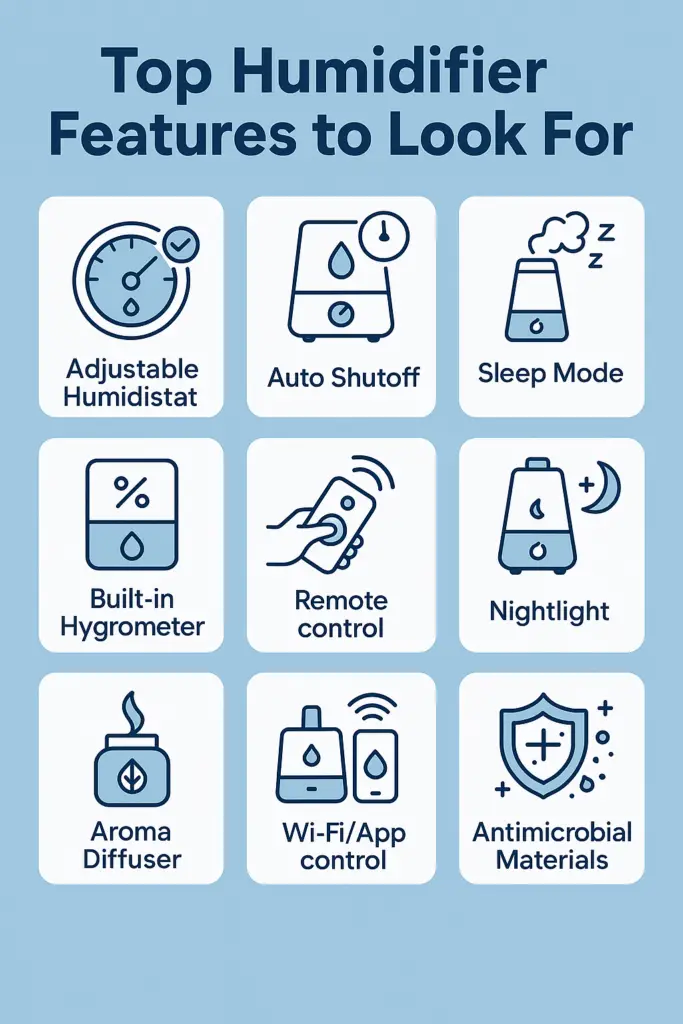
Top Humidifier Features to Look For
Modern humidifiers offer smart features and user-friendly options that can make a big difference in daily use. Here’s a breakdown of the most useful features to look for when buying a humidifier — whether you’re shopping for a nursery, bedroom, or whole-home setup.
🌡️ Humidity Control
- Adjustable Humidistat: Lets you set a specific humidity level (like 40%) and maintains it automatically.
- Built-in Hygrometer: Measures the current room humidity so you don’t need a separate device.
- Auto Mode: Increases or decreases mist output based on real-time humidity readings.
🛑 Convenience & Safety
- Auto Shut-Off: Turns the humidifier off when the tank is empty or your target humidity is reached — protects both the device and your home.
- Timer Function: Set it to run for 2, 4, or 8 hours. Helps prevent over-humidifying while you sleep or leave the house.
- Sleep Mode: Dims lights and runs quietly to support uninterrupted sleep — great for bedrooms and nurseries.
📱 Smart Controls
- Wi-Fi/App Connectivity: Control humidity settings from your smartphone or tablet. Some models include charts and usage logs.
- Voice Assistant Integration: Works with Alexa, Google Home, or other smart home systems for hands-free control.
💡 Other Useful Features
- Top Fill Design: Lets you refill the tank from the top without removing the base — more convenient and less mess.
- Removable Water Tank with Handle: Makes cleaning and refilling much easier.
- Nightlight: Built-in soft light — helpful for children’s rooms or nighttime visibility.
- Aroma Diffuser: A separate tray or chamber for essential oils (only safe on models that support this feature).
🦠 Antimicrobial Features
- Antimicrobial Materials: Built-in treatment to reduce bacteria and mold growth inside the tank.
- UV-C Light or Silver Ion Filters: Help kill germs in the water before mist is released into the air.
The more advanced the features, the easier it is to manage humidity levels safely and efficiently — especially in high-use areas like bedrooms or whole homes.
Top-Rated Humidifiers
Not sure which humidifier to buy? We’ve put together a free downloadable guide that compares top-rated models by size, type, and special features.
From quiet ultrasonic units for bedrooms to high-output models for large living rooms, you’ll find our personal picks based on performance, reliability, and ease of use.
Frequently Asked Questions
Q: What is the ideal humidity level for a home?
A: The ideal indoor humidity is between 30% and 50%. Below that can cause dryness and irritation; above 50% may encourage mold, dust mites, and condensation issues.
Q: How do I choose what size humidifier I need?
A: Match the unit’s output (usually listed in square feet) to your room size. A small bedroom might need a unit that covers 200–400 sq ft, while a living room may require 600–1,000 sq ft or more.
Q: What type of humidifier is best for sinus relief?
A: Both cool and warm mist models can help. Cool mist is safer and more energy-efficient. Warm mist may feel more soothing during congestion but poses burn risk around children.
Q: Can I use tap water in my humidifier?
A: You can, but it’s not ideal. Tap water contains minerals that create white dust and can clog or damage your unit. Distilled or filtered water is safer and cleaner.
Q: Why is there white dust on my furniture?
A: That’s mineral residue from hard water. It’s harmless but annoying and can irritate lungs. Use distilled water or a model with a demineralization cartridge.
Q: How often should I clean my humidifier?
A: Rinse and refill the tank daily. Disinfect weekly with vinegar or bleach (depending on the model). Always follow your manufacturer’s cleaning schedule.
Q: How do I prevent mold in my humidifier?
A: Clean it regularly, use distilled water, empty the tank daily, and let all parts dry between uses. Avoid stagnant water and never leave the tank full when off.
Q: Is it safe to run a humidifier all night?
A: Yes, if the humidity stays within the safe range (30%–50%) and the unit is placed safely. Use a model with auto shutoff or built-in humidistat for peace of mind.
Q: Where should I place my humidifier?
A: Place it on a flat, elevated surface like a table or dresser. Keep it away from walls, electronics, and direct sunlight, and at least a few feet from your bed or seating area.
Q: Can a humidifier cause mold in my house?
A: Yes — if overused. High humidity levels over 60% can cause mold on walls, windows, or furniture. Use a hygrometer and don’t exceed recommended levels.
Q: Can I add essential oils to my humidifier?
A: Only if the model is designed for it. Most humidifiers will be damaged by essential oils unless they have a dedicated aroma tray or oil-safe reservoir.
Q: What’s the difference between a humidifier and a vaporizer?
A: A humidifier adds moisture to the air without heat (cool mist), while a vaporizer creates steam by boiling water. Both add humidity, but vaporizers can feel warmer and require more power.
Q: Do I need a humidifier in summer?
A: Not usually. Humidifiers are most helpful in winter when heating systems dry out the air. However, some climates have dry summers too — check your indoor humidity to decide.
Q: Can I use a humidifier and air purifier at the same time?
A: Yes — and it’s often recommended. A humidifier adds moisture, while a purifier removes airborne particles. Just keep them a few feet apart so the purifier doesn’t pull in moist air directly.

 A humidifier not misting properly is often caused by a clogged nozzle or filter that needs cleaning. Mineral deposits and dust can build up in the humidifier and prevent it from releasing moisture into the air. Fortunately, troubleshooting a non-misting humidifier is usually an easy fix.


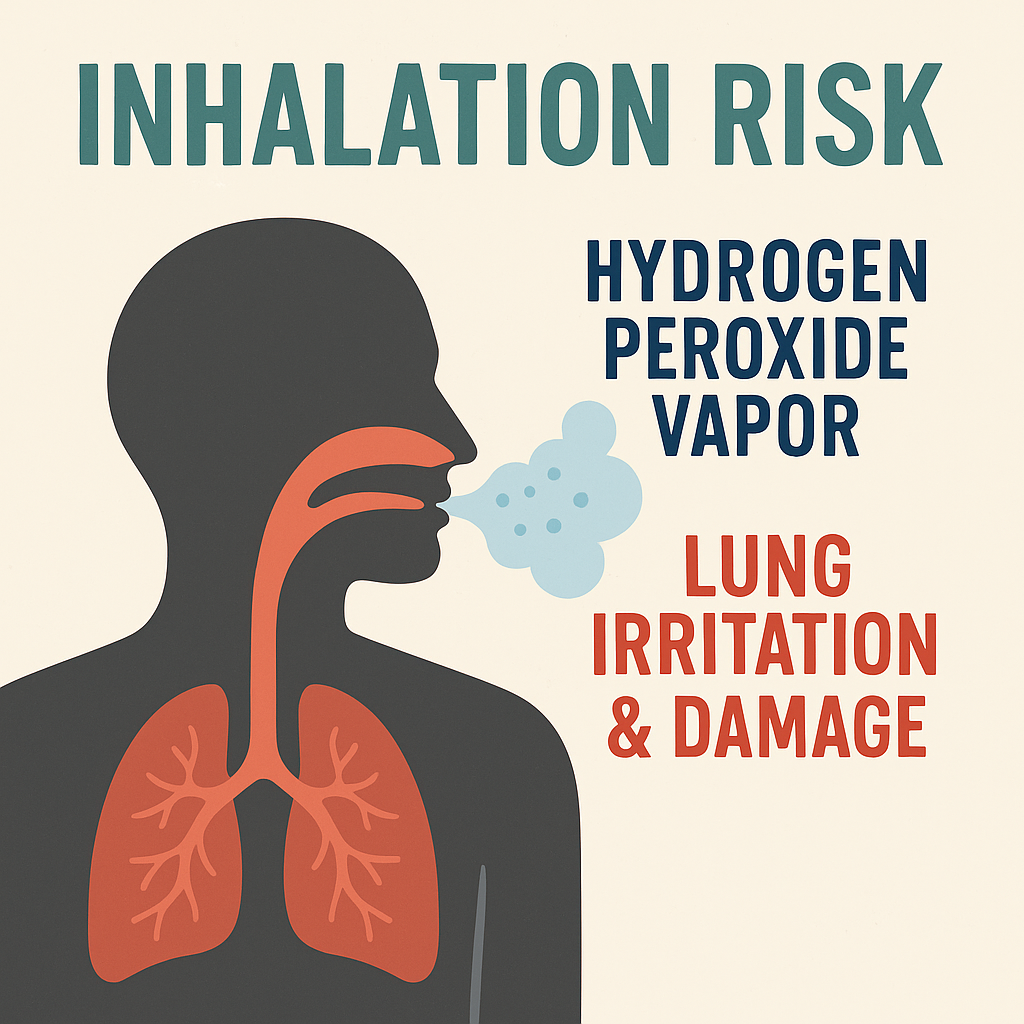 Hydrogen Peroxide in Humidifiers: Why It’s So Controversial
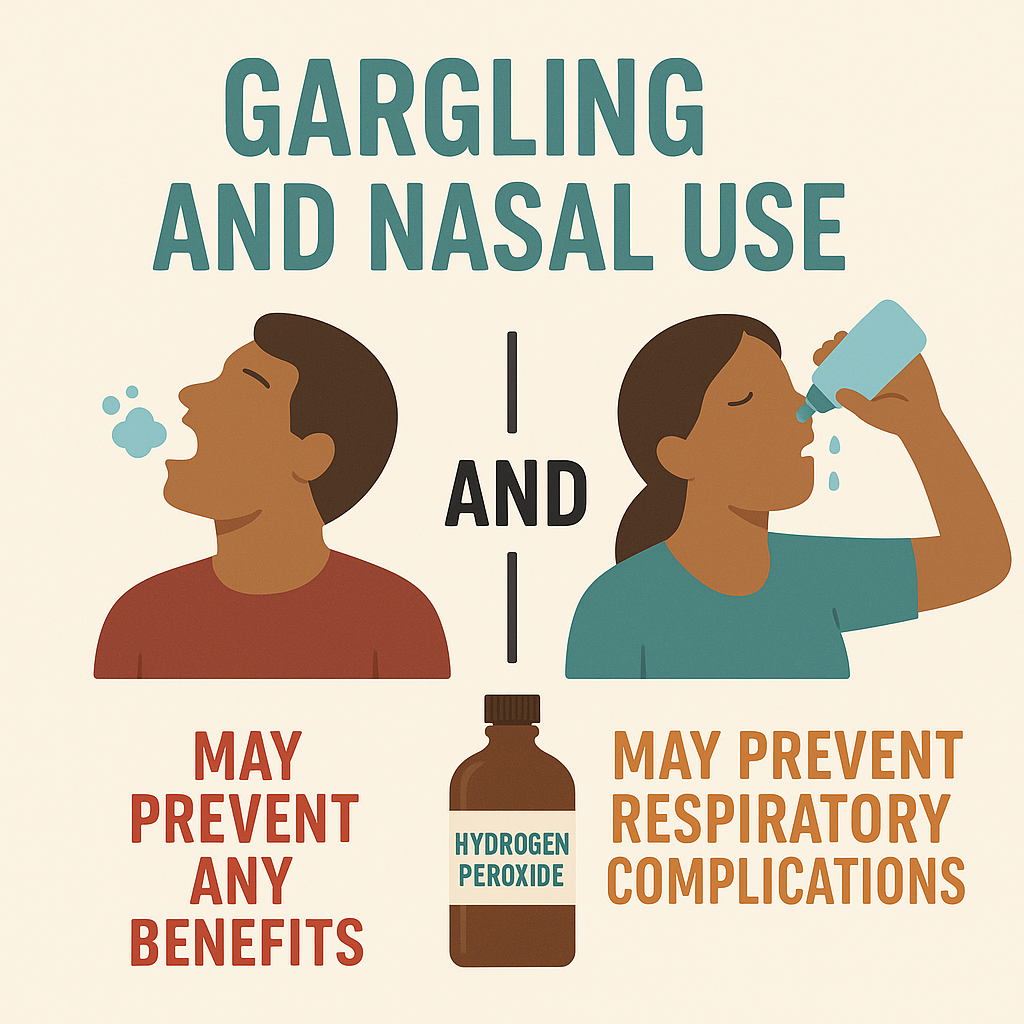 What About Gargling with Hydrogen Peroxide?
 So… Should You Put Hydrogen Peroxide in Your Humidifier?
 “Distilled water is the best water to run in a humidifier. Distilled water goes through a process that removes 99% of the minerals and sediment that you find in your usual tap water.”

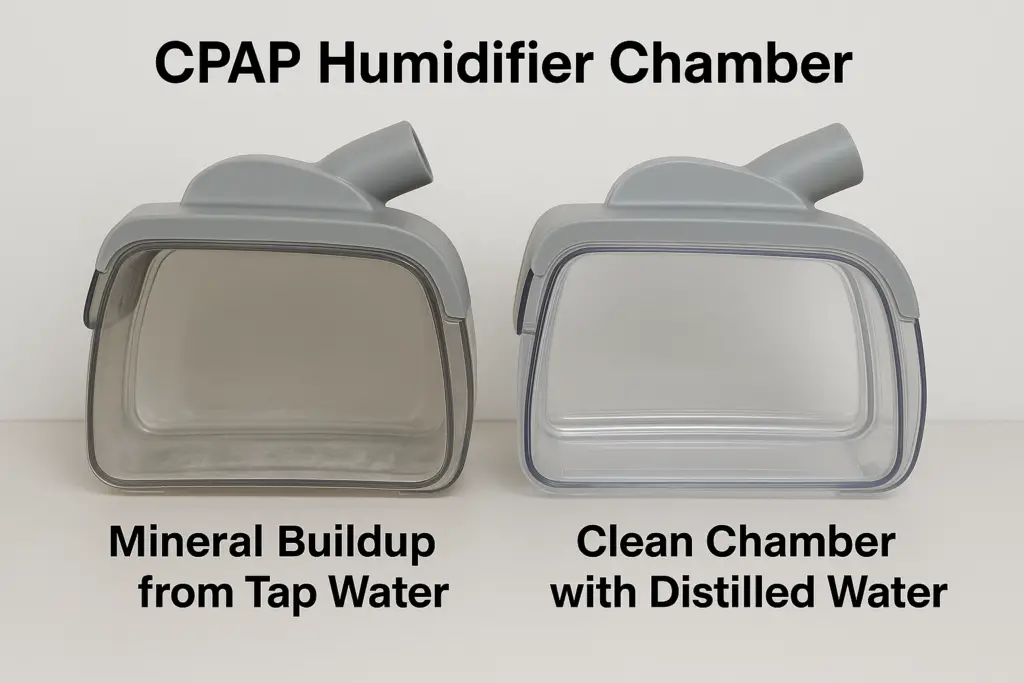 Why You Shouldn’t Use Tap Water in a CPAP
 What Happens If You Use Tap Water?
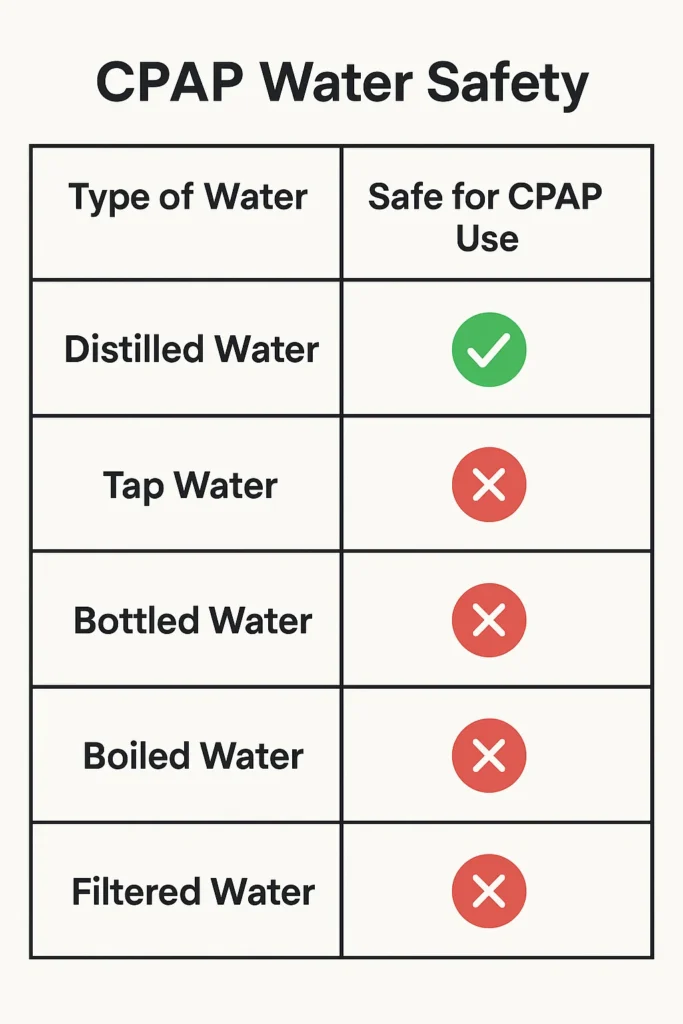 Water Types Compared for CPAP Use
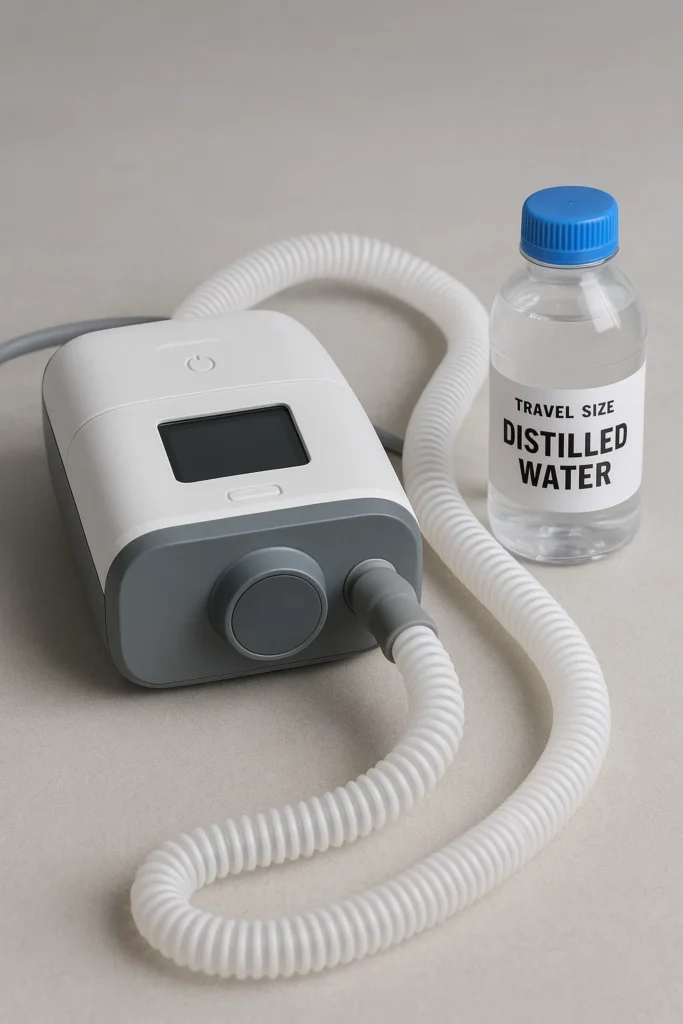 Travel Tips for CPAP Users
 4.Standing water
 Recap
Recap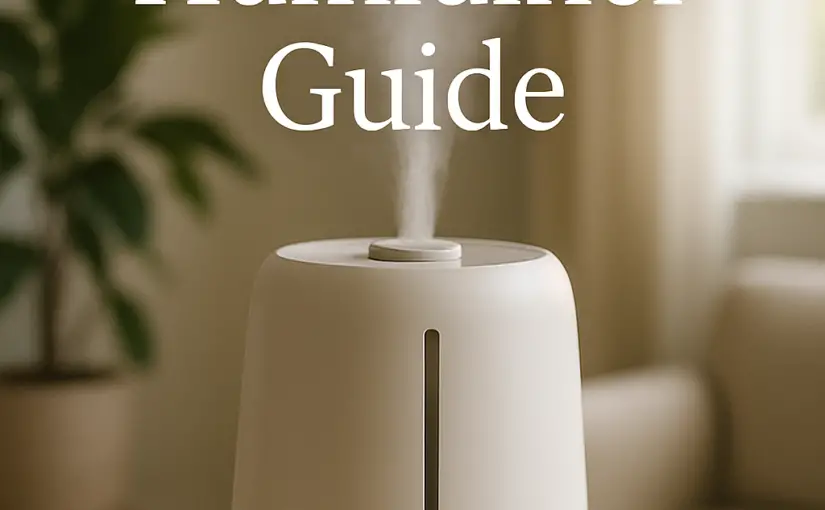
 How Do Humidifiers Work?
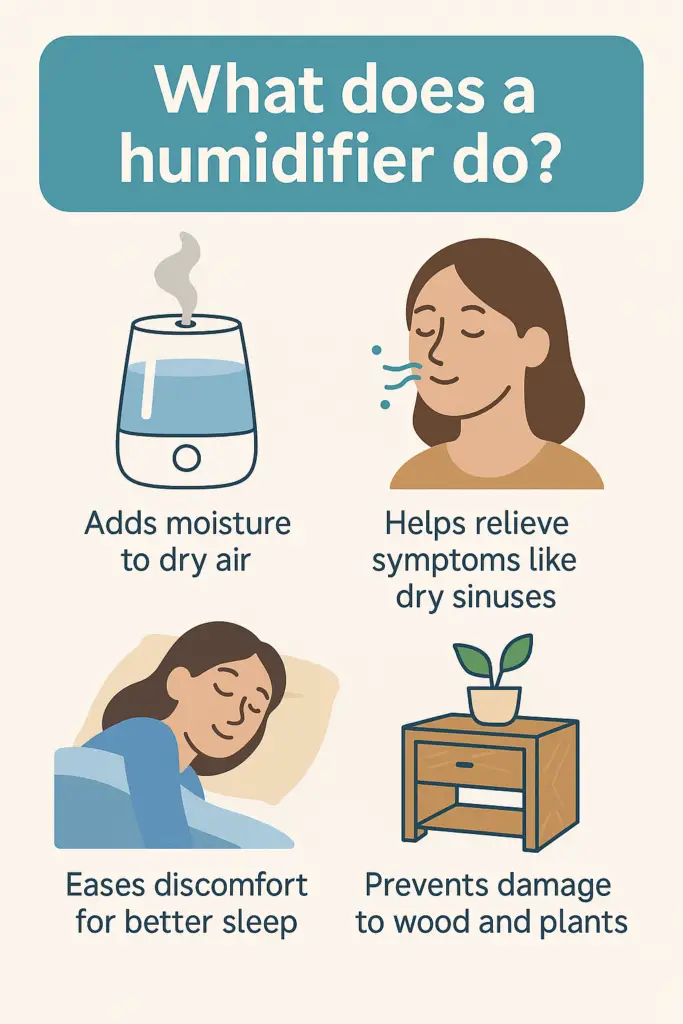


 1. Regular Cleaning and Maintenance
 4. Safe Placement of the Humidifier
 7. Auto Shut-Off Feature