For most homes, your thermostat fan should be set to AUTO, not ON. AUTO uses less electricity, removes humidity more effectively, and is the setting most HVAC professionals recommend for everyday cooling.
But don’t change it just yet.
There are several situations where leaving the fan set to ON is actually the better choice. If your home has hot and cold rooms, an in-duct air purifier, allergy concerns, or certain airflow problems, switching to AUTO could make your home less comfortable instead of more.
The trick is knowing whether your home is one of those exceptions.
Fan ON vs AUTO: Which Setting Is Right for You?
At first glance, the fan switch on your thermostat seems simple. It only has two settings:
- ON – The blower fan runs continuously, whether the air conditioner is cooling or not.
- AUTO – The blower only runs when the air conditioner is actively heating or cooling your home.
That tiny switch affects much more than airflow. It can change:
- ✔ Your monthly electric bill
- ✔ Indoor humidity levels
- ✔ How evenly your home cools
- ✔ How well your HVAC filter and in-duct air purifier work
- ✔ Overall comfort throughout the house
For most homeowners, AUTO is the better everyday choice. But before you decide, it’s worth finding out whether your home falls into one of the situations where Fan ON can actually improve comfort.
Fan ON vs AUTO at a Glance
| Feature | Fan ON | Fan AUTO |
|---|---|---|
| Airflow | Runs continuously | Runs only during heating or cooling cycles |
| Comfort | More even temperatures between rooms | Normal temperature cycling |
| Humidity | Can increase indoor humidity during summer | Better moisture removal |
| Electric Bill | Higher operating cost | Lower operating cost |
| Air Filtration | Filters air continuously | Filters only while the system is running |
| Best For | Homes with airflow issues or in-duct air purifiers | Most homes and everyday cooling |
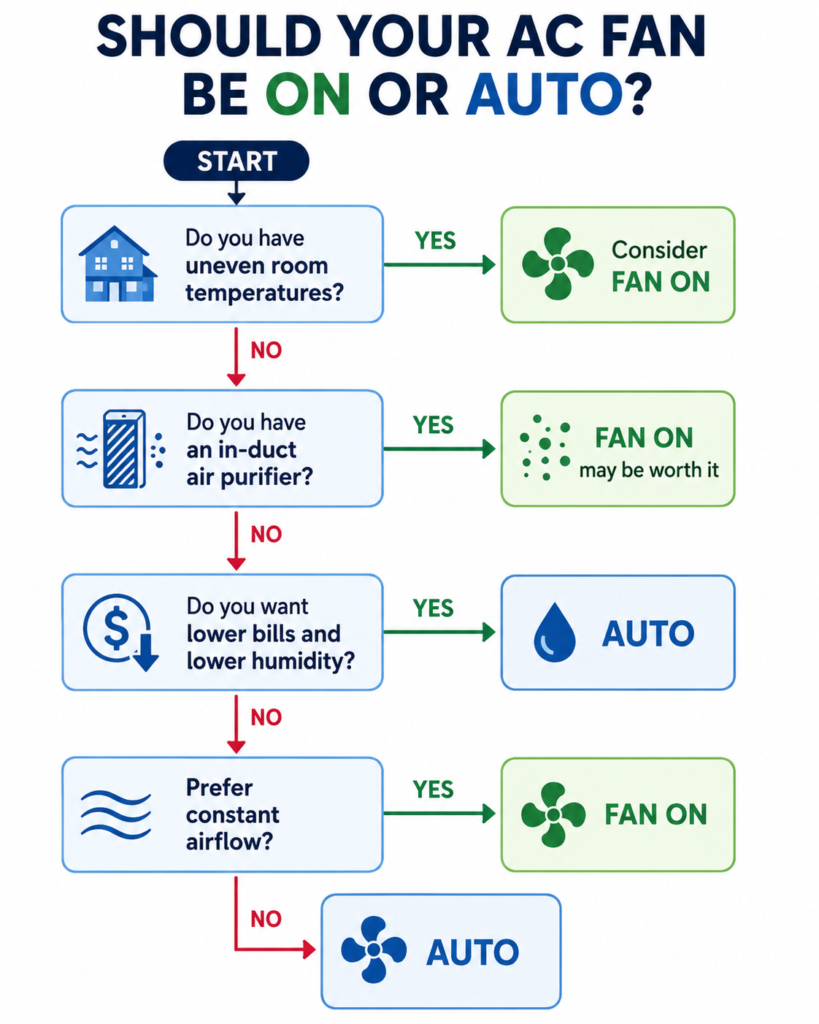
Are You One of the Exceptions?
Most people should leave the fan on AUTO, but Fan ON may be the better choice if any of these sound familiar:
- ✔ Your upstairs is always hotter than downstairs.
- ✔ Some rooms never seem to stay comfortable.
- ✔ You have an in-duct UV light or whole-house air purifier.
- ✔ You want your HVAC filter cleaning the air all day long.
- ✔ You simply prefer constant airflow, even when the AC isn’t cooling.
If none of those describe your home, you can probably leave your thermostat on AUTO and enjoy lower energy bills with better humidity control.
Let’s look at why AUTO is usually the best setting—and when breaking that rule actually makes sense.
Why AUTO Is the Best Choice for Most Homes
If you asked ten HVAC technicians which thermostat fan setting they recommend for everyday use, most would tell you to leave it on AUTO.
That’s because your air conditioner is designed to do more than simply cool the air. Every time it runs, it also removes heat and moisture from your home. Letting the blower fan stop when the cooling cycle ends helps the system work the way it was designed.
For the average homeowner, AUTO offers three major advantages.
1. Lower Electric Bills
When your thermostat is set to AUTO, the blower fan only runs when your air conditioner is actively cooling the house.
With the fan set to ON, the blower runs 24 hours a day—even when no cooling is needed. That extra run time uses electricity and can noticeably increase your monthly utility bill, especially if your HVAC system has an older blower motor.
2. Better Humidity Control
This is the biggest reason AUTO is recommended during the summer.
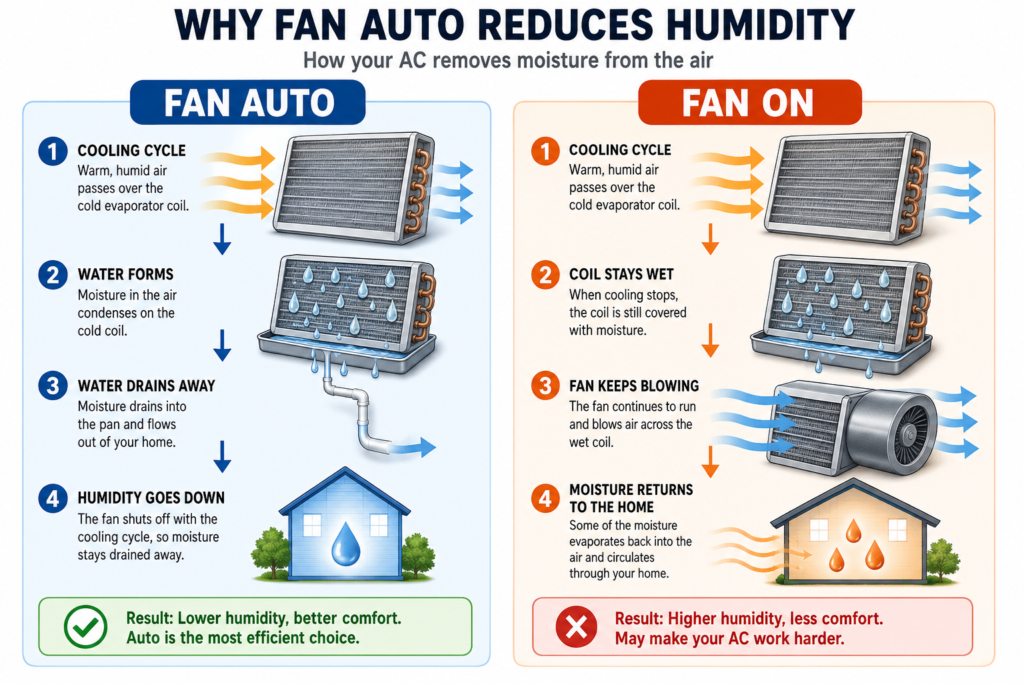
As your air conditioner cools the house, moisture in the indoor air condenses on the cold evaporator coil and drains away. That’s one of the reasons your home feels cooler and less sticky after the AC has been running.
When the cooling cycle ends, the coil is still wet for a short time. If the blower fan keeps running continuously, some of that moisture can evaporate back into the air and be circulated throughout the house.
With the fan set to AUTO, the blower shuts off with the cooling cycle, giving the moisture a better chance to drain away instead of being blown back into your home.
3. The Air Feels Colder
Many homeowners assume that leaving the fan on all the time will make the house feel cooler.
In reality, the opposite often happens.
While the air conditioner is actively cooling, both settings deliver cold air through the vents. Once the cooling cycle ends, however, Fan ON continues blowing room-temperature air. That constant airflow can make the house feel less crisp, especially on hot, humid days.
With AUTO, the airflow stops when the cooling stops, so you’re only feeling cool air while the system is actually producing it.
But what if your upstairs never cools down, some rooms are always uncomfortable, or you have a whole-house air purifier? Those are the situations where Fan ON may actually be the better choice.
When Fan ON Is Actually the Better Choice
Although AUTO is the best setting for most homes, there are several situations where leaving the fan set to ON can improve comfort or air quality.
If one of these sounds familiar, you may actually benefit from continuous airflow.
Your Home Has Hot and Cold Rooms
Does your upstairs always feel warmer than downstairs? Is one bedroom comfortable while another is always too hot?
Those temperature differences are common, especially in two-story homes or houses with long duct runs.
Leaving the fan on ON keeps air moving even after the cooling cycle ends. That extra circulation helps mix the air throughout the house, reducing hot and cold spots and creating a more consistent temperature from room to room.
It won’t completely solve airflow or ductwork problems, but many homeowners notice their house feels more balanced.
You Have a Whole-House Air Purifier or UV System
If your HVAC system includes an in-duct air purifier, UV light, or electronic air cleaner, continuous airflow often makes those systems much more effective.
After all, the purifier can only clean air that passes through the ductwork.
When the blower only runs during cooling cycles, the air purifier also stops working between cycles. Keeping the fan on allows the system to continuously circulate and clean the indoor air.
If improving indoor air quality is your primary goal, the slightly higher electric bill may be worth it.
Many homeowners pair continuous fan operation with an in-duct UV light or air purifier to improve indoor air quality. If you’re considering one, see our guide to the pros and cons of UV lights in HVAC systems.
You Want Maximum Air Filtration
Even if you don’t have a whole-house air purifier, running the fan continuously means more air passes through your HVAC filter.
That can help remove additional dust, pet dander, and other airborne particles throughout the day.
Just remember that better filtration comes with trade-offs. Your blower runs longer, electricity use increases, and in humid climates the house may feel slightly more humid during the summer.
You Prefer Constant Air Movement
Some people simply like feeling air coming from the vents all the time.
Even though the air isn’t always cold, continuous airflow can make the home feel less stagnant and eliminate that “silent” period between cooling cycles.
If comfort is more important to you than squeezing every dollar out of your electric bill, leaving the fan on may be worth the extra operating cost.
Fan ON is worth considering if:
- Your home has uneven temperatures.
- You use an in-duct air purifier or UV system.
- You want your HVAC filter cleaning the air continuously.
- You enjoy constant air circulation throughout the house.
There’s one important drawback, though, that causes many homeowners to switch right back to AUTO—especially during the summer. It has nothing to do with cooling and everything to do with humidity.
The Biggest Downside of Leaving Your AC Fan ON
If you only remember one thing from this article, make it this:
Running your thermostat fan continuously during the summer can actually make your home feel more humid.
That surprises many homeowners because the air conditioner is supposed to remove humidity—not add it.
The Biggest Downside of Leaving Your AC Fan ON
If you only remember one thing from this article, make it this:
Running your thermostat fan continuously during the summer can actually make your home feel warmer—even if the thermostat is set to the same temperature.
That sounds backwards, but you’ve probably experienced the reason before.
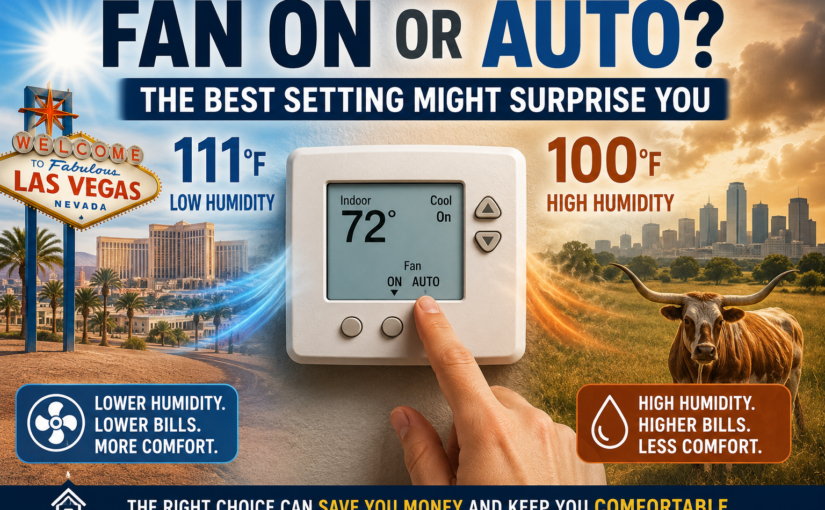
Why Does 100°F in Texas Feel Hotter Than 111°F in Las Vegas?
People who visit both places often notice something surprising.
Even though Las Vegas may be 10 degrees hotter, it often feels more comfortable than a typical summer day in Texas.
The difference isn’t the temperature.
It’s the humidity.
Your body cools itself by evaporating sweat. In a dry climate like Las Vegas, sweat evaporates quickly, carrying heat away from your body and helping you feel cooler.
In humid climates like much of Texas, the air is already holding a lot of moisture. Sweat evaporates much more slowly, making it harder for your body to cool itself. That’s why 100°F with high humidity can feel much more uncomfortable than 111°F in the desert.
Your air conditioner works the same way.
Cooling your home isn’t just about lowering the temperature. One of the air conditioner’s most important jobs is removing moisture from the air.
How Your Air Conditioner Removes Humidity
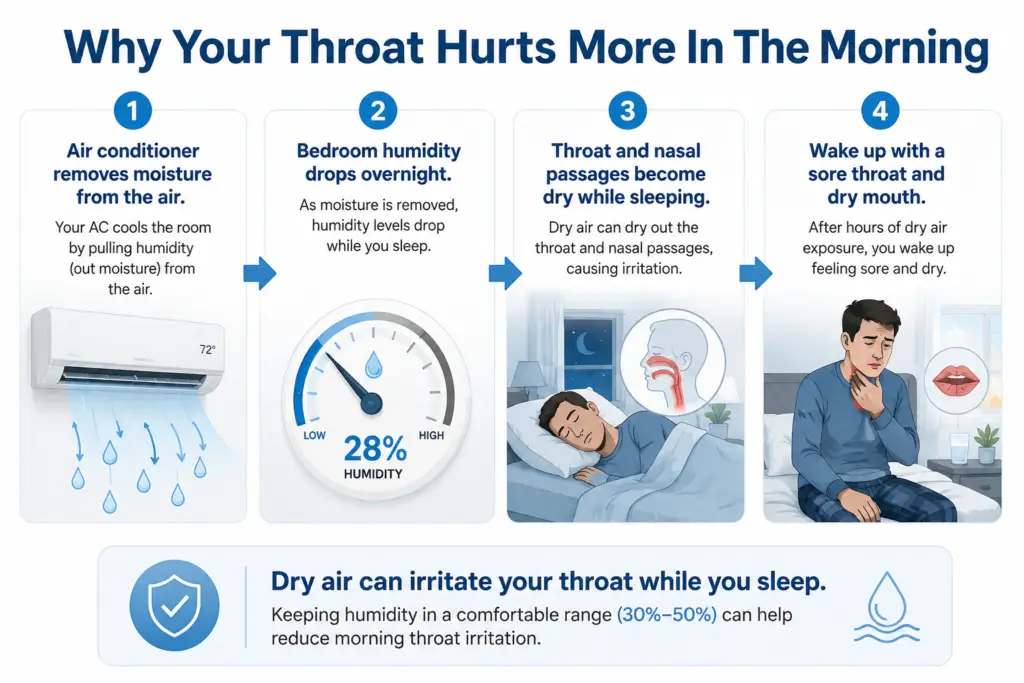
As warm indoor air passes over the cold evaporator coil, moisture condenses into water—just like water droplets forming on the outside of a glass of ice water.
That water drains safely away through the condensate line instead of staying inside your home.
This is one of the biggest reasons your house feels cool and comfortable after the air conditioner has been running.
If your air conditioner is running but you’re still uncomfortable, it could also be causing throat or respiratory irritation. Read our guides on Why Is My Air Conditioner Making Me Cough? and Can Air Conditioning Cause a Sore Throat?
What Happens When the Fan Keeps Running?
When the cooling cycle ends, the evaporator coil is still wet.
If your thermostat is set to Fan ON, the blower continues pushing air across that damp coil.
Some of the moisture that was just removed from your home can evaporate back into the air and be circulated through your ductwork.
Instead of draining away completely, part of that moisture ends up right back inside the house.
How Much More Does It Cost to Leave the AC Fan ON?
For most homeowners, leaving the thermostat fan set to ON will increase the monthly electric bill.
The exact amount depends on your HVAC system, the efficiency of the blower motor, and your local electricity rates, but the difference is often enough to notice on your utility bill.
Typical Monthly Cost Comparison
| Thermostat Setting | Estimated Monthly Cost* |
|---|---|
| AUTO | Lowest operating cost |
| ON | Typically $15–$50+ more per month |
*Actual costs vary depending on your blower motor, electricity rates, and how often your air conditioner runs.
Why the Cost Varies So Much
Not all HVAC systems use the same blower motor.
Older systems often have traditional PSC blower motors that use considerably more electricity when they run continuously.
Many newer systems use ECM (Electronically Commutated Motor) blowers, which are designed to operate much more efficiently. If your home has one of these newer motors, the cost of running the fan continuously may be much lower.
If you’re not sure which type your system has, assume that leaving the fan on all day will increase your electric bill until you know otherwise.
Does Fan ON Cool Your House Faster?
This is one of the biggest misconceptions about thermostat settings.
No. Leaving the fan set to ON does not make your air conditioner cool the house any faster.
The component that actually cools your home is the compressor in the outdoor unit. The blower fan simply moves air through your ductwork.
When the air conditioner is running, both AUTO and ON deliver the same cold air through your vents.
The difference comes after the cooling cycle ends.
- AUTO: The blower stops when cooling stops.
- ON: The blower continues moving room-temperature air through the vents until the next cooling cycle begins.
If you’ve ever walked past a vent and thought, “The AC is running, but the air doesn’t feel cold,” there’s a good chance the thermostat fan was simply set to ON.
In other words, Fan ON gives you more airflow—but it doesn’t give you more cooling.
Why Does My AC Fan Keep Running?
If your blower fan never seems to shut off, don’t assume something is broken. In many cases, the solution is surprisingly simple.
1. Check Your Thermostat Setting First
This sounds obvious, but it’s also the most common cause.
If your thermostat fan is set to ON, the blower is designed to run continuously—even when your air conditioner isn’t cooling.
Simply switching the fan setting back to AUTO should cause the blower to stop after the current cooling cycle ends.
2. Your HVAC System May Have a Fan Delay
Many newer heating and cooling systems intentionally keep the blower running for a minute or two after the compressor shuts off.
This allows the system to use the remaining cool air trapped inside the evaporator coil instead of wasting it.
If the fan shuts off after a short delay, your system is probably operating exactly as designed.
3. Check Your Air Filter
A clogged air filter restricts airflow and can cause your HVAC system to run longer than normal while trying to reach the thermostat setting.
If you can’t remember the last time you changed the filter, it’s one of the easiest and least expensive things to check.
In many cases, replacing a dirty filter improves airflow and cooling performance immediately.
4. The Thermostat or HVAC Controls May Be Faulty
If the fan continues running even though the thermostat is set to AUTO and the air filter is clean, the problem could be a faulty thermostat, relay, or fan control board.
These components control when the blower starts and stops. When one fails, the fan may continue running even when it shouldn’t.
If you’ve ruled out the simple fixes, it’s time to have the system inspected by an HVAC technician.
Final Recommendation
If you’re still wondering which thermostat setting to use, here’s the simplest answer.
- Choose AUTO if you want lower electric bills, better humidity control, and the best all-around performance during the cooling season.
- Choose ON if you have uneven temperatures, a whole-house air purifier, or you simply prefer constant airflow throughout your home.
For the vast majority of homeowners, AUTO is the setting you’ll want to use every day. Fan ON isn’t wrong—it’s simply a better fit for a smaller number of homes and situations.
Additional Resources
If you’d like to learn more about improving your home’s energy efficiency and indoor air quality, these government resources are excellent places to start.
Frequently Asked Questions
Should my AC fan be on AUTO or ON?
For most homes, AUTO is the best choice. It lowers electricity costs, improves humidity control, and only runs the blower when heating or cooling is needed. Consider ON if you have uneven room temperatures, a whole-house air purifier, or simply prefer constant airflow.
Does leaving the fan ON cool the house faster?
No. The blower fan only circulates air. The outdoor compressor is what actually cools your home. Leaving the fan on simply keeps air moving between cooling cycles.
Will Fan ON make my electric bill higher?
Usually, yes. Running the blower continuously uses more electricity than letting it cycle on and off with the air conditioner. The exact cost depends on your blower motor and local electric rates.
Can Fan ON make my house feel more humid?
Yes. During the cooling season, continuous blower operation can circulate some moisture back into your home after the compressor shuts off. That’s one of the main reasons HVAC professionals typically recommend using AUTO in the summer.
Does Fan ON help with allergies?
It can. Running the blower continuously pushes more air through your HVAC filter, allowing it to capture more airborne dust, pollen, and pet dander. The tradeoff is higher energy use and, in humid climates, potentially higher indoor humidity.
Should I use Fan ON if I have a whole-house air purifier?
Often, yes. Many in-duct UV lights and whole-house air purification systems work best when air is constantly moving through the ductwork. Check your manufacturer’s recommendations for your specific system.
Does Fan ON bring fresh air into the house?
No. In most homes, the HVAC blower simply recirculates indoor air through the ductwork. It does not pull fresh outdoor air into the house unless your HVAC system includes a dedicated fresh-air intake.
Why won’t my AC fan turn off?
First, check whether the thermostat fan is set to ON instead of AUTO. If it’s already on AUTO, a dirty air filter, fan-delay feature, thermostat issue, or control board problem could be the cause.
Is Fan ON better during the winter?
It can be. In homes with high ceilings, continuous airflow may help redistribute warm air that naturally rises, making temperatures more even throughout the house.
What thermostat setting do HVAC professionals recommend?
For everyday cooling, most HVAC professionals recommend AUTO. It provides the best balance of comfort, humidity control, and energy efficiency while still allowing you to switch to ON when your home’s conditions make it beneficial.
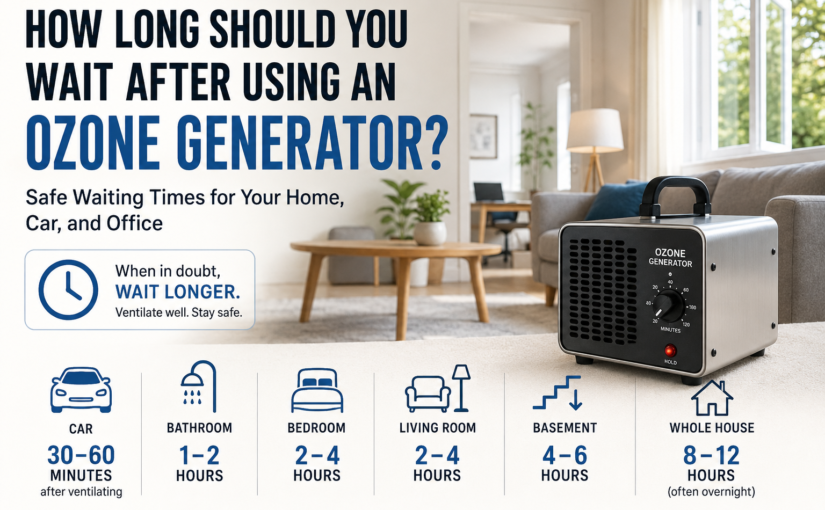
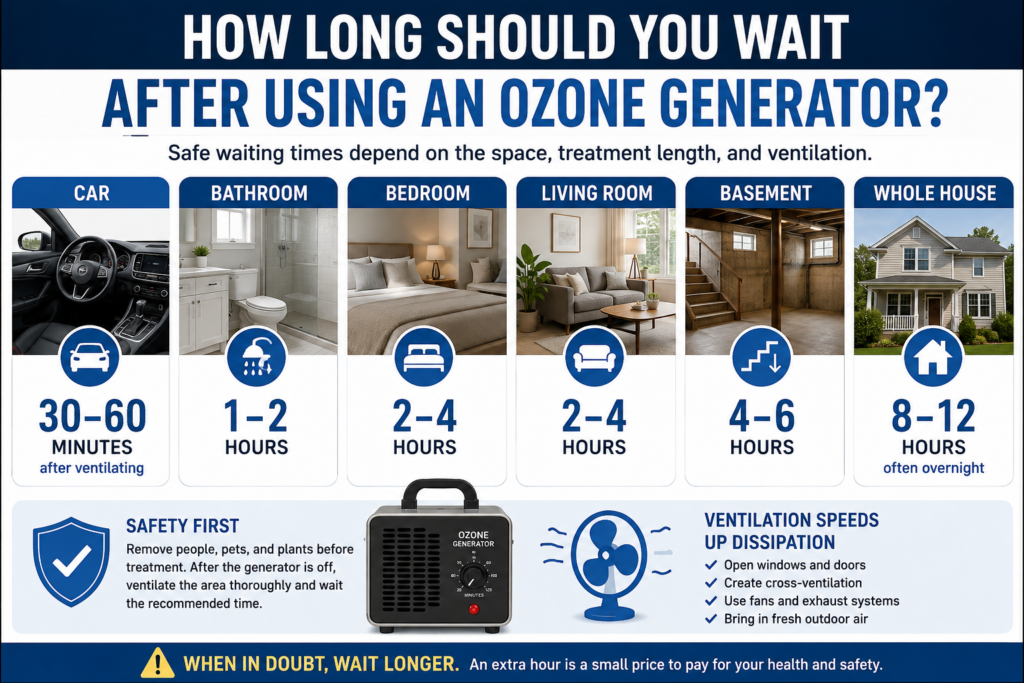 Find Your Situation
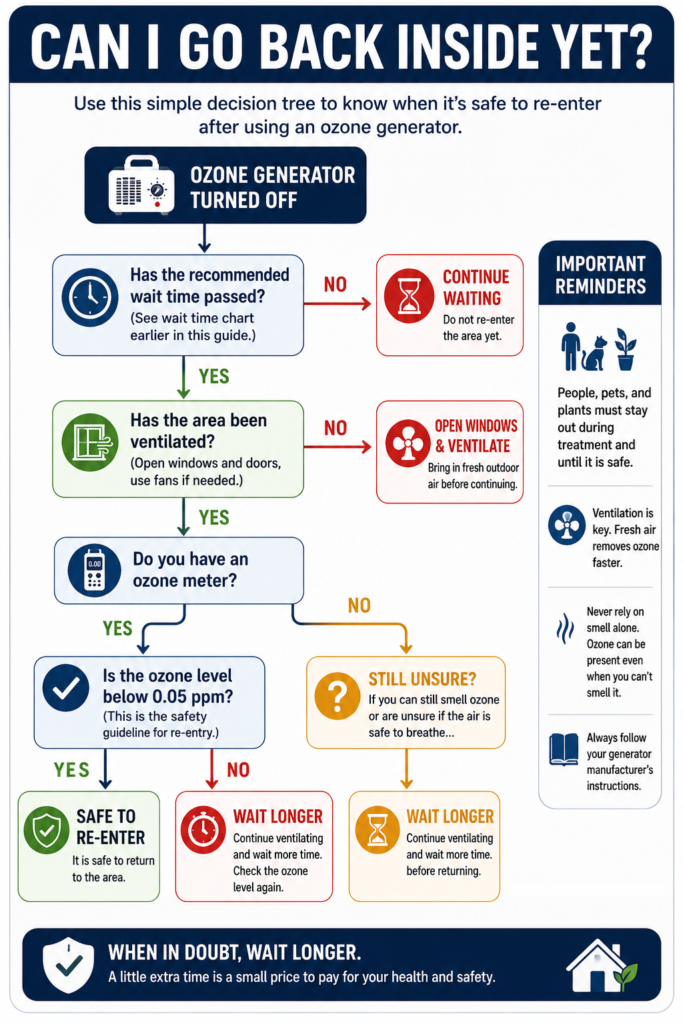 How Do You Know It’s Safe to Go Back Inside?


 Frequently Asked Questions
 5. Bulky and Unattractive
 Final Thoughts