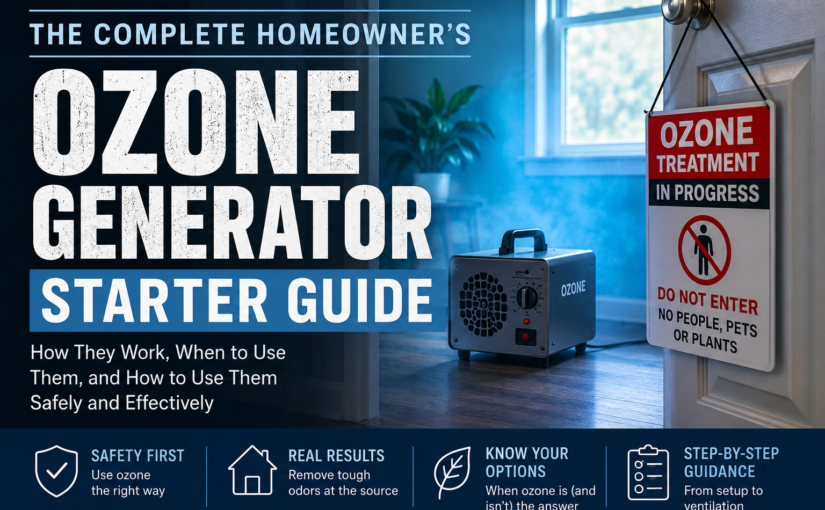
Introduction to Ozone Generators: Harnessing the Power of Ozone for Your Space
Ozone generators release ozone gas (O₃) to neutralize odors, kill bacteria, and sanitize indoor air. While highly effective, they must only be used in unoccupied spaces and require proper ventilation afterward to ensure safe reentry.
What Is an Ozone Generator and How Does It Work?
Ever walk into a space that smells crisp and clean—almost like the air after a thunderstorm? That fresh scent might be ozone at work.
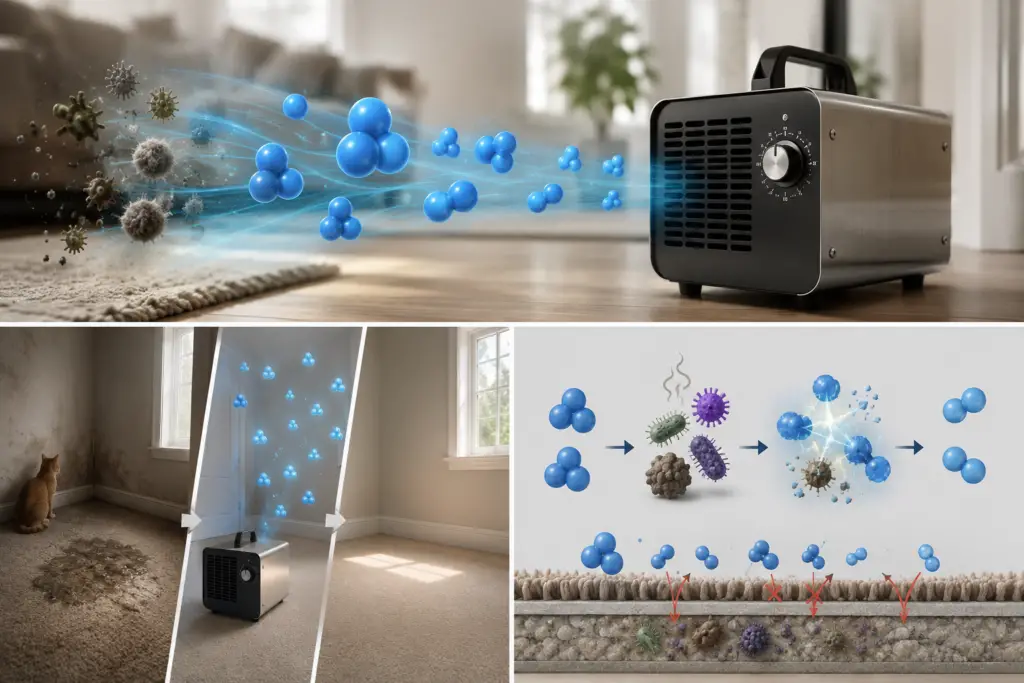
An ozone generator is a device that produces ozone gas (O₃), a molecule made of three oxygen atoms. Ozone is naturally present in the Earth’s atmosphere and is known for its ability to oxidize—or break down—odor-causing particles, bacteria, viruses, and even mold spores.
How it works: The generator pulls in regular oxygen (O₂) and uses an electrical process to convert it into ozone (O₃). When released into a room, this extra oxygen atom binds with pollutants in the air and destroys them at a molecular level.
Common uses include:
- Odor elimination: Great for removing smells caused by smoke, pets, cooking, or mildew.
- Air purification: Helps clear the air of bacteria, allergens, and even some viruses.
- Surface sanitization: In high enough concentrations, ozone can sanitize entire rooms—including furniture and textiles.⚠️ However, this power comes with responsibility. Ozone can be harmful if used improperly—so it’s vital to understand when and how to use these machines safely.
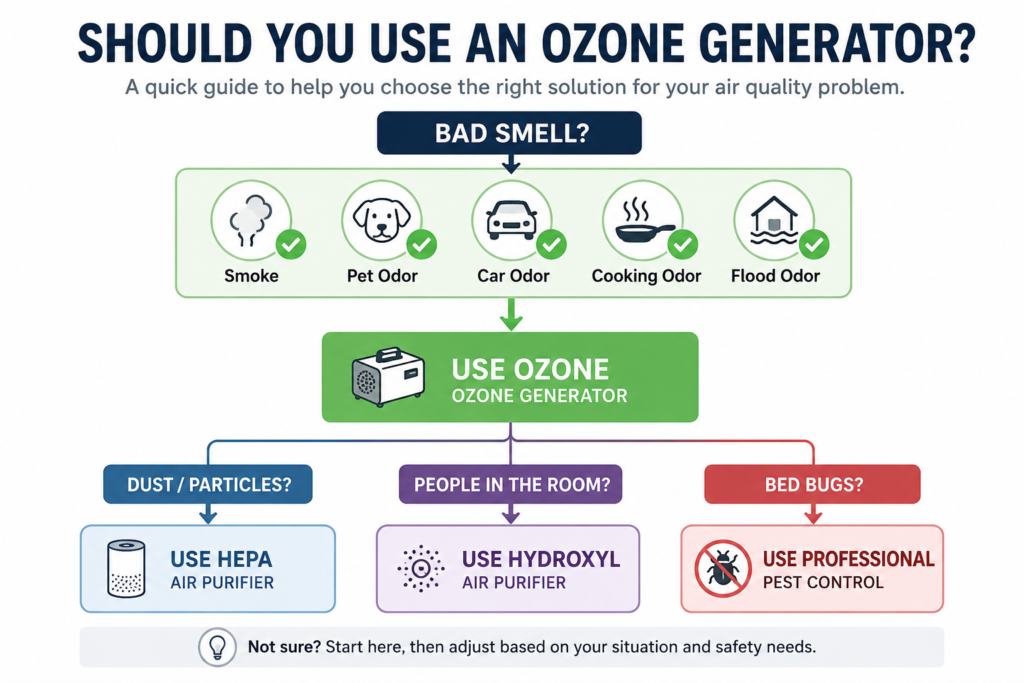
Is an Ozone Generator the Right Solution for Your Problem?

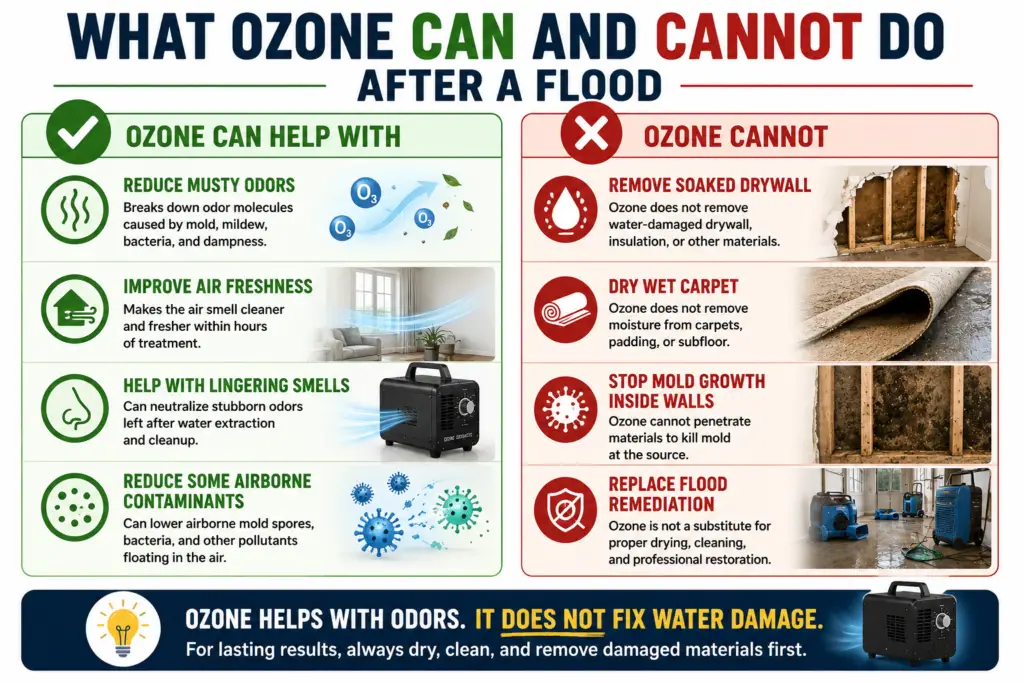
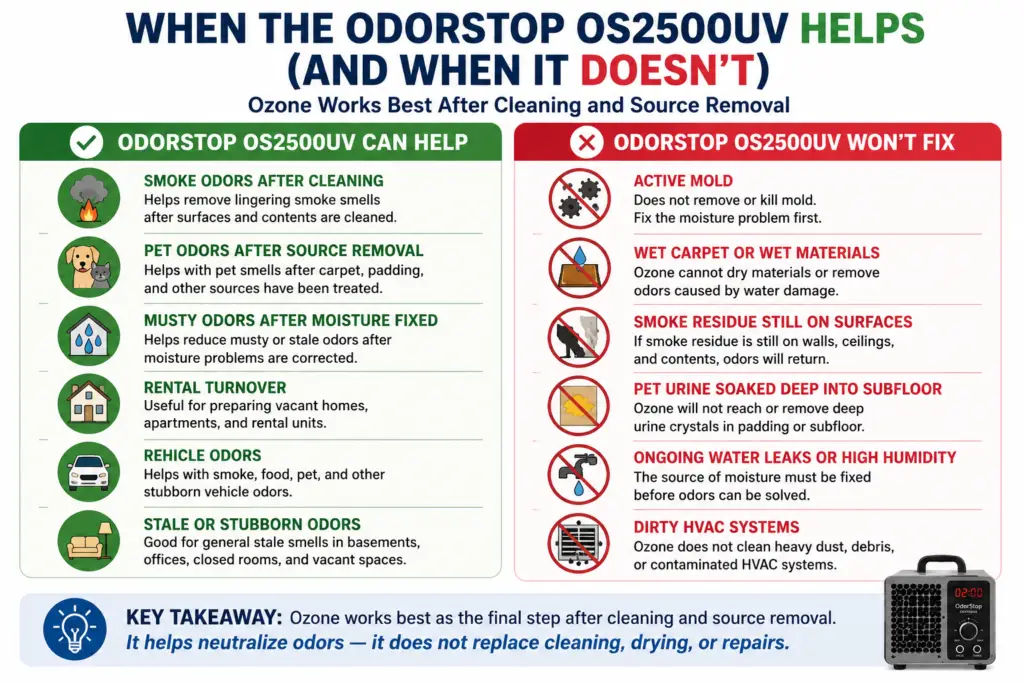
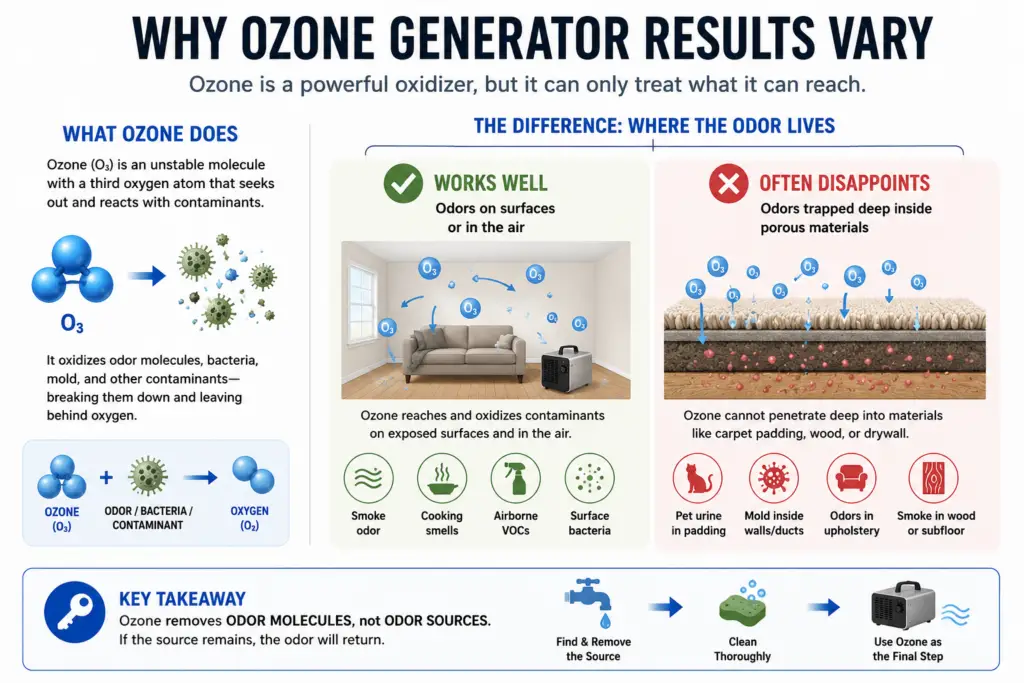
Ozone generators are not everyday air cleaners. They are problem-solving tools. That matters because ozone can be very effective when the problem is an odor trapped in the air, fabric, carpet, walls, or hard surfaces. But it can also be the wrong tool entirely if the problem is dust, allergies, active mold growth, or pests.
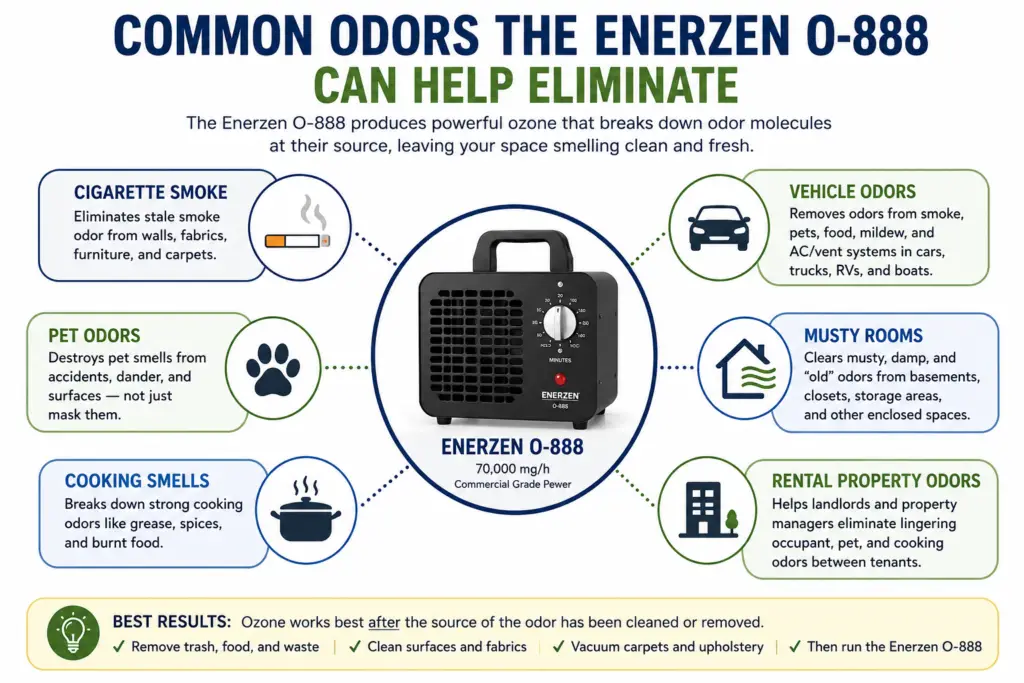
The easiest way to think about ozone is this: ozone works best after the source of the problem has already been cleaned or removed. If the carpet is still soaked with cat urine, ozone will not magically erase it. If the house still has wet drywall after a flood, ozone will not dry it out. If dust is floating through the room, ozone will not trap it like a HEPA filter.
Here is a quick way to decide whether ozone belongs in your cleanup plan.
| Problem |
Is Ozone a Good Fit? |
What to Know |
| Cigarette smoke |
Yes, after cleaning |
Ozone can help with smoke odor trapped in rooms, furniture, and surfaces, but it works best after ash, tar residue, and soft materials have been cleaned first. Read more about using ozone for cigarette smoke. |
| Fire or smoke damage |
Sometimes |
Ozone may help with lingering smoke smell after fire cleanup, but it is not a replacement for removing soot, damaged materials, or contaminated insulation. Learn when ozone works for fire or smoke damage. |
| Cat urine smell |
Sometimes |
Ozone can help with leftover odor, but it will not remove urine crystals or contamination soaked into carpet padding, subfloor, or drywall. See the truth about ozone and cat urine smell. |
| Car odors |
Yes, in the right situation |
Ozone can be useful for smoke, mildew, food, or pet odors inside a vehicle, but the car still needs to be cleaned first. Read the car odor guide. |
| Mold smell |
Only after fixing moisture |
Ozone may reduce a musty smell, but it does not fix the moisture problem or remove active mold growth. Learn when ozone helps with mold smell. |
| Cooking odors |
Yes, for stubborn odors |
Ozone can help with strong cooking smells that linger in curtains, cabinets, and nearby rooms after normal cleaning and ventilation have not worked. Read more about ozone for cooking odors. |
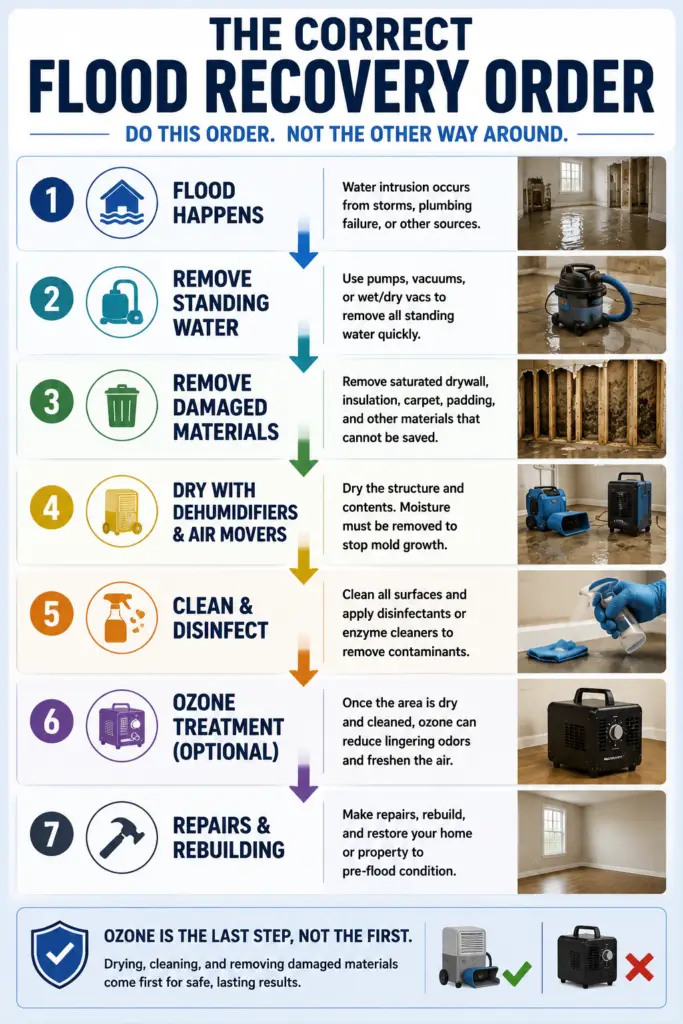
| Flood or water damage smell |
Only after drying and cleanup |
Ozone should not be the first step after flooding. Drying, removing damaged materials, and preventing mold come first. Read the flood cleanup ozone guide. |
| VOCs from paint or new furniture |
Maybe, but be careful |
Ozone can react with some chemicals, but that does not always mean the air is safer afterward. Ventilation and source control are usually more important. Learn more about ozone and VOCs. |
| Dust |
No |
Ozone does not trap dust or remove particles from the air. A HEPA air purifier or better filtration is usually the better tool. See why ozone is not a dust or allergy solution. |
| Allergies |
No |
If your main problem is pollen, pet dander, dust mites, or airborne particles, ozone is the wrong starting point. Use filtration, cleaning, and humidity control instead. Read more about ozone, dust, and allergens. |
| Bed bugs |
No |
Ozone is not a reliable bed bug treatment. It may leave dangerous ozone levels behind without solving the infestation. Read why ozone does not work for bed bugs. |
| General everyday air cleaning |
No |
Ozone generators are not meant to run while people are in the room. For daily air cleaning, use a properly sized air purifier instead. Compare ozone generators vs air purifiers. |
Bottom line: ozone is best used as a final odor-removal step, not the first step. Clean the source, dry the space, remove contaminated materials when needed, and then use ozone only in an unoccupied area with proper ventilation afterward.
Are Ozone Generators Safe? Key Safety Precautions
Ozone generators are effective—but they’re not plug-and-play devices. Misuse can lead to health risks, especially for your lungs. Here’s what every user should know before running one at home.
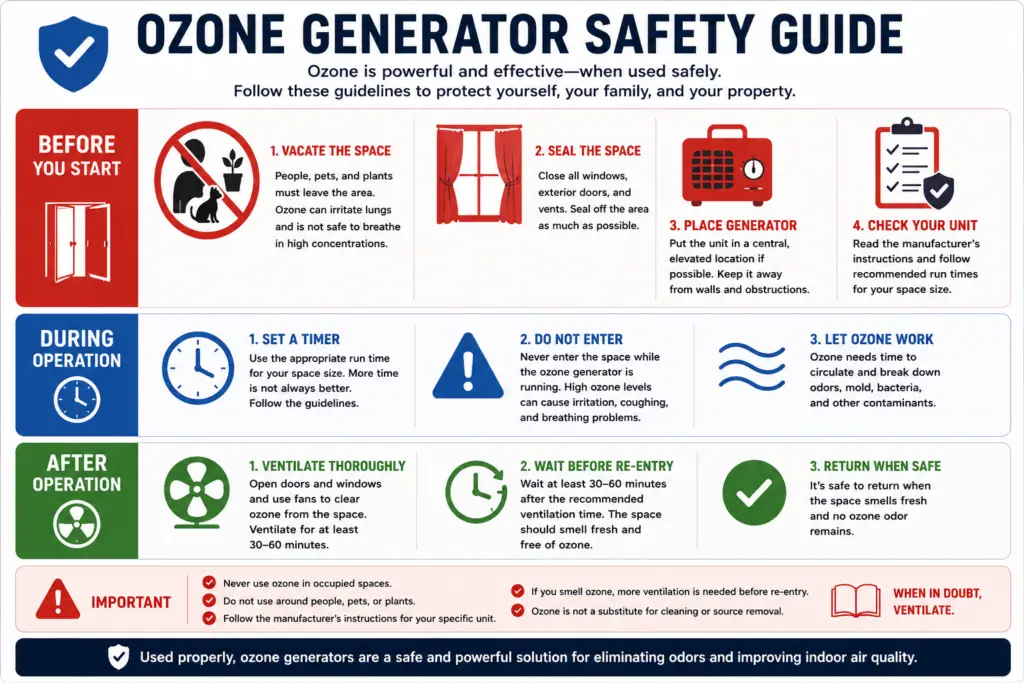
🔹 Before You Start
- Know what ozone is: It’s a strong oxidizer, great for cleaning—but dangerous to breathe in high concentrations.
- Clear the area: Make sure people, pets, and plants are out of the room before turning on the device.
- Read the manual: Always follow the manufacturer’s instructions carefully. Models vary in strength and operation.
🔹 During Use
- Use in unoccupied spaces only: Never stay in the room while the generator is running.
- Watch your settings: Higher concentrations and longer treatment times aren’t always better. Start small and adjust as needed.
- Protect sensitive items: Cover or remove rubber, plastic, electronics, and fabrics that could degrade from repeated ozone exposure.
🔹 After Treatment
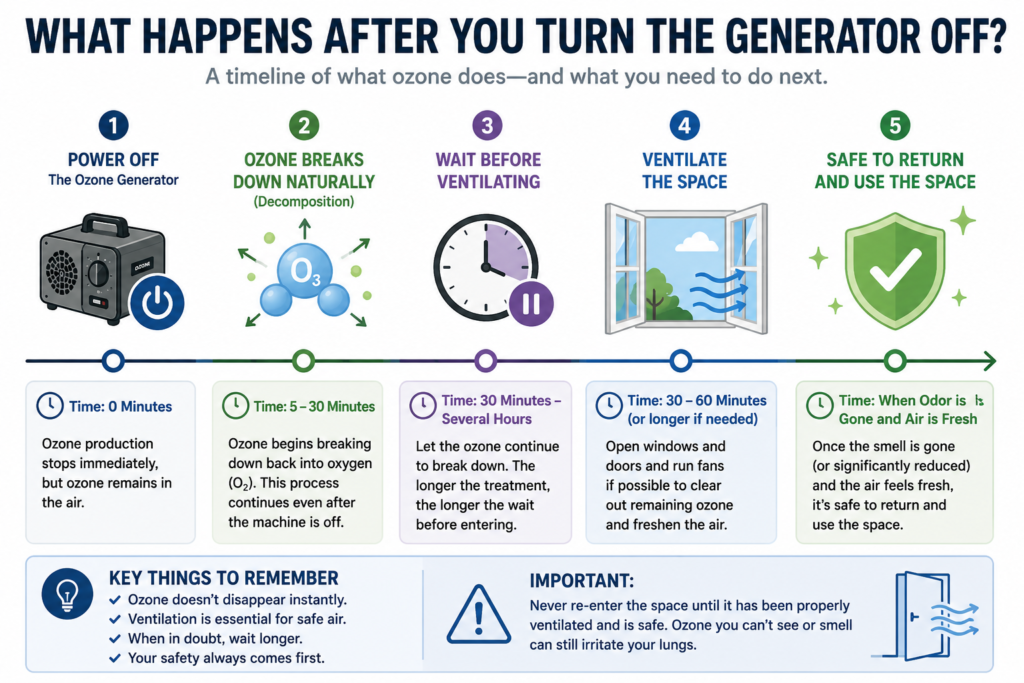
- Ventilate thoroughly: Open windows and use fans to circulate fresh air. Let ozone break down naturally before reentering.
- Wear protection if needed: If early entry is required, use an ozone-rated respirator and gloves.
- Have a backup plan: Know what to do in case of overexposure. Symptoms can include coughing, chest tightness, and shortness of breath.
Safety should always come first. Used properly, ozone generators can make your air cleaner and your space feel renewed—just be sure you’re treating the air, not the people inside it.
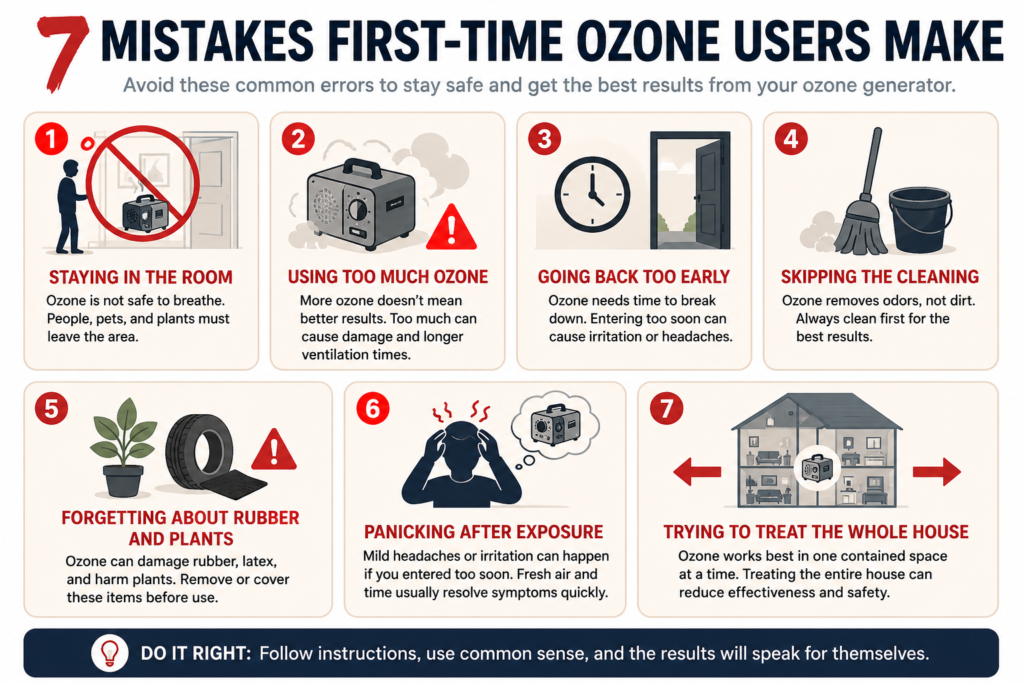
The Biggest Mistakes First-Time Ozone Users Make
Most problems with ozone generators do not happen because the machine is complicated. They happen because people treat ozone like a regular air freshener or air purifier. It is neither one.
An ozone generator is more like a strong cleanup tool. Used the right way, it can help with stubborn odors that normal cleaning does not fully remove. Used carelessly, it can irritate your lungs, leave a harsh smell behind, or make people think the treatment failed when the real problem was that the odor source was never removed.
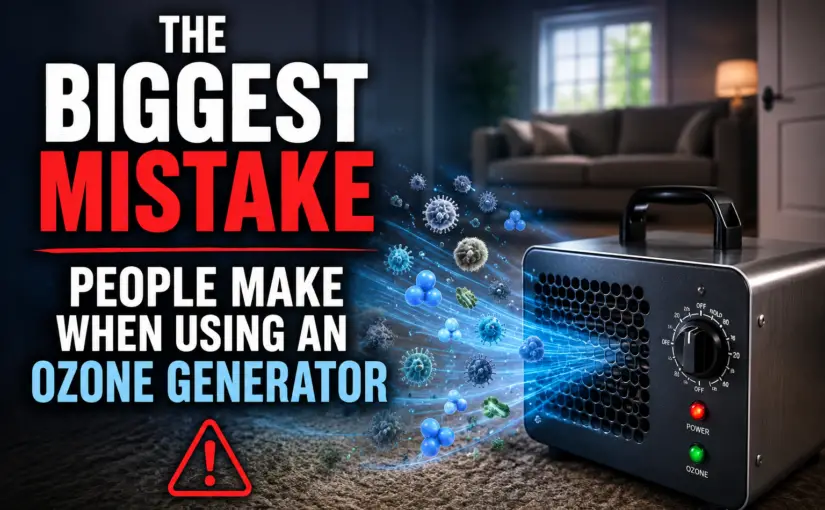
1. Staying in the Room While the Machine Is Running
This is the big one. You should not be in the room while an ozone generator is operating. Neither should pets, children, houseplants, or anyone else. Ozone is useful because it reacts strongly with odor molecules, but that same reactive quality is why you do not want to breathe it.
If you only remember one rule from this guide, make it this one: ozone is for empty spaces, not occupied rooms. For a deeper safety explanation, read the biggest mistake people make when using an ozone generator.
2. Thinking More Ozone Is Always Better
A bigger machine is not always the safer or smarter choice. Running a high-output ozone generator in a small bedroom can be like using a fire hose to water a houseplant. You may get more ozone than the space needs, which can make the smell linger longer and increase the chance of irritating materials in the room.
Start with the smallest reasonable treatment time and output for the space. If the odor remains after proper ventilation, you can adjust from there. It is much easier to repeat a cautious treatment than to deal with a room that was badly over-treated.
3. Reentering Too Soon After Treatment
Just because the machine has shut off does not mean the room is ready. Ozone needs time to break down and the room needs fresh air before people or pets go back inside.
A common mistake is opening the door, smelling that sharp “clean” ozone smell, and assuming that means the job worked. What it may really mean is that there is still too much ozone in the room. If the smell is strong, ventilate longer and stay out until the air clears. For more detail, see how long to wait after using an ozone generator.
4. Using Ozone Before Removing the Odor Source
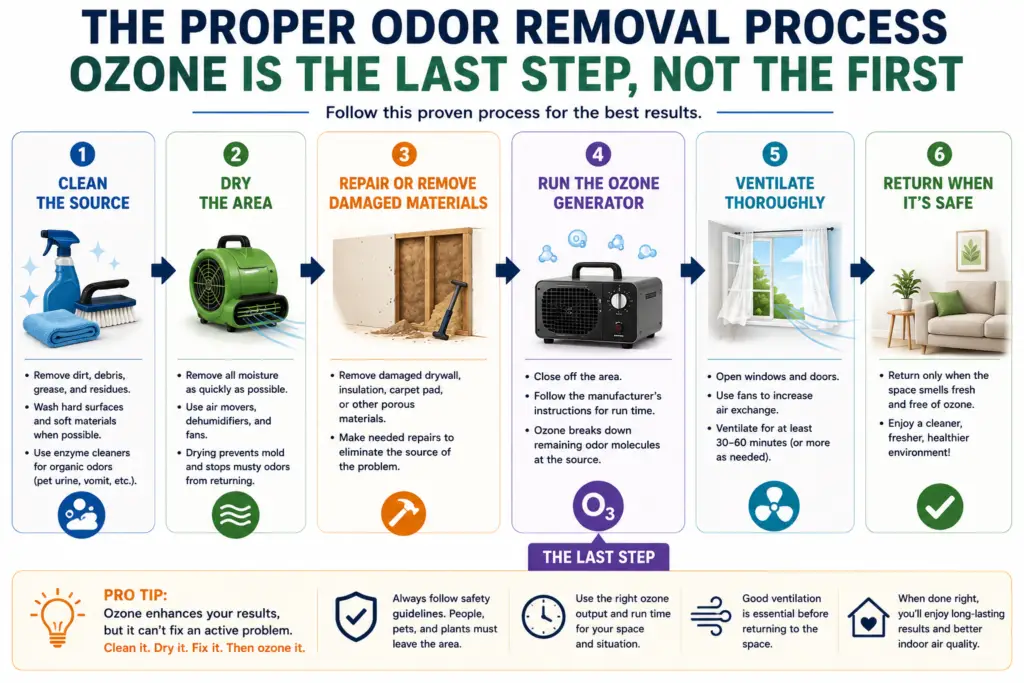
Ozone should usually be the last step, not the first step. If smoke residue is still on the walls, urine is still in the carpet pad, or moldy materials are still wet, ozone may only knock the smell down temporarily. Then a few days later, the odor comes back and the machine gets blamed.
Clean first. Dry first. Remove contaminated materials when needed. Then use ozone to treat what is left behind.
5. Forgetting About Pets, Plants, and Sensitive Materials
People usually remember to leave the room themselves. But they sometimes forget the dog bed, the cat tree, the plants in the window, elastic clothing, rubber items, leather, or delicate materials that may not handle repeated ozone exposure well.
Before you run the machine, take a slow look around the room. Ask yourself: “What is alive, what is delicate, and what could be damaged by a strong oxidizer?” Remove those items when possible.
6. Panicking After Accidentally Breathing Ozone
If someone walks into a treated room too soon, the first step is simple: leave the area and get to fresh air. Mild irritation can happen, especially if the person already has asthma, COPD, allergies, or another breathing issue.
Do not ignore serious symptoms like chest tightness, trouble breathing, wheezing, or symptoms that do not improve after getting fresh air. For a more complete guide, read what to do if you breathe ozone.
7. Treating the Whole House When One Room Is the Problem
Whole-house ozone treatment sounds simple, but it is usually not the best starting point for homeowners. Treating one problem room is easier to control, easier to ventilate, and less likely to expose materials throughout the house.
If the smell is coming from one bedroom, one car, one basement corner, or one piece of furniture, start there. Bigger treatments should be approached carefully, especially if people live in the home. For a broader list of practical safety rules, see these do’s and don’ts for ozoning a house.
The safe way to use ozone is not complicated: remove the source, clear the room, run a reasonable treatment, wait, ventilate, and only return when the air is safe. Most first-time problems come from skipping one of those steps.
Buying Guide: How to Choose the Right Ozone Generator for Your Home
Choosing the right ozone generator can make a huge difference in how effective—and safe—your treatment is. The best model for your space depends on what you’re trying to achieve, the size of the area, and how often you plan to use the machine.
Which Type of Ozone Generator Should You Buy?
One of the biggest mistakes people make is shopping by ozone output alone. While the mg/h rating is important, the best ozone generator depends just as much on how you plan to use it.
Products Worth Considering
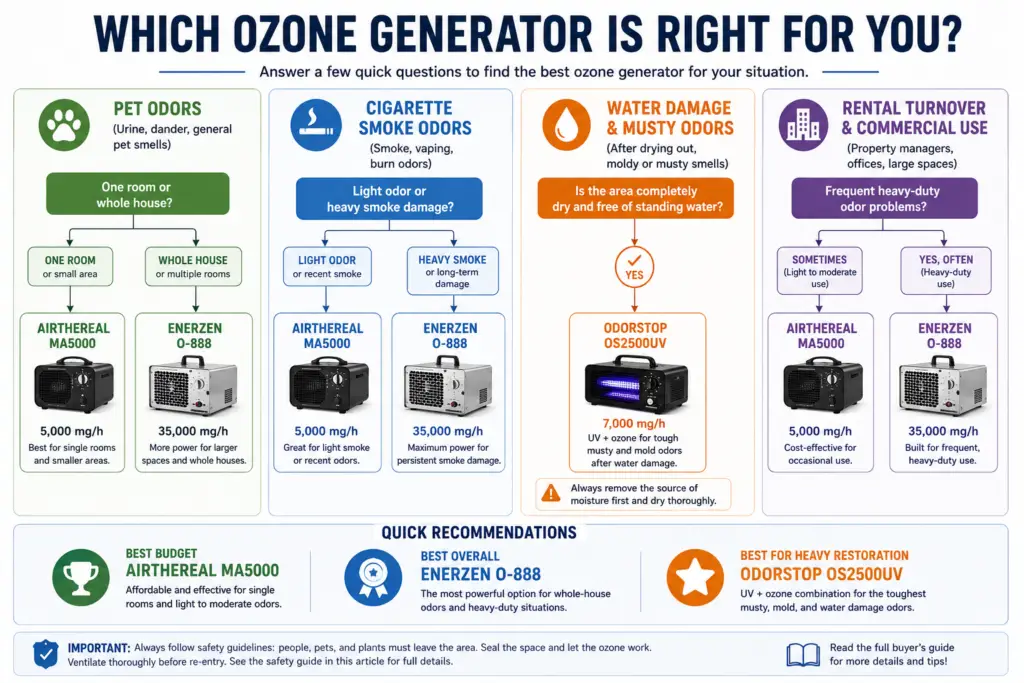
If you already know which type of ozone user you are, the next step is matching that use case to the right kind of machine. These aren’t one-size-fits-all recommendations. A homeowner, car detailer, rental owner, and restoration contractor all need different levels of power, portability, durability, and safety features.
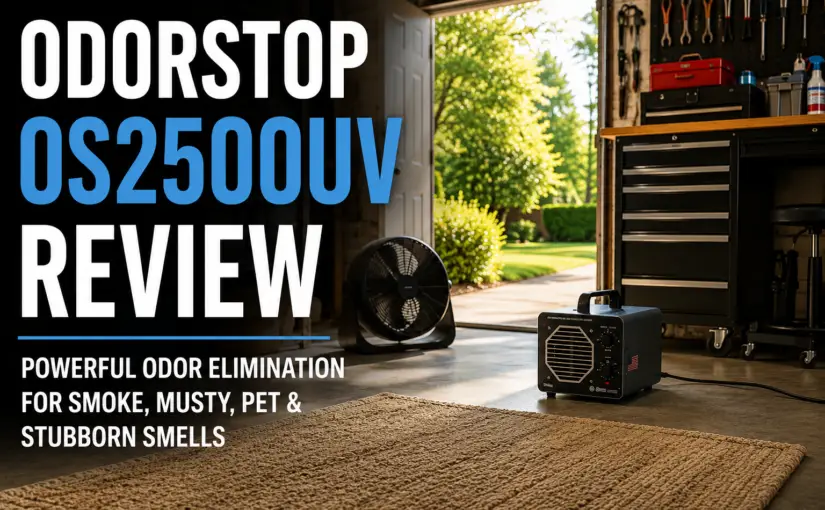
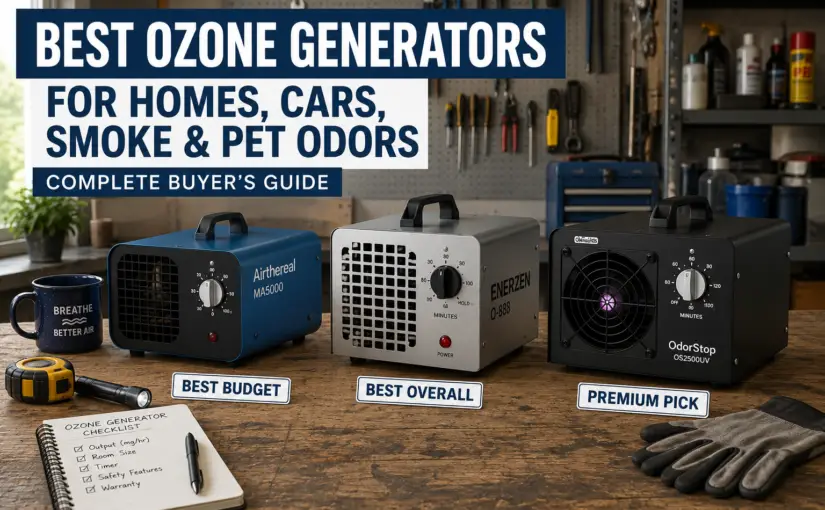
- OdorStop OS2500UV — A great choice for rental owners and homeowners who want a durable mid-range machine for recurring odor removal. Look for adjustable output, a built-in timer, and a sturdy metal housing. Read the OdorStop OS2500UV review.
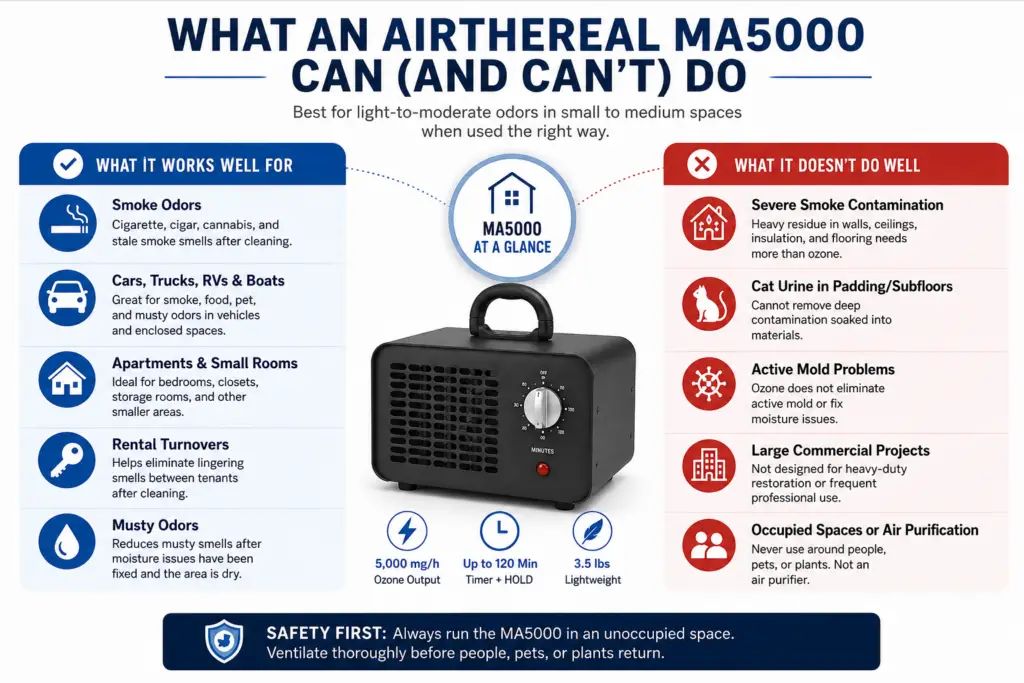
- Airthereal MA5000 / MA5K — Well suited for car detailers and occasional homeowners who need portability. Compact enough for vehicles yet powerful enough for most rooms when used correctly. Delay start or remote controls are especially useful. Read the Airthereal MA5000 review.
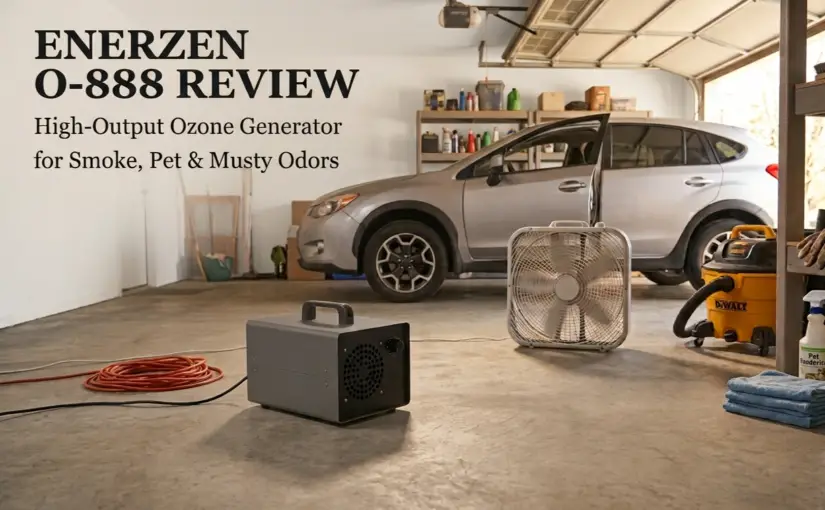
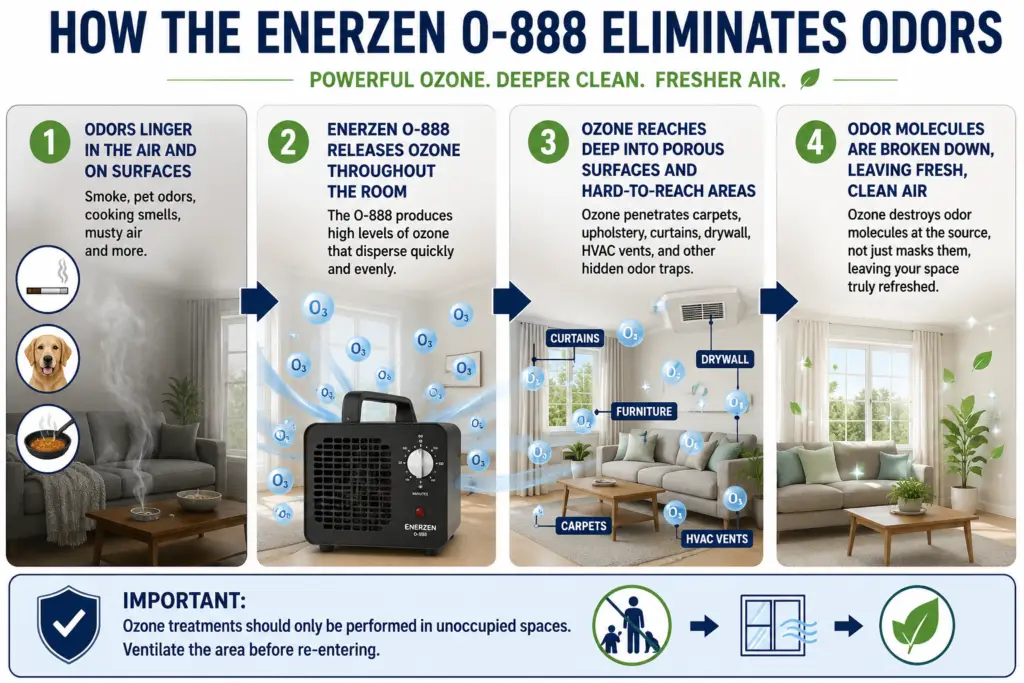
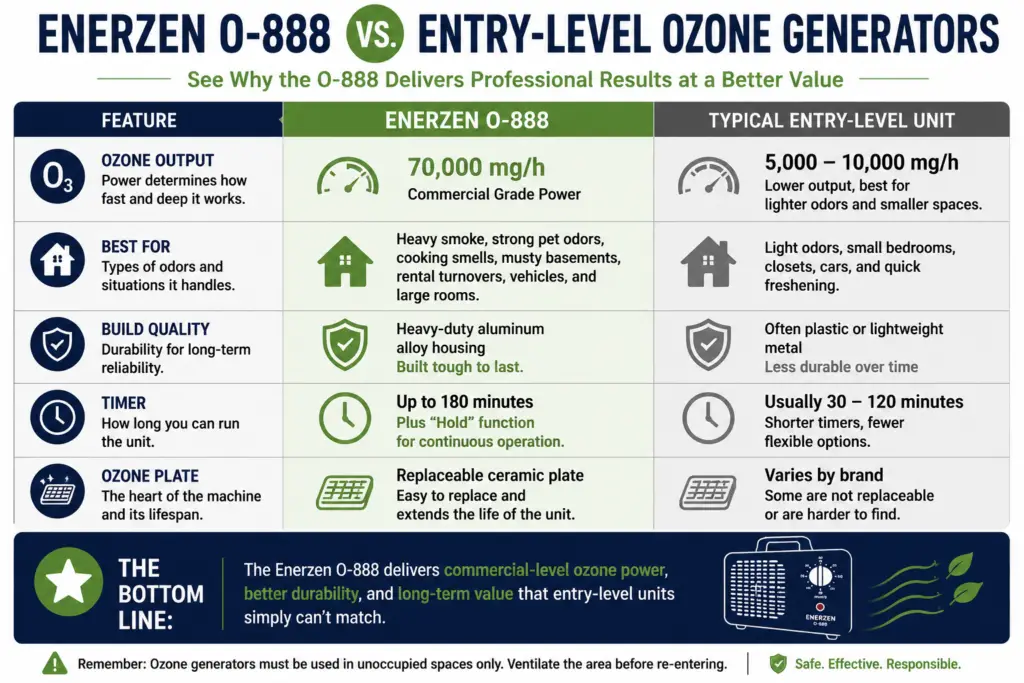
- Enerzen O-888 — A solid entry-level option for homeowners who expect to treat odors only a few times each year. Easy controls and good value make it a popular first purchase. Just be sure to match the output to the room size. Read the Enerzen O-888 review.
- Commercial ozone units or professional restoration services — Best for smoke restoration, flood cleanup, hoarding situations, whole-house odors, or frequent rental-property work. For larger jobs, compare the cost of buying commercial equipment versus renting or hiring a restoration contractor. Learn when renting makes sense.
Quick buying checklist:
- Match the ozone output to the room size using our Ozone Generator Sizing Guide.
- Choose adjustable output whenever possible.
- Look for a built-in timer, delay start, or remote control.
- For frequent use, choose a metal-cased unit with replaceable ozone plates and a solid warranty.
- If you’re tackling an entire home, major smoke damage, or flood cleanup, consider renting equipment or hiring a professional instead.
Remember: ozone generators are designed for odor removal in unoccupied spaces—not everyday air cleaning. If your goal is cleaner daily indoor air, see our comparison of ozone generators versus air purifiers.
A homeowner trying to remove a musty basement odor has very different needs than someone detailing cars every weekend or a restoration contractor cleaning up smoke damage. Before you compare specifications, decide which category best describes you.
When It Makes Sense to Call a Pro
Ozone works best as the final step after cleaning, drying, and removing the source of the odor. If you’ve already done that and the smell keeps coming back, it’s probably time to bring in a professional.
- Restoration contractors can handle fire and smoke damage, flood cleanup, hoarding situations, and severe odor problems.
- HVAC contractors can diagnose odors coming from ductwork, evaporator coils, or other heating and cooling components.
- Rental equipment can be a cost-effective option when a homeowner machine isn’t powerful enough but a full restoration company isn’t necessary.
Professionals don’t simply use larger ozone machines. They locate the source of the problem, remove contaminated materials when necessary, and develop a safe treatment and ventilation plan. In many situations, that solves the odor permanently instead of temporarily masking it.
Remember: the best ozone generator isn’t necessarily the biggest one. It’s the one that’s properly sized for your space, fits how often you’ll use it, and includes the safety features that make treatments easier to perform correctly.
Here’s a simplified guide to help you make a smart decision:
1. Know Your Purpose
-
- Air Purification: If you’re targeting allergens or bacteria in the air, a lower-output unit with better control settings is often best. You may also want to consider UV light air purifiers as a long-term solution for air quality maintenance.
- Odor Elimination: For smoke, mildew, or strong pet odors, go for a model designed for deeper, more intense treatments. If you’re dealing with lingering smells after water damage, you may want to read our guide on using ozone after flooding.
2. Match Output to Space Size
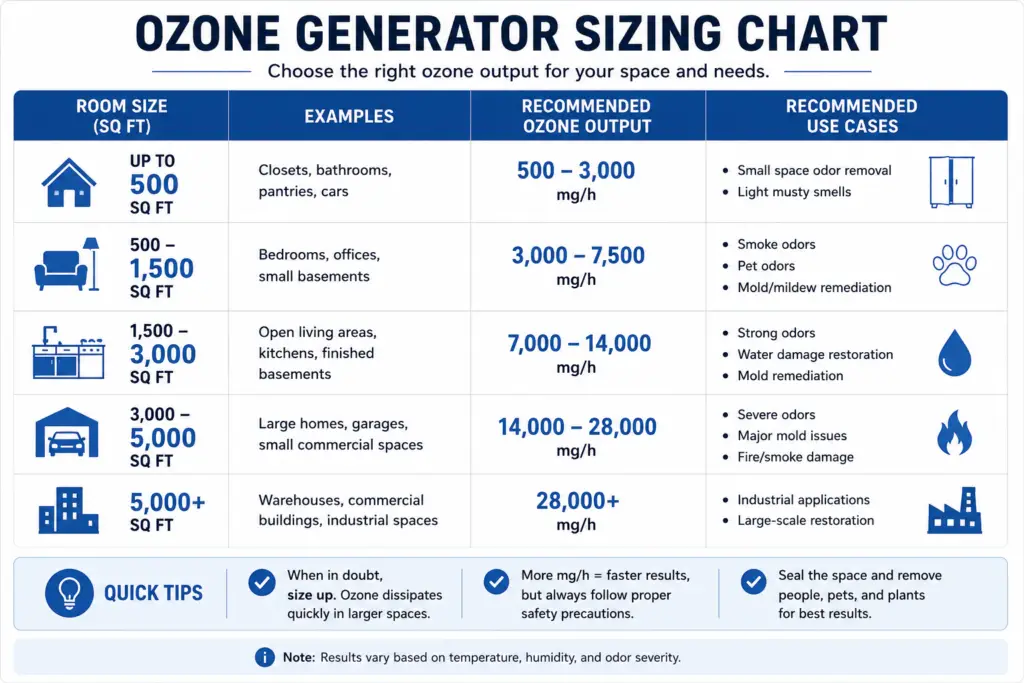
Ozone output is measured in milligrams per hour (mg/h)—and bigger spaces usually require stronger machines.
- Small rooms (closets, bathrooms): 100–500 mg/h
- Bedrooms, kitchens: 500–1,000 mg/h
- Basements, garages, large rooms: 1,000–4,000 mg/h or more
📌 Tip: Always start with lower settings and short durations to avoid over-treatment. For a deeper breakdown, see our ozone generator sizing guide.
3. Prioritize Safety Features
Look for models that include:
- Built-in timers for automatic shutoff
- Adjustable ozone output to match room size
- Delay start or remote control to avoid being in the room when it starts
4. Consider Portability and Design
If you plan to use the unit in different rooms or take it to other locations:
- Choose a lightweight unit with a handle or wheels
- Look for a compact design for easier storage—especially useful for cleanup projects like post-flood restoration
5. Durability and Maintenance
Quality materials and build matter. A cheap unit may wear out quickly, especially with regular use.
- Check for metal casing instead of flimsy plastic
- Look for brands that include or sell replacement ozone plates and filters
- Review the warranty and availability of customer support
💡 Planning to control mold long-term? Ozone generators work well for occasional odor-removal treatments, but if you’re looking for continuous mold prevention inside your HVAC system, a UV light may be a better long-term solution. Learn more in our guide to the pros and cons of UV lights in HVAC systems.
6. Noise Level and Energy Use
These are easy to overlook but can matter depending on where and how often you use it.
- Noise-sensitive areas: Check decibel (dB) ratings in the product specs
- Frequent use: Choose energy-efficient models to save power
7. Price vs. Value
Don’t just buy the cheapest machine. A higher-quality model with more control, safety, and power is often worth the extra cost.
- Compare brands with good customer reviews
- Ensure it’s certified or compliant with local safety standards
🧠 Final Tip: If you’re unsure, start with a mid-range generator rated for medium rooms (500–1,000 mg/h). These models are versatile enough for most homeowners and are a good balance between performance, safety, and ease of use.
Still not sure what size you need? Our Ozone Generator Sizing Guide walks you through choosing the right output for your room, while our Rental vs. Buy Guide can help you decide whether purchasing a machine makes sense for your situation.
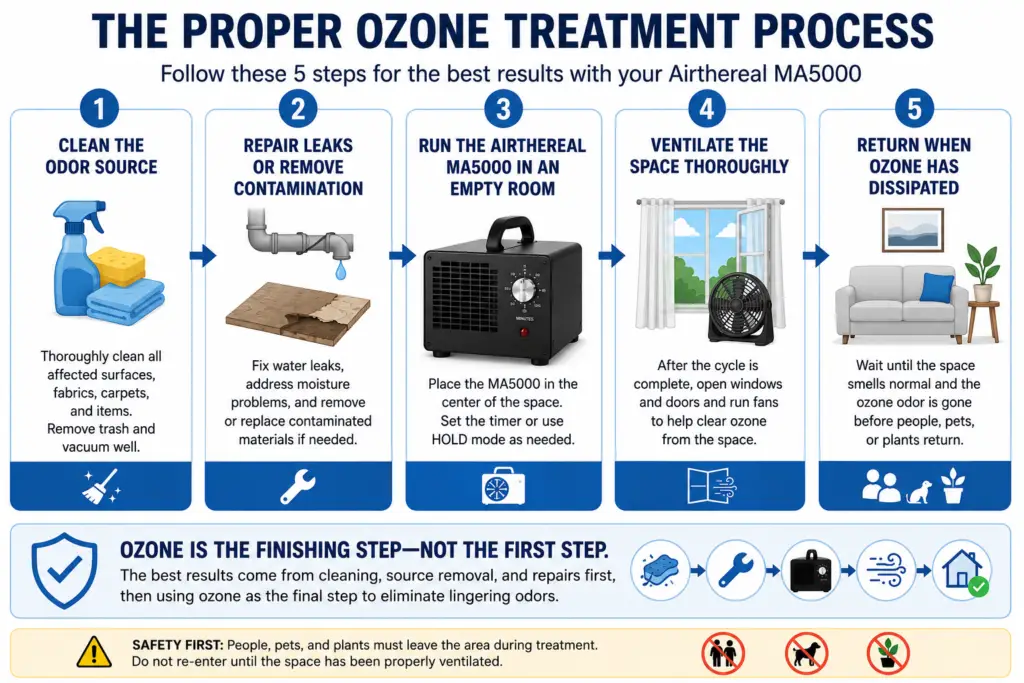
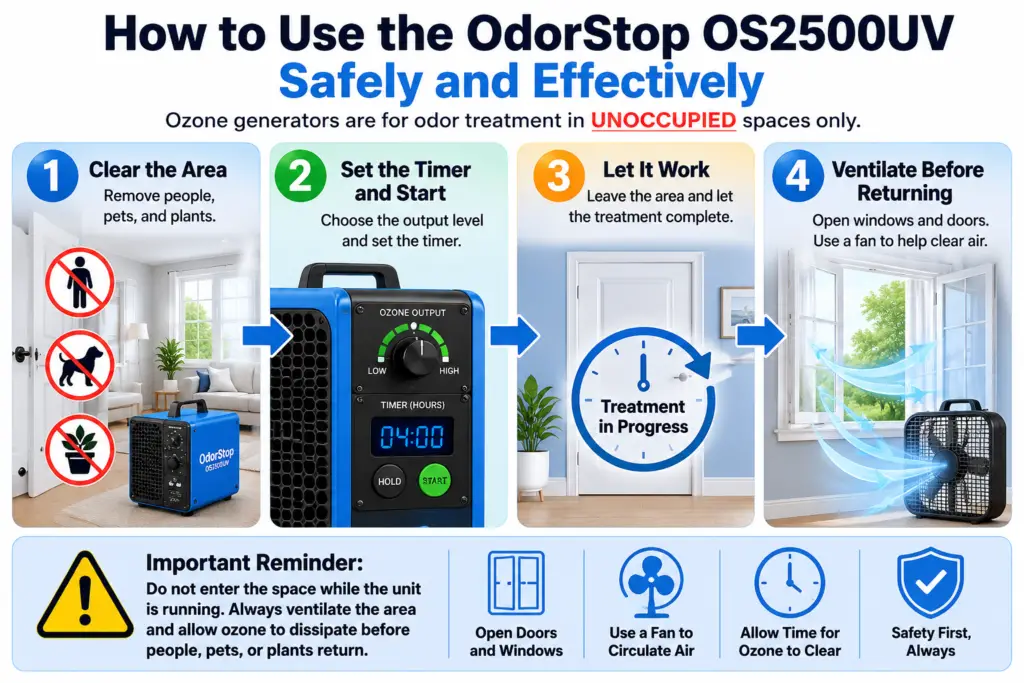
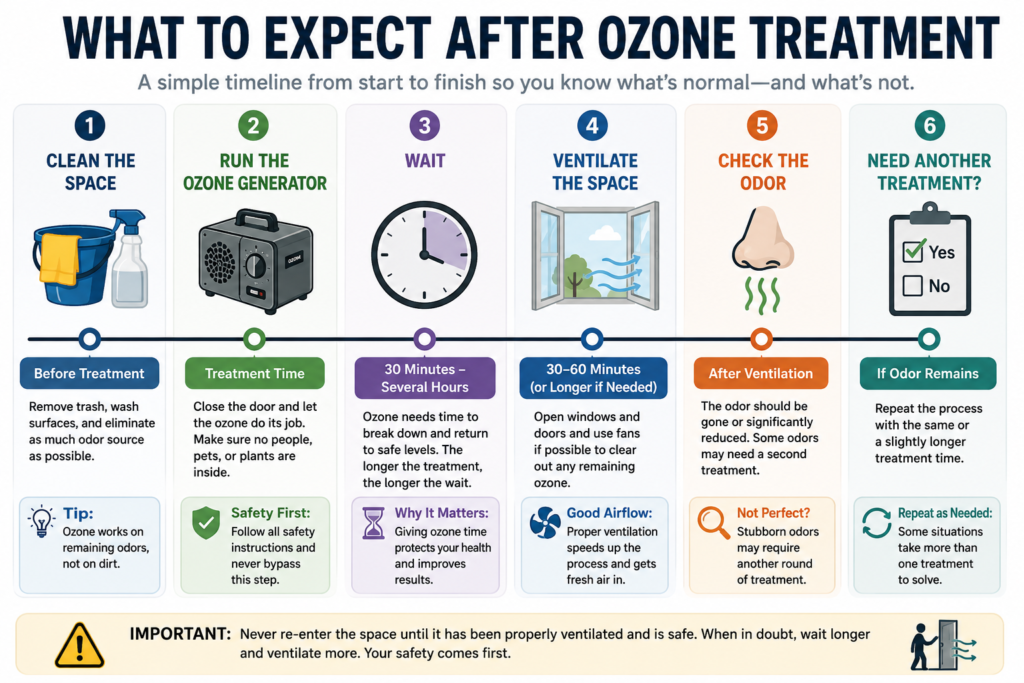
Step-by-Step: How to Use an Ozone Generator at Home
Using an ozone generator for the first time might seem intimidating, but once you know the steps, it becomes a straightforward process. The key is always safety—ozone is effective, but it must be handled with care.
This step-by-step guide will walk you through the full process of using your generator properly so you can get the results you want—whether it’s removing stubborn odors or disinfecting a room after a cleanup.
Step 1: Unboxing and Assembly
- Carefully remove the ozone generator and any accessories from the box.
- Follow the manufacturer’s instructions for assembly. This might include attaching a hose or inserting filters.
Step 2: Choose the Right Location
- Select a space that will be unoccupied during treatment—no people, pets, or plants.
- Place the device in a central, elevated location (like a table or shelf) to allow ozone to spread evenly.
Step 3: Prepare the Area
- Remove or cover sensitive materials like rubber, leather, electronics, or live plants. Ozone can degrade these over time.
- Close all windows and doors to seal the room. If you’re treating HVAC odors, be sure the system is off unless you’re using ozone for duct treatment (see our related post: UV Light in HVAC: Is It Worth It?).
Step 4: Plan Your Treatment
- Decide on a treatment time and ozone output level based on the size of the room and the intensity of the odor.
- When in doubt, start with shorter treatment times and lower settings, then adjust as needed.
- If you’re unsure how long to run the machine or when it’s safe to go back inside afterward, read our guide on how long ozone lasts and why its lifetime matters.
Step 5: Set Up the Device
- Plug the generator into a secure outlet. Make sure it’s sitting level and won’t be disturbed.
- If your unit has a timer, set it. If not, use an external timer or smart plug to control treatment duration safely.
Step 6: Start the Ozone Generator
- Turn on the device using the appropriate setting.
- Immediately exit the room and close the door tightly behind you.
Step 7: Let It Run Uninterrupted
- Do not re-enter the room while the ozone generator is running.
- If you’re treating a space after water damage, check out our tips on ozone use after flooding.
Step 8: Ventilate After Treatment
- Once the treatment ends, wait 1–2 hours before re-entering to allow ozone to dissipate.
- Open windows and use fans to increase ventilation and help clear any lingering ozone. You can also run your HVAC system in Fan Mode to circulate air without cooling.
Step 9: Post-Treatment Check
- Return to the space and assess. You should notice a clean, fresh smell and significantly reduced odor or contamination.
- If results aren’t sufficient, you can do a second treatment—just make sure to adjust duration or settings based on your first experience.
What Should You Expect After an Ozone Treatment?
The first time you use an ozone generator, it’s easy to wonder whether everything went according to plan. Should the room smell different? Should every odor be gone immediately? What if it still smells bad—or even worse?
The good news is that these are some of the most common questions first-time users ask. In many cases, what you’re experiencing is completely normal.
Should the Room Smell Like Ozone?
Probably. Many people describe ozone as smelling like fresh air after a thunderstorm, electrical sparks, chlorine, or even freshly copied paper. Others barely notice it at all.
That smell doesn’t necessarily mean the treatment worked better than expected—it simply means ozone is (or recently was) present. After proper ventilation, the ozone smell should gradually disappear.
If you’re wondering exactly what ozone smells like and why people describe it so differently, read our guide on what ozone smells like and when that smell should concern you.
Should the Odor Be Gone Immediately?
Sometimes—but not always.
Light odors may disappear after a single treatment. Stronger odors from cigarette smoke, pet accidents, mold, or water damage often improve significantly but may require additional cleaning or another ozone treatment.
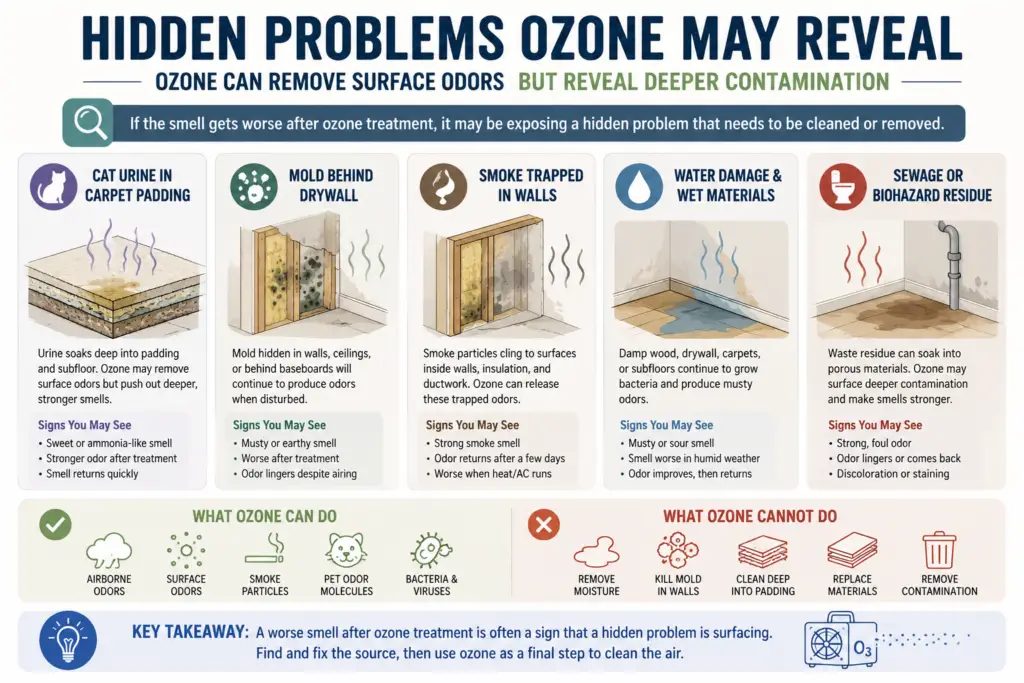
Remember, ozone removes odor molecules—it doesn’t remove the source of the problem. If smoke residue is still on the walls or urine has soaked into the subfloor, the smell may eventually return.
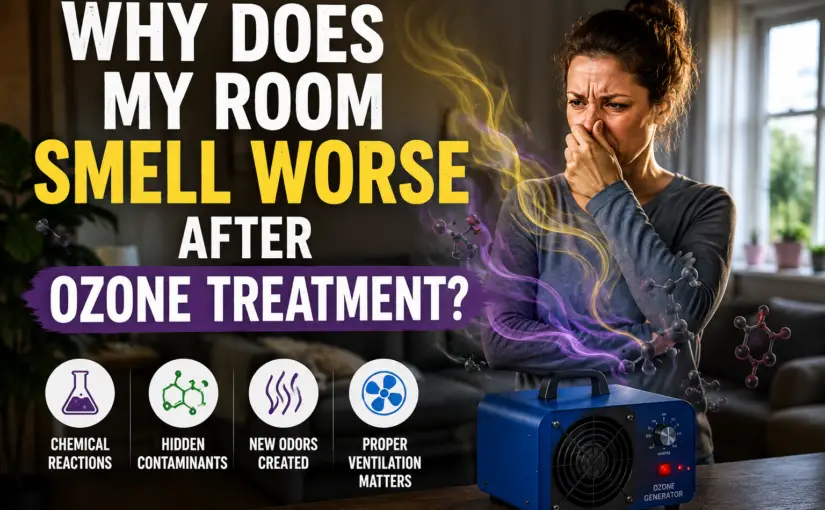
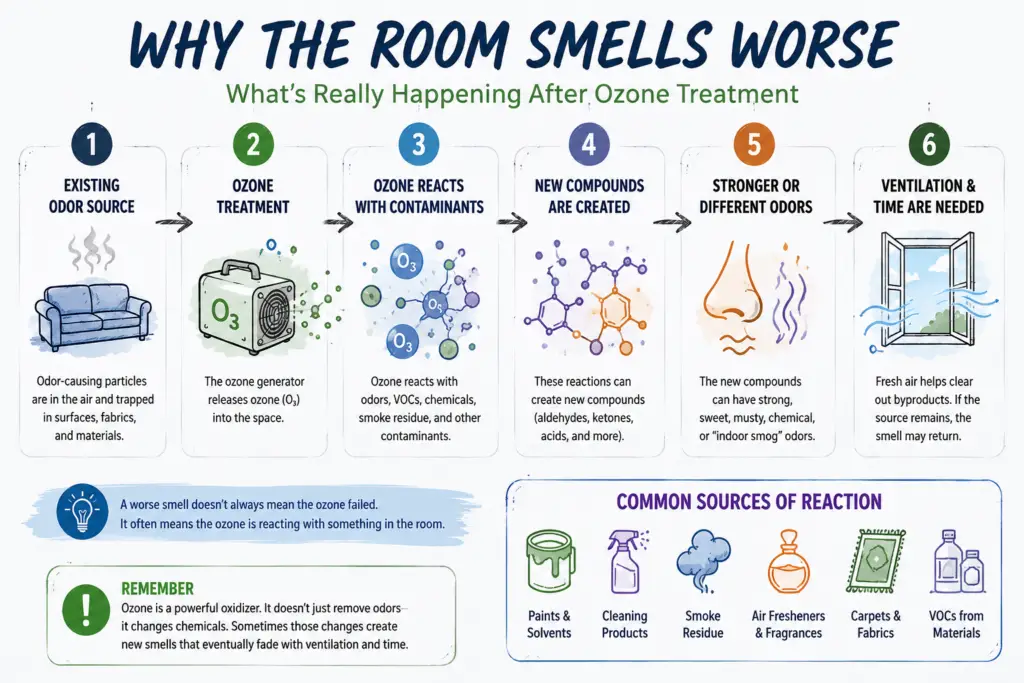
Why Does the Room Smell Worse After Treatment?
This surprises many homeowners.
Sometimes ozone reacts with odor-causing compounds and temporarily creates new odors before they fully dissipate. In other situations, the treatment removes one smell and exposes another that was hidden underneath.
It can also happen when the original contamination was never completely cleaned away.
If your room actually smells worse after using ozone, don’t assume the machine failed. Read Why Does My Room Smell Worse After Ozone Treatment? before running another treatment.
How Do You Know if the Treatment Worked?
One of the easiest ways to tell is simply to leave the room for several hours—or even overnight—and then come back with a fresh nose.
If the unpleasant odor is gone and only a faint ozone smell remains (or no smell at all after ventilation), the treatment was likely successful.
If the original odor comes back within a day or two, there’s a good chance the source is still present and needs additional cleaning or removal.
Should You Run Another Treatment?
Sometimes one treatment isn’t enough.
Before running the machine again, ask yourself these questions:
- Did I remove the actual source of the odor?
- Did I allow enough time for ventilation afterward?
- Was the treatment long enough for the size of the room?
- Is this an odor that may require multiple treatments?
If the answer to those questions is yes and the smell is still present, a second treatment may be worthwhile.
However, if repeated ozone treatments aren’t solving the problem, the issue probably isn’t the machine. Learn the most common reasons in Ozone Generator Didn’t Work: Common Reasons the Smell Came Back.
Quick Tip: Successful ozone treatment usually follows this pattern:
- Remove or clean the source of the odor.
- Run the ozone generator in an unoccupied space.
- Allow enough time for ozone to dissipate.
- Ventilate thoroughly.
- Evaluate the results with fresh air and fresh senses before deciding whether another treatment is needed.
Ozone Output Levels: How Much Do You Really Need?
Ozone generators vary widely in how much ozone they produce—measured in milligrams per hour (mg/h). Choosing the right output level is crucial for both effectiveness and safety. Too little ozone, and you won’t get results. Too much, and you risk damaging materials or overexposing the space.
Here’s a simple breakdown of what each level is best suited for:
🔹 Low Output (100–500 mg/h)
- Best for: Small spaces like closets, pantries, or bathrooms
- Use cases: Light pet odors, mild mildew, lingering food smells
- Duration: Short bursts of 15–30 minutes are often enough
👉 Ideal for apartment dwellers or anyone dealing with light but persistent odors.
🔸 Medium Output (500–1,000 mg/h)
- Best for: Bedrooms, small living rooms, or laundry rooms
- Use cases: Moderate odors from pets, smoke, or humidity-related mildew
- Duration: 30 minutes to 1 hour, depending on severity
💡 Tip: If you’re also using your AC to circulate air, check out our article on Fan Mode on your AC to help move treated air safely after a session.
🔶 High Output (1,000–4,000 mg/h)
- Best for: Basements, garages, entire apartments
- Use cases: Strong smoke damage, pet accidents, mold issues
- Duration: 1 to 2 hours per treatment, followed by thorough ventilation
🔴 Very High Output (4,000+ mg/h)
- Best for: Whole-house treatments, commercial spaces, or extreme conditions
- Use cases: Flood restoration, hoarding cleanup, biohazards
- Duration: 2–4 hours+ followed by 4–6 hours of ventilation (or longer)
⚠️ These are best handled by professionals. If you’re considering this level of ozone treatment, also weigh the pros and cons of alternatives like UV light in HVAC systems.
Quick Visual Comparison: Ozone Generator Output Levels
| Output (mg/h) |
Room Size |
Use Case |
Run Time |
Skill Level |
| 100–500 |
Closet, Bathroom |
Light odors, mildew |
15–30 minutes |
Beginner |
| 500–1,000 |
Bedroom, Kitchen |
Pets, smoke, damp smells |
30–60 minutes |
Beginner |
| 1,000–4,000 |
Garage, Apartment |
Mold, strong odors |
1–2 hours |
Intermediate |
| 4,000+ |
Whole House, Commercial |
Fire, flood, biohazards |
2–4 hours+ |
Pro / Extreme Use |
How to Maintain Your Ozone Generator (And Why It Matters)
Ozone generators don’t require daily upkeep, but regular maintenance is essential if you want reliable performance and a longer lifespan. Dirty filters, corroded plates, or internal dust buildup can all reduce your unit’s effectiveness—and in some cases, make it unsafe to use.
Below is a maintenance schedule you can follow to keep your machine in top condition:
🧰 Ozone Generator Maintenance Schedule
| Maintenance Task |
Frequency |
Description |
| Filter Cleaning/Replacement |
After every use |
Clean or replace filters to prevent airflow blockages and maintain ozone output efficiency. |
| Ozone Plate Cleaning |
Monthly |
Use mild detergent and warm water to remove residue from plates, then dry completely before reuse. |
| Interior and Fan Cleaning |
Every 3–6 months |
Remove dust and buildup from internal components and fan blades to prevent overheating or performance drops. |
| Electrical Connections Check |
Every 6 months |
Ensure wiring is secure and that there are no signs of corrosion or damage. |
| Exterior Cleaning |
As needed |
Wipe down the exterior with a soft, damp cloth to prevent dust accumulation. |
| Overall Inspection |
Annually |
Conduct a full system check to identify any signs of wear, electrical issues, or needed part replacements. |
🔍 Notes & Best Practices
- Always unplug your unit and let it cool down completely before doing any maintenance.
- Refer to your manufacturer’s manual for any brand-specific cleaning steps or part compatibility.
- Handle ozone plates with care—they can be fragile and costly to replace.
- Staying on top of these tasks helps prevent performance drops and extends the overall life of the machine.
📌 If your ozone generator is being used frequently for tough jobs—like treating smoke or mold after a storm—consider pairing it with a more permanent system like a UV light in HVAC system to reduce how often deep ozone treatments are needed.
What Can an Ozone Generator Damage?
Ozone is a powerful oxidizer. That’s exactly why it removes stubborn odors—but it’s also why it can slowly damage certain materials if they’re repeatedly exposed to high ozone concentrations.
For most homeowners using an ozone generator occasionally, this isn’t a major concern. But if you’re treating the same room regularly or running long, high-output treatments, it’s worth knowing what should be removed or protected beforehand.
Rubber and Elastic Materials
Rubber is one of the materials most sensitive to ozone. Over time, repeated exposure can cause rubber to dry out, crack, become brittle, or lose its flexibility.
This includes:
- Door and window weatherstripping
- Rubber seals
- Exercise bands
- Elastic straps
- Foam-backed rubber products
One occasional treatment probably won’t cause noticeable damage, but repeated commercial-strength treatments can shorten the life of these materials.
Leather
Leather furniture, jackets, shoes, and handbags generally tolerate occasional ozone exposure, but repeated treatments may dry the material and contribute to premature aging.
If valuable leather items can be removed from the room, it’s usually a good idea to do so.
Clothing and Fabrics
Most everyday clothing won’t be ruined by a single ozone treatment. However, delicate fabrics, vintage clothing, silk, wool, and garments containing elastic may gradually deteriorate after repeated exposure.
If you’re specifically treating clothing, closets, or stored fabrics, it’s worth understanding both the benefits and the risks. Read our guide on how ozone generators can affect clothing and fabrics.
Artwork and Collectibles
Paintings, photographs, old books, antiques, and collectible items may contain delicate papers, inks, adhesives, varnishes, or natural materials that can be affected by repeated oxidation.
If an item is valuable or irreplaceable, it’s safest to remove it before treatment whenever possible.
Electronics
Most modern electronics can tolerate occasional residential ozone treatments, but manufacturers generally do not recommend prolonged exposure to high ozone concentrations.
Computers, televisions, stereo equipment, and other electronics contain rubber seals, adhesives, and electrical contacts that may slowly degrade after repeated commercial-strength treatments.
If practical, unplug sensitive electronics and remove portable devices before treating the room.
Houseplants
Living plants are particularly sensitive to ozone. Exposure can damage leaves, reduce growth, and stress the plant even if the treatment is relatively short.
Always move houseplants to another area before running an ozone generator.
Should You Be Worried?
For most homeowners, the answer is probably not.
If you’re using an ozone generator once or twice to remove smoke, pet odors, or a musty smell, you’re unlikely to notice damage to most household items. The concern grows when ozone generators are used frequently, for long treatment times, or at very high output levels.
A simple rule of thumb is this: if something is valuable, delicate, made of natural materials, or contains rubber or elastic, remove it if you reasonably can. It’s much easier to move an item for a few hours than to wonder later whether repeated ozone exposure shortened its lifespan.
Frequently Asked Questions (FAQ)
Safety & Usage
Q: Are ozone generators safe to use at home?
A: Yes—but only when they’re used correctly. Ozone generators should only be operated in unoccupied spaces. People, pets, and plants should leave the area during treatment, and the room should be thoroughly ventilated before anyone returns.
Q: Can I stay in the room while the ozone generator is running?
A: No. Breathing elevated ozone concentrations can irritate your lungs and airways. Always leave the room immediately after starting the treatment.
Q: What should I do if I accidentally breathe ozone?
A: Leave the area immediately and get to fresh air. Mild exposure may cause coughing, throat irritation, or chest discomfort. If symptoms are severe or don’t improve, seek medical attention. Read our complete guide on ozone exposure.
Q: How long should I wait before going back into the room?
A: It depends on the size of the treatment and ventilation, but you should always allow time for the ozone to dissipate before reentering. Learn how long ozone lasts and when it’s safe to return.
Buying & Using an Ozone Generator
Q: What size ozone generator do I need?
A: The right size depends on the room and the problem you’re trying to solve. Small bathrooms need much less ozone than a smoke-damaged basement. Use our ozone generator sizing guide.
Q: Can I use one ozone generator for my whole house?
A: Usually it’s better to treat individual rooms rather than the entire home. Smaller, targeted treatments are easier to control and ventilate afterward.
Q: Should I rent an ozone generator or buy one?
A: If you only need ozone for a one-time cleanup, renting may make sense. If you expect to use it several times over the coming years, buying is often more economical. Compare renting vs. buying.
Q: What’s the difference between an ozone generator and an air purifier?
A: Air purifiers capture particles such as dust and pollen using filters. Ozone generators chemically react with odor molecules. They solve different problems and are not interchangeable. Read the full comparison.
Can Ozone Remove…
Q: Can ozone remove cigarette smoke?
A: Yes, ozone can be very effective at reducing lingering cigarette smoke odors after the smoke residue has been cleaned. It is most effective as the final step in the cleanup process. Read more.
Q: Can ozone remove cat urine smell?
A: Sometimes. Ozone can reduce lingering odors, but it cannot remove urine that’s still trapped in carpet padding, wood, or concrete. Learn more.
Q: Can ozone remove mold smell?
A: Yes, it can reduce musty odors, but it won’t eliminate active mold or fix the moisture problem causing it. Read the complete guide.
Q: Can ozone remove cooking odors?
A: Yes. Ozone can help eliminate stubborn cooking smells that remain after normal cleaning and ventilation. Learn when it works best.
Q: Can ozone remove skunk smell?
A: It can help remove lingering skunk odors after contaminated surfaces have been cleaned, but it won’t replace washing away the skunk oils themselves. Read more.
Q: Can ozone remove VOCs from paint or new furniture?
A: Sometimes, but it’s not always the best solution. Ventilation and source control are usually more important than ozone treatment. Learn more about ozone and VOCs.
Q: Can ozone help with allergies or dust?
A: No. Ozone doesn’t remove dust, pollen, or pet dander from the air. A HEPA air purifier is usually the better choice. Read why.
Q: Can ozone kill bed bugs?
A: No. Ozone is not considered a reliable treatment for bed bug infestations. Proven pest-control methods are much more effective. Learn why.
Q: Can ozone kill viruses indoors?
A: While ozone can inactivate some viruses under controlled conditions, the concentrations required are generally unsafe for occupied spaces. Read more about ozone and viruses.
Troubleshooting Guide
If your ozone generator isn’t working as expected, here are common issues and how to fix them:
Power & Startup Issues
Problem: Generator won’t turn on
✅ Check if it’s plugged into a working outlet
✅ Inspect the power cord for damage
✅ Look for safety switches or loose components that prevent startup
Performance Issues
Problem: Reduced ozone output
✅ Clean the ozone plates (they may have buildup)
✅ Ensure air vents and filters aren’t blocked
✅ Consider humidity—ozone output drops in high humidity environments
Problem: Persistent odors after treatment
✅ Increase treatment duration
✅ Boost ozone output if adjustable
✅ Repeat treatment cycles if needed
Problem: Ozone smell lingers too long
✅ Improve room ventilation
✅ Use shorter treatment times
✅ Check that the generator isn’t oversized for the space
Mechanical Issues
Problem: Strange noises
✅ Clean the fan and check for obstructions
✅ Tighten loose screws or components
Problem: Overheating
✅ Allow time to cool down between sessions
✅ Ensure vents are clear and device isn’t near heat sources
Problem: Sparks or electrical smell
❌ Unplug the unit immediately
☎️ Contact the manufacturer or a certified electrician—do not attempt repair yourself
Complementary Products to Use with Ozone Generators
To boost air quality and maintain freshness between ozone treatments, consider combining your generator with the following tools:
1. HEPA Air Purifiers
What They Do: Trap airborne particles like dust, pollen, and allergens down to 0.3 microns
Why It Helps: While ozone kills odors and microbes, HEPA purifiers filter the physical debris left behind.
2. Activated Charcoal Filters
What They Do: Absorb odors, gases, and VOCs
Why It Helps: These work great in conjunction with ozone, catching leftover chemicals or smells.
3. UV Light Systems
What They Do: Kill bacteria and viruses with UV-C light
Why It Helps: Provide passive air sanitation between ozone treatments. Learn more in our article on UV lights in HVAC.
4. Essential Oil Diffusers
What They Do: Add pleasant scents and may offer mild antimicrobial effects
Why It Helps: Great for freshening air naturally after ozone dissipates
5. Proper Ventilation
What It Does: Improves airflow and reduces pollutant buildup
Why It Helps: Helps ozone clear faster post-treatment. Use with open windows or in fan mode on your AC.
6. Humidity Control (Dehumidifiers or Humidifiers)
What They Do: Keep indoor humidity at optimal levels
Why It Helps: Reduces conditions that cause mildew and odor buildup
7. Indoor Plants
What They Do: Absorb pollutants and increase oxygen levels
Why It Helps: Offers a passive, natural form of air purification that works well alongside occasional ozone treatments
8. Baking Soda
What It Does: Absorbs mild household odors
Why It Helps: Great for maintenance between ozone sessions—use in trash cans, fridges, or on carpets
When an Ozone Generator Isn’t the Best Choice
Ozone generators are excellent at solving certain odor problems, but they are not the answer to every indoor air quality issue. In many situations, another technology is safer, more practical, or simply does a better job.
If you’re not sure whether ozone is the right tool, here’s a quick comparison.
Choose an Air Purifier If…
- You have allergies.
- You want cleaner air every day.
- You need to remove dust, pollen, or pet dander.
- People or pets will remain in the room.
Unlike ozone generators, HEPA air purifiers are designed to operate while people are occupying the space. They physically capture airborne particles instead of chemically reacting with them.
Compare ozone generators and air purifiers.
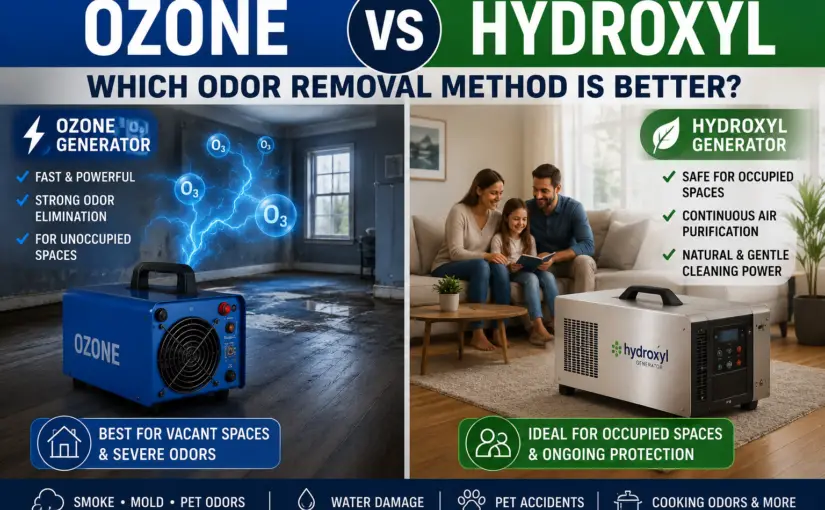
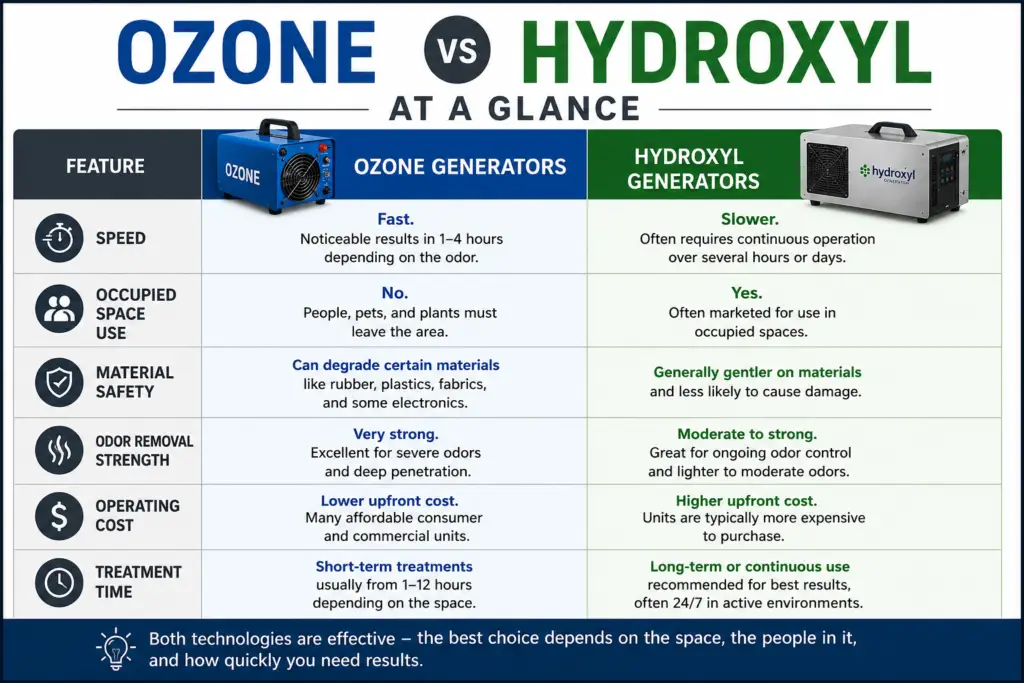
Choose a Hydroxyl Generator If…
- The building cannot be vacated.
- You need odor control while people continue working.
- You’re treating businesses, hospitals, schools, or occupied homes.
Hydroxyl generators work much more slowly than ozone generators, but they can often be used safely in occupied spaces. Many restoration companies use hydroxyl technology when evacuation isn’t practical.
Learn when a hydroxyl generator is the better choice.
Choose an Ionizer If…
- Your goal is reducing airborne particles.
- You want cleaner air rather than aggressive odor removal.
- You’re comparing different air-cleaning technologies.
Some people confuse ionizers with ozone generators because certain ionizers can produce small amounts of ozone. However, they are designed for different purposes and should not be considered interchangeable.
See the differences between ionizers and ozone generators.
Choose UV Air Treatment If…
- You want continuous treatment inside your HVAC system.
- You’re trying to reduce biological growth on coils.
- You prefer a low-maintenance solution that works automatically.
UV lights don’t remove smoke or pet odors like ozone can, but they can help control biological growth inside heating and cooling systems without requiring homeowners to leave the building.
If your primary concern is maintaining HVAC air quality rather than removing severe odors, UV treatment may be the better long-term investment.
So Which One Is Best?
The answer depends entirely on the problem you’re trying to solve.
| If Your Goal Is… |
Best Choice |
| Remove stubborn smoke or pet odors |
Ozone Generator |
| Clean everyday indoor air |
HEPA Air Purifier |
| Treat odors while people remain inside |
Hydroxyl Generator |
| Reduce airborne particles |
Ionizer or Air Purifier |
| Improve HVAC air quality |
UV Air Treatment |
The important thing to remember is that ozone isn’t better than these technologies—it simply solves a different problem. Choosing the right tool for the job usually produces better results than trying to make one technology solve every indoor air quality issue.
Final Thoughts
Ozone generators are powerful tools that can transform your indoor air—when used responsibly. From choosing the right output level to following essential safety steps, it’s all about balancing effectiveness with caution. Whether you’re targeting stubborn smoke smells, battling mold, or just freshening up a space, knowing how to use your machine the right way makes all the difference.
If you’re still exploring air purification options, be sure to check out our guides on UV lights in HVAC and mold prevention strategies.
Continue Your Ozone Learning
Whether you’re buying your first ozone generator, trying to remove a stubborn odor, or learning how to use ozone safely, these guides will help you go deeper into the topics that matter most.
🛒 Buying Guides
🛡️ Safety & Best Practices
🏠 Odor Removal Guides
⚖️ Comparisons
⭐ Product Reviews
🔬 Special Topics
Trusted Resources for Ozone Safety
While this guide focuses on helping homeowners use ozone generators safely and effectively, these organizations provide additional research and safety information if you’d like to learn more.
These organizations don’t sell ozone generators. Their information is based on scientific research and safety guidance, making them valuable resources if you’re deciding whether an ozone generator is appropriate for your situation.


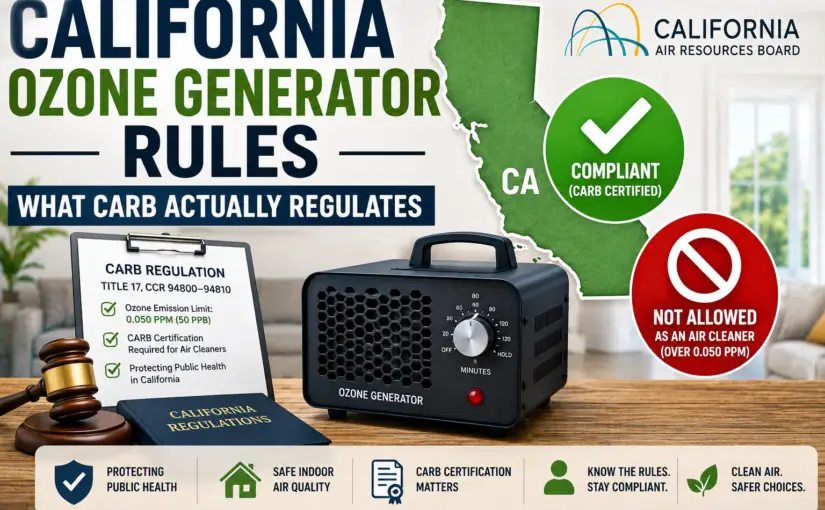
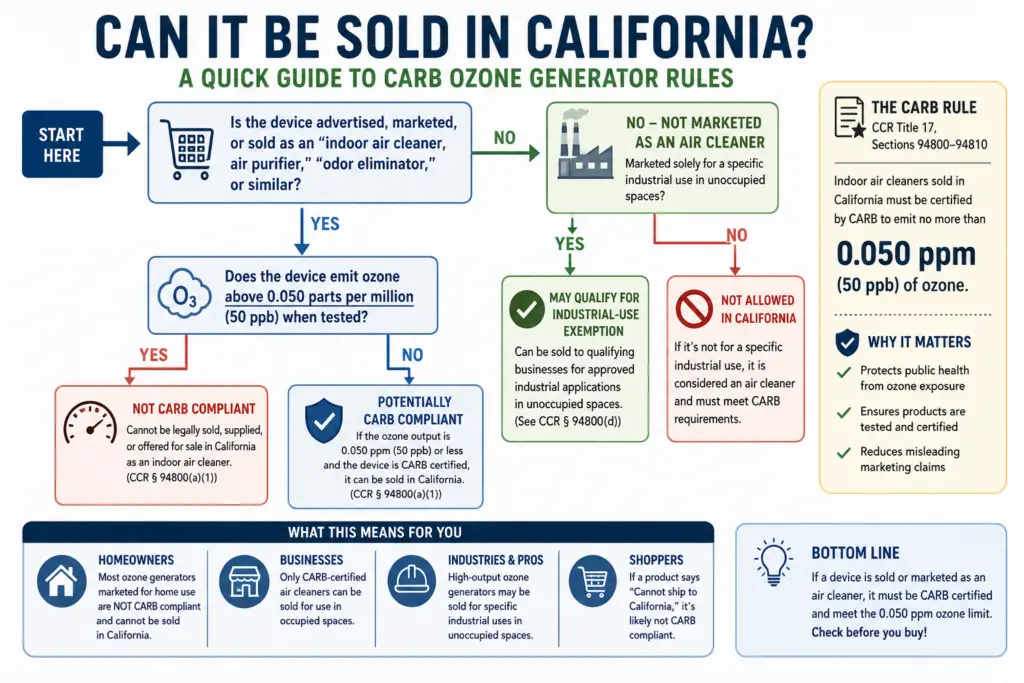
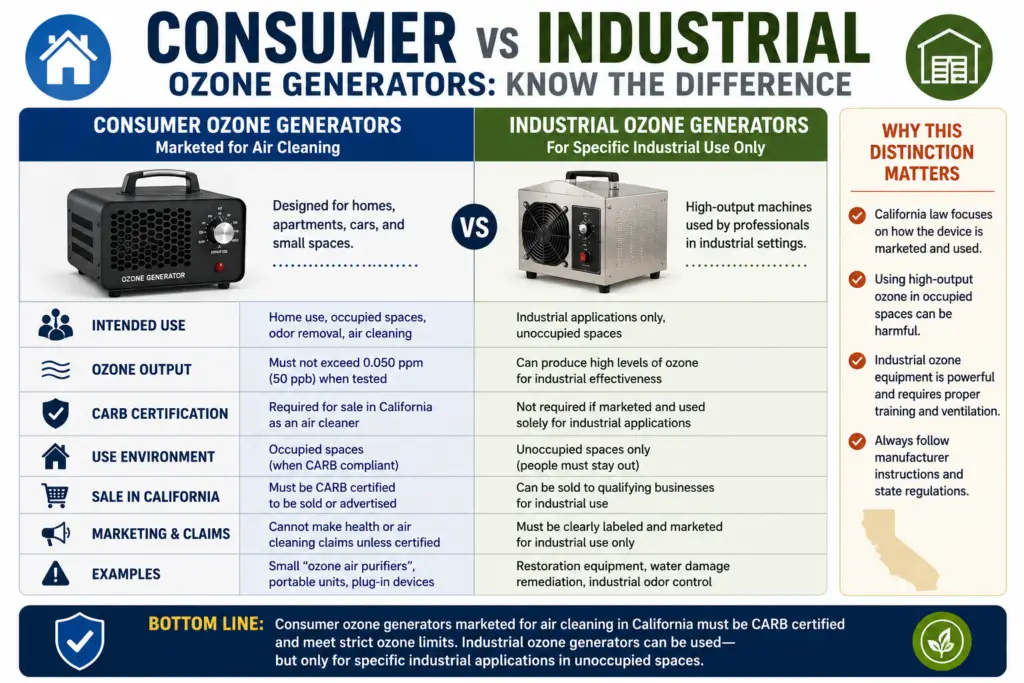 CARB-Certified Air Purifiers vs Ozone Generators