
Warm Mist Humidifier – Benefits and Impediments

The humidity in your home has so many direct benefits to your respiratory and skin health but you don’t even notice till the air is dry.

And regardless of the temperature of the humidity, moisture is moisture and you will reap the benefits of a humidifier all the same.

But is there any advantage to choosing a warm mist humidifier other than a cool mist?

What are the benefits of using a warm mist humidifier?

1. Kills bacteria and mold
2. Relieve nasal congestion
3. Good for additives like Vicks and eucalyptus
4. Will warm up a cool room
5. Silent
6. Less hard water buildup and fewer particles released into the air

Don’t miss our in-depth Humidifier Guide.

1. Kills bacteria and mold

Warm mist humidifiers have a built-in advantage to keeping bacteria and mold from forming in and around the humidifier.

What is it?
Heat. Since the water and a warm mist humidifier or vaporizer is heated to a boiling point to create steam, bacteria and mold are a much smaller problem than with a cool mist humidifier because they simply cannot survive the heat.

Does that absolve them of regular cleaning? Not exactly. Any appliance like a humidifier, diffuser, dehumidifier, or air cooler that has a chance for water to be left standing inside it for even a small amount of time can and do have a tendency to grow bacteria in the water.

The chance for bacteria becoming a problem in a warm mist humidifier maybe smaller but it still exists and should not be taken lightly.

2. Relieve congestion

If you have ever sit in a sauna, then you know the feeling of steam opening up your airways.
For many people, steam has a relieving feeling on their nasal passages and opens up their airways nicely when they are stopped up with congestion.

3. Good for Additives like Vicks and Eucalyptus

The combination of warm mist and Vicks congestion medicine can make you feel so much better when you are down sick that there is a whole line of Vicks warm mist vaporizers that have been created and sold just for that.

Other essential oils like eucalyptus and peppermint can also be used in conjunction with warm mist and steam to help break up phlegm and open up your airways to breathe better.

4. Warm a Room Up

Warm mist humidifiers will warm up a space and make it more comfortable when the temperature is chilly.

5. Silent

Warm mist humidifiers and vaporizers are completely silent.

6. Less hard water buildup and particles released into the air

Boiling water has the advantage of separating minerals out of hard water. Which can mean that there is less hard water buildup around your humidifier and less mineral particles that can be emitted into the air when you are using the humidifier.

warm mist humidifierWhat’s not to love?

Well there are a few things…

Disadvantages of warm mist humidifiers

1. Creates a swampy atmosphere
2. Not everyone experiences nasal relief from steam
3. Can be dangerous

1.Create a Swampy Atmosphere

Warm mist humidifiers can make a room feel swampy. Humidity is not always the most comfortable feeling especially when the temperature is hot.

And when you’re feeling sick, that steamy feeling is not always welcomed.

2. Not everyone experiences relief from steam.

When the air is dry, adding humidity to the air regardless of the temperature of the humidity will moisten your nasal passages as well as your skin and so forth.
But cool mist can offer more relief sometimes than warm.
Mayo clinic indicates that cool mist can be more of a relief for a cold than warm, but more research is needed.

3. Can Be Dangerous

Warm mist humidifiers heat water to a boiling point as a means of creating steam to humidify the room.

That means that the water would be scalding hot if it were to spill on someone.

That’s why you will find a universal warning on vaporizers that they should not be used in the baby or children’s rooms.

Hot and Cold Combination Humidifiers

There is really no reason to pit a warm mist humidifier up against a cool mist humidifier. There are specific advantages to using both and they both have their disadvantages.

There are many times when you need a vapor machine to help you breathe better immediately, but don’t need the vapor on throughout the night.

There’s also times when the warm mist feels good, but that doesn’t mean you want to sleep in a steamy room.

Modern humidifiers like the Levoit 6L give you the advantage of being able to use the humidifier as a warm mist or cool.

Being able to diffuse essential oils with these humidifiers is a basic feature anymore.
They can be filled from the top, set on auto and left alone, and
They also have the capacity to schedule and turn them off and on via a smart app that can be used with Alexa or Google Assistant.

Humidifiers like Air Innovations are made from mold resistant materials and can also have ultraviolet lamps that target the water to keep mold and bacteria from ever becoming an issue.

warm mist humidifier disadvantageRecap.

Warm mist humidifiers have specific benefits that you do not get with a cool mist humidifier.

They have the advantage of heating water to a temperature that automatically reduces any bacteria, germ growth or mold that can take root inside of a humidifier.

They also work very well for disseminating essential oils like eucalyptus and peppermint and work great with Vicks. So much so that Vicks has their own vaporizer meant to do just that.

And many people consider steam to be more of a relief to swollen and dried nasal passages with congestion then using cool mist.

And you can’t beat the fact that they are completely silent.

But on the flip side,..

Not everyone likes the feeling of hot humidity especially when they are sick and trying to sleep.

And there is the issue of being dangerous because of the temperature of the water that they create.

Warm mist humidifiers are never recommended for the children’s room where they can get bumped and accidentally spill.

Best of Both Worlds

Humidifiers like the Levoit 6l give you the advantage of being able to operate the humidifier as a warm or a mist humidifier.

There are times when using vapor to disseminate essential oils can be an awesome way to open up your airways but that doesn’t mean that you want to sleep in a steamy room.

Having the option to use the vapor and then turn the humidifier on cool for the rest of the night while you sleep is a great feature/benefit.

This new style of humidifiers also comes with built-in hygrometers and humidistats that allow you to set and leave your humidifier knowing that it will elevate the humidity and turn off when the appropriate humidity is reached.

Most have the option of being able to fill them from the top as well as operate them from your smartphone or an Alexa or Google Assistant.

Humidifiers like Air Innovations also have the advantage of being made from mold resistant materials that resist bacteria and create a much safer humidifier.
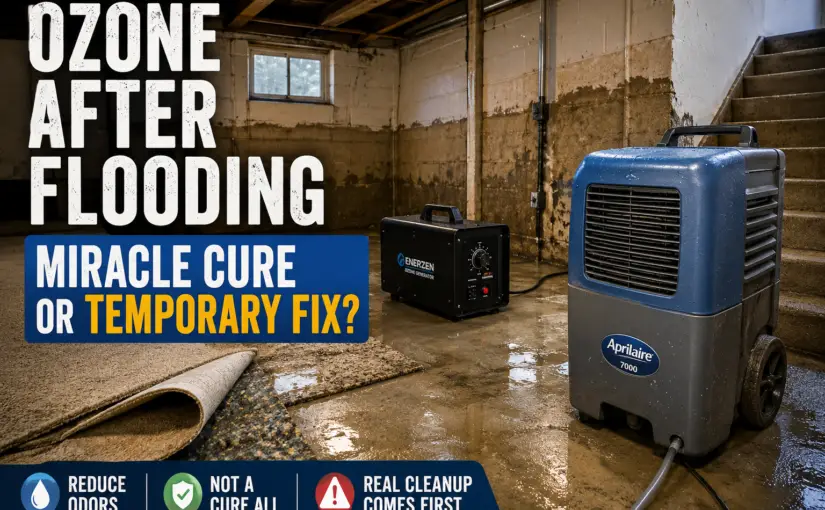
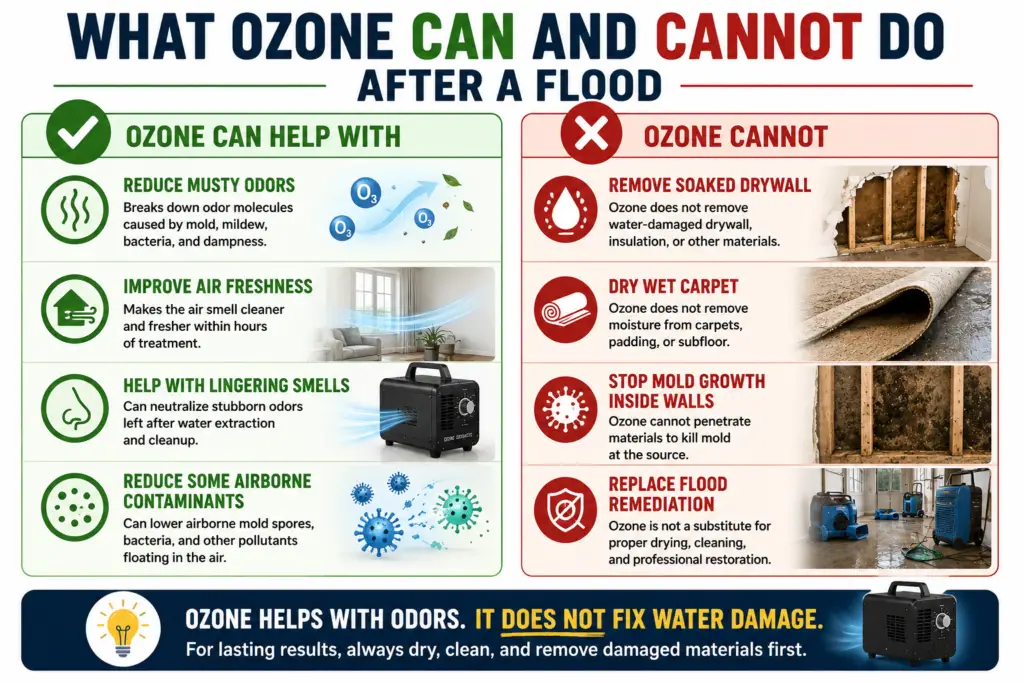
Ozone After Flooding: Miracle Cure or Temporary Cover-Up?

Quick Answer: Ozone can reduce musty flood odors, but a fresher smell doesn’t always mean the problem is solved. Many homeowners are surprised to learn that mold growth and water damage can continue even after the odor seems to disappear.

Ozone After Flooding: Miracle Cure or Temporary Cover-Up?

Maybe you’ve had flooding in the house or worse. Storms and heavy rains have caused historic damage in recent years, and the aftermath can feel overwhelming. Once the water recedes, you’re left with soaked carpets, musty walls, and a smell that refuses to go away. It’s natural to wish for a shortcut — and that’s where ozone generators seem like they might help.

Brands like Enerzen, Airthereal, and OdorStop sell machines that promise to “shock” away stubborn odors from mold, mildew, and bacteria. Commercial providers such as Ozone Solutions even market ozone treatment as part of professional water-damage cleanup. And in theory, ozone works: it breaks apart odor molecules and makes a flooded house smell cleaner within hours. But here’s the catch — agencies like the EPA and CDC caution that ozone doesn’t remove soaked materials or kill mold at the source. Without drying, cleaning, and often professional remediation, the smell — and the health risks — come right back.

Flood recovery is the ultimate test for any air treatment tool. If you’re new to ozone generators, start with our Ozone Generator Starter Guide. It explains how ozone works, when to use it, and how to use it safely before choosing a machine.

What Can You Get Out of an Ozone Generator After a Flood?

An ozone generator can break down the odors left behind by soaked drywall, wet carpet, and bacteria in the air. That’s its main strength. Within a few hours of treatment, the air often smells fresher — and that’s a big relief in the middle of a messy cleanup. Machines from Enerzen or Airthereal make this process easy enough for DIY use, while commercial units from Ozone Solutions are built for restoration companies.

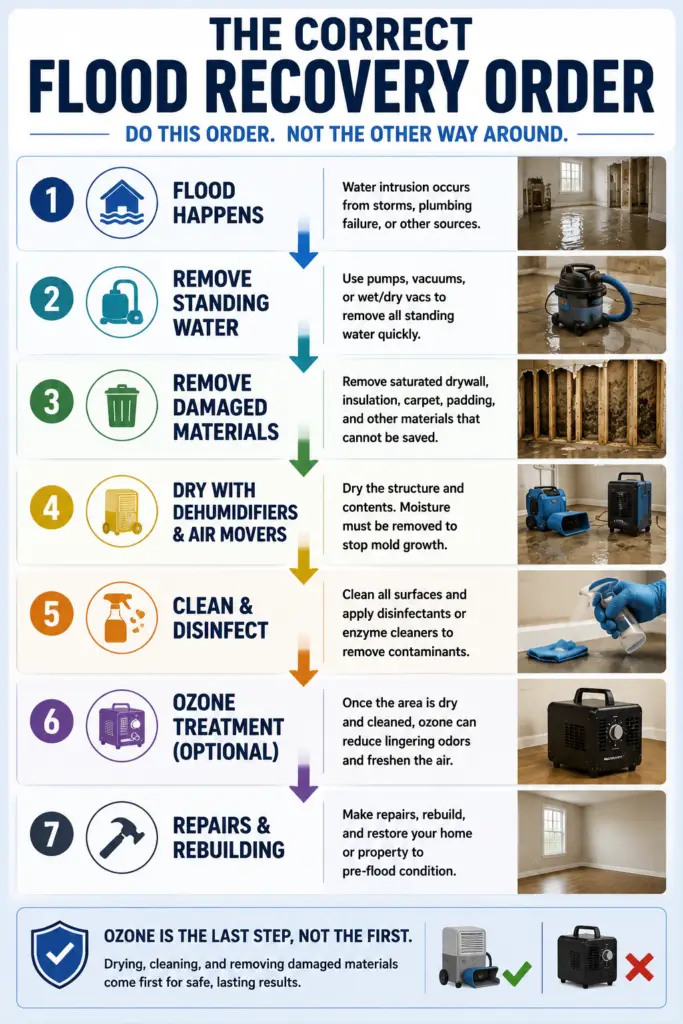
The truth is that using an ozone generator is about 99% odor control. Ozone can also knock down airborne mold spores floating in the room, but that’s not the same as removing the actual mold growing inside walls or under flooring. Where ozone does help is after the heavy flood cleanup work has already been done — once the water is pumped out, soaked materials are removed, and the space has been dried. At that stage, ozone can freshen the air and reduce lingering musty odors, making the home feel more livable while longer-term repairs continue. But it should be seen as a finishing touch, not the main cleanup tool.

The easiest way to think about ozone after flooding is to separate what it can help with from what it can’t.

Flood cleanup infographic showing how ozone can reduce musty odors but cannot dry wet materials, remove water damage, or stop mold growth inside walls

It Seems Great… But Here’s the Catch

The problem is that ozone works on smells, not on the soaked materials causing them. The EPA and OSHA warn that ozone is a lung irritant and does not kill mold growing deep inside wet wood or drywall. It also doesn’t remove contaminants like mud or sewage that floods often leave behind. So while your nose may say “problem solved,” the actual damage is still there — and it can come back worse if it isn’t dealt with properly.
Flood cleanup process infographic showing why ozone treatment should be used after water removal, drying, dehumidification, and cleaning

Here’s What You’re More Likely Looking At

Flood cleanup isn’t just about odors. It’s about moisture, mold, and long-term health. This means cutting out water-soaked drywall, pulling up carpet, and using tools like dehumidifiers and air scrubbers to dry the air. If you don’t, mold spores spread quickly and can trigger allergies, asthma, or worse. That’s why groups like the IICRC (Institute of Inspection Cleaning and Restoration Certification) emphasize drying first, deodorizing second.

Other Devices That Can Help

    • HEPA air scrubbers – Machines from brands like BlueDri and Abatement Technologies capture mold spores and dust directly from the air.
    • Dehumidifiers – Units from Frigidaire or Aprilaire pull gallons of water out of the air daily, helping stop mold growth before it takes hold.
    • Enzyme cleaners – Products like RMR-86 and Concrobium Mold Control actually break down organic growth on surfaces instead of masking it.

For restoration projects where you cannot fully vacate the property, you might want to compare ozone and hydroxyl generators to find a safer professional alternative for occupied homes.

In the End: Pro vs DIY

You can run an ozone generator yourself, and it may give you a short break from the musty smell after a flood. But real cleanup takes more than ozone. Professionals not only use ozone and HEPA equipment, they also know how to safely tear out damaged materials and treat mold at its source. If you’re dealing with a small basement leak, DIY with an OdorStop machine and a strong dehumidifier may help. But if water damage covers multiple rooms or involves sewage, hiring certified pros is the only way to protect your home — and your health — for the long run.
If you are dealing with a manageable leak and want to choose a machine for your own toolkit, you can compare our recommended ozone generators for home use

Ozone vs Other Flood Cleanup Tools

Method What It Does Best For Limits
Ozone Generator Neutralizes odors by breaking down molecules in the air. Temporary odor relief after cleanup. Does not dry, disinfect, or remove mold at the source.
HEPA Air Scrubber Physically captures mold spores, dust, and contaminants. Improving indoor air quality during cleanup. Does not remove moisture or deep odors.
Dehumidifier Pulls moisture from the air to stop mold growth. Drying out basements, carpets, and drywall. Needs continuous power and daily draining or pump-out.
Enzyme Cleaners Break down organic matter like mold or pet urine. Spot-treating walls, floors, and carpets. Surface-level only; not effective for hidden water damage.
Professional Remediation Certified pros remove damaged materials and use pro-grade drying equipment. Large-scale flooding, sewage, or long-standing water damage. Costs more than DIY methods.

FAQ: Ozone Generators and Flood Cleanup

Can ozone remove the musty smell after a flood?
Yes, but only temporarily. Ozone can break down odor molecules in the air and make the house smell fresher, but if carpets, drywall, or wood remain damp, the musty smell will return.

Does ozone kill mold from flooding?
Not effectively. Ozone may reduce airborne spores, but it cannot penetrate soaked building materials to stop mold growth. Mold remediation requires removing and drying affected materials.

When should I use ozone after a flood?
Ozone should only be used after the main cleanup — once standing water is gone, damaged materials are removed, and the space is dry. At that point, ozone can help reduce lingering odors.

How long should an ozone generator run after water damage?
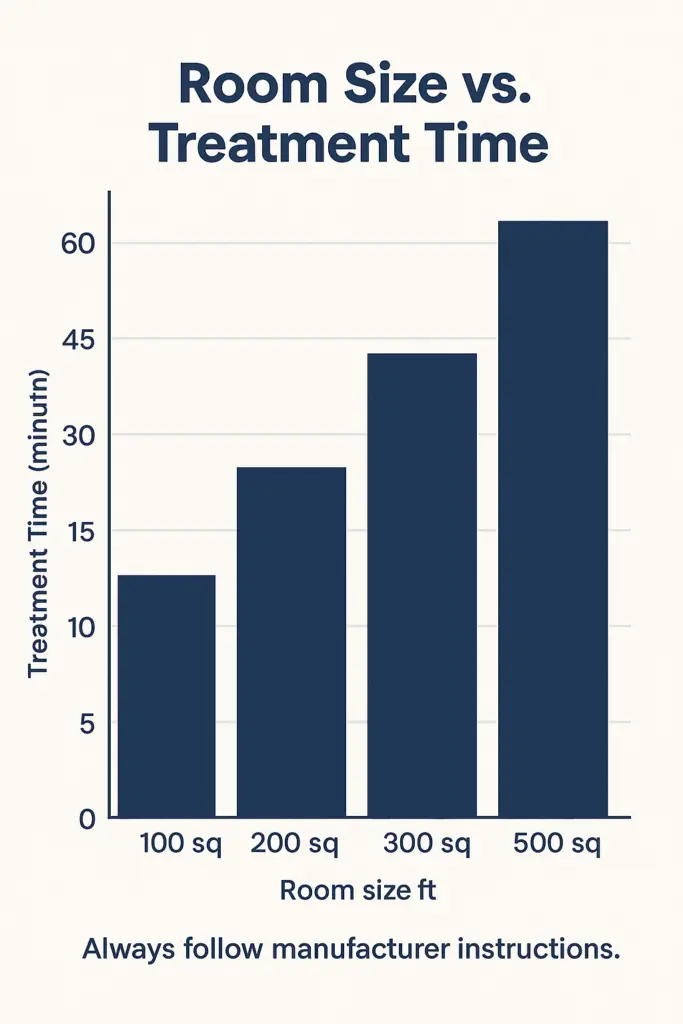
Most consumer units (like those from Enerzen or Airthereal) are run for a few hours at a time in sealed rooms. Large commercial units may run longer, but treatment times vary depending on room size and odor strength.

Is ozone better than a dehumidifier for flood cleanup?
No. A dehumidifier actually dries out the space and prevents mold growth, which is essential after flooding. Ozone only helps with odors, so it should be considered a secondary step, not a replacement.

Read More About Ozone Generators

If you’re researching ozone generators, ozone safety, or ozone treatments for homes and vehicles, these articles may be helpful:

Ozone for Bed Bugs: Why It Doesn’t Work — and What Actually Does

Ozone can kill bed bugs — but only at levels far too dangerous for people or pets. While ozone gas is powerful enough to destroy bacteria, mold, and odors, the concentrations required to eliminate bed bugs would make a home uninhabitable. Heat, steam, and encasements are far safer and far more effective solutions.

Ozone Seems Like a Quick Fix — But Bed Bugs Aren’t

When you first discover bed bugs, it’s tempting to reach for an ozone generator. After all, ozone can kill bacteria, neutralize odors, and wipe out mold. So why not bed bugs?

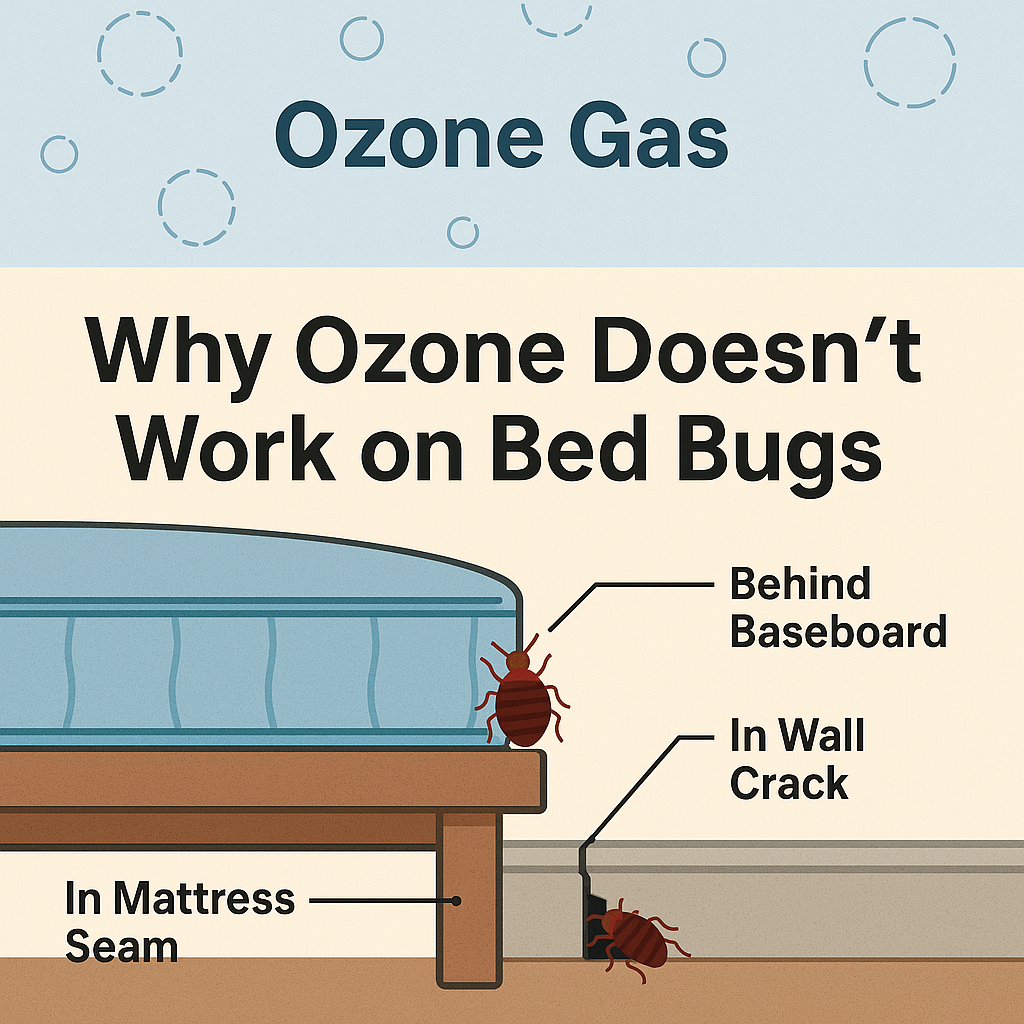
The problem is that ozone doesn’t reach where bed bugs live — deep inside mattress seams, wall cracks, and clothing folds. Even powerful commercial units can’t penetrate far enough without filling the air with unsafe levels of ozone gas.

While ozone is the wrong tool for pests, it remains the gold standard for removing the odors they leave behind. If you’re new to ozone generators, start with our Ozone Generator Starter Guide. It explains how ozone works, when to use it, and how to use it safely before choosing a machine.

Warning: Ozone might seem like a fast solution, but bed bugs rarely are. Even with perfect cleaning and treatments, it usually takes several weeks to fully reclaim your bed and bedroom.

So if ozone isn’t the answer, what’s really going on with bed bugs — and how do you get your life back?

Cutaway diagram showing ozone gas in open air while bed bugs hide inside mattress seams and wall cracks.Bed Bugs 101: Why They’re a Problem, Where They Hide, and Why Clothes Matter
Why Bed Bugs Are a Big Deal

Bed bugs don’t spread disease, but they do cause itchy bites, sleepless nights, and stress that can wear you down fast. Their bites often appear in clusters or rows, usually on arms, legs, or the neck. Some people have no reaction, while others get red, swollen welts that take days to heal.

The worst part? They’re patient. Bed bugs can live months without feeding, waiting quietly until you lie down again. For a medical overview of symptoms and identification, see the CDC’s guidance: CDC: Bed Bugs.

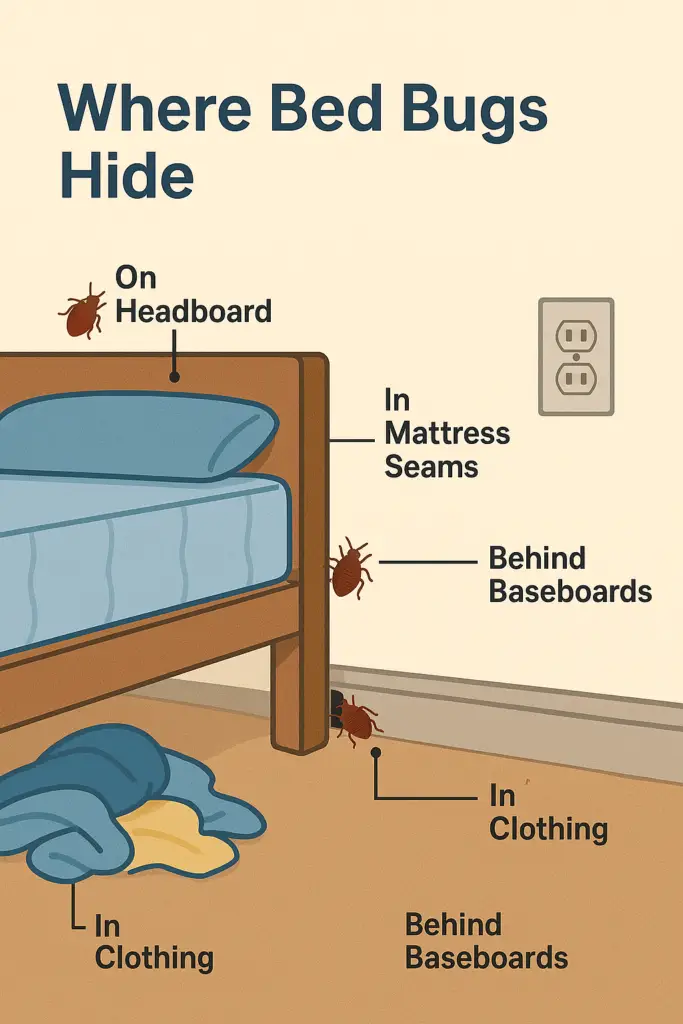
Where Bed Bugs Hide

Bed bugs are master hiders. They squeeze into paper-thin spaces and prefer places near where people sleep. Typical hiding spots include:

  • Mattress seams and box spring fabric
  • Behind headboards and baseboards
  • Inside screw holes, wall outlets, and picture frames
  • Under loose wallpaper, rugs, or carpet edges
  • In dresser drawers, nightstands, and even book bindings
  • Inside clothing and laundry piles near beds or chairs

Educational graphic labeling common hiding spots for bed bugs — mattress seams, baseboards, clothing, and wall outlets.For a detailed, practical field guide, see EPA: Bed Bugs and the University of Minnesota Extension’s excellent overview: UMN Extension: Bed Bugs.
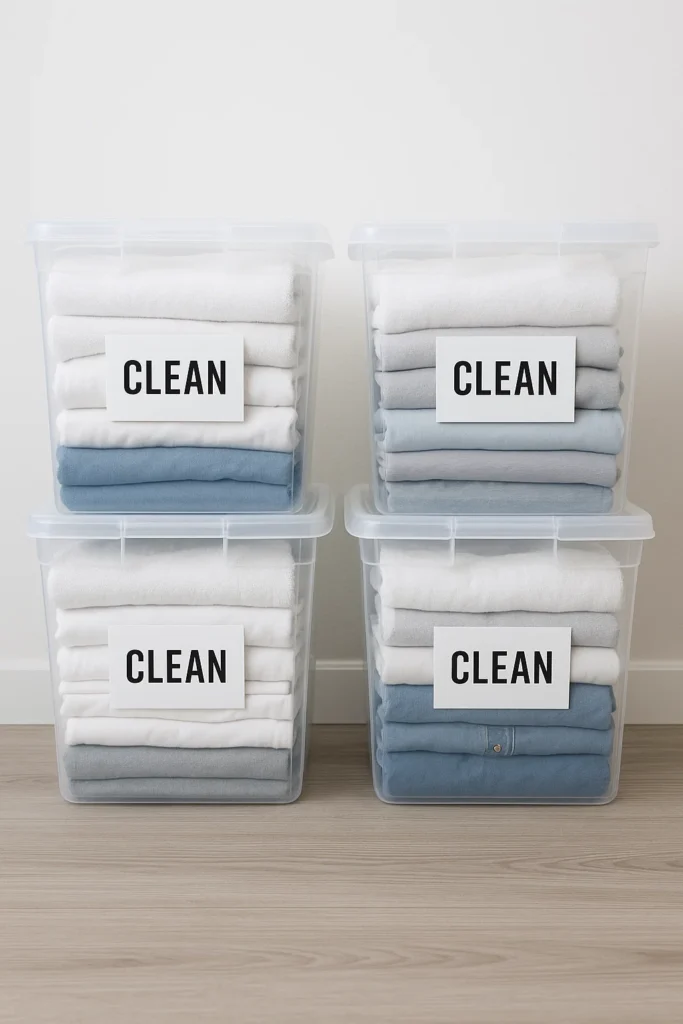
Why Clothes Are Such a Big Issue

Clothing gives bed bugs warmth, texture, and scent — all things they seek. They cling to worn items, hide in cuffs, and hitchhike to other rooms or even other homes. A single infested hoodie or blanket can reintroduce bed bugs weeks after you thought they were gone.

That’s why washing and sealing clothes is a crucial step. You’re cutting off one of their best hiding and travel routes.

Freshly washed clothes stored in clear plastic bins labeled clean during bed bug treatment.What Actually Works to Get Rid of Bed Bugs
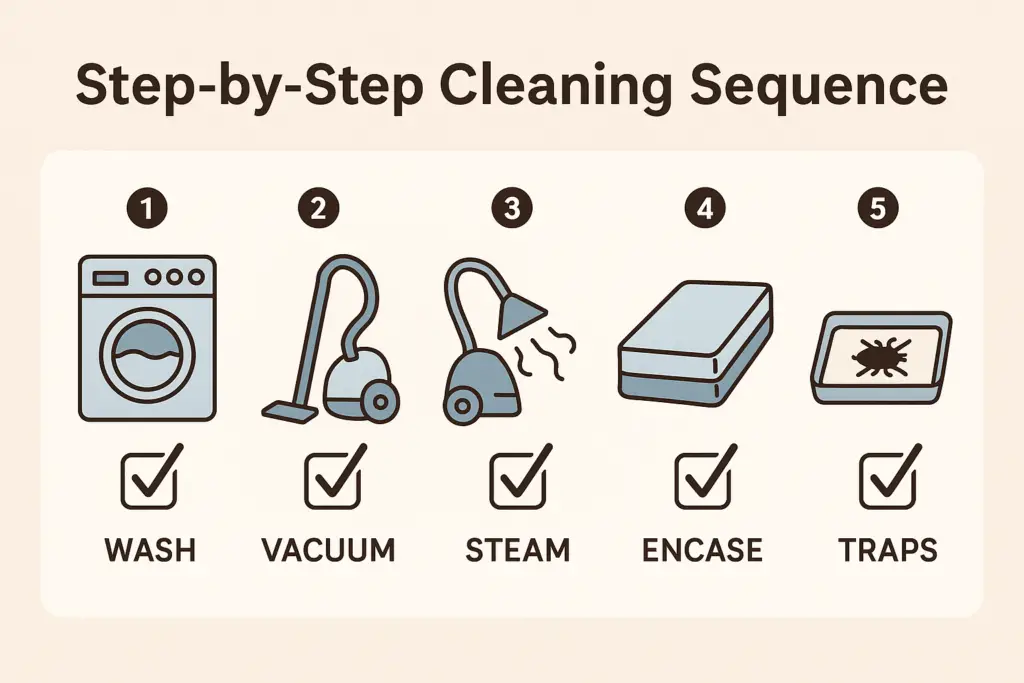
Here’s the complete, realistic process — not a one-day trick, but a plan that works.

Visual checklist showing washing, vacuuming, steaming, encasing, and setting traps to remove bed bugs.Step 1: Contain and Clean Everything

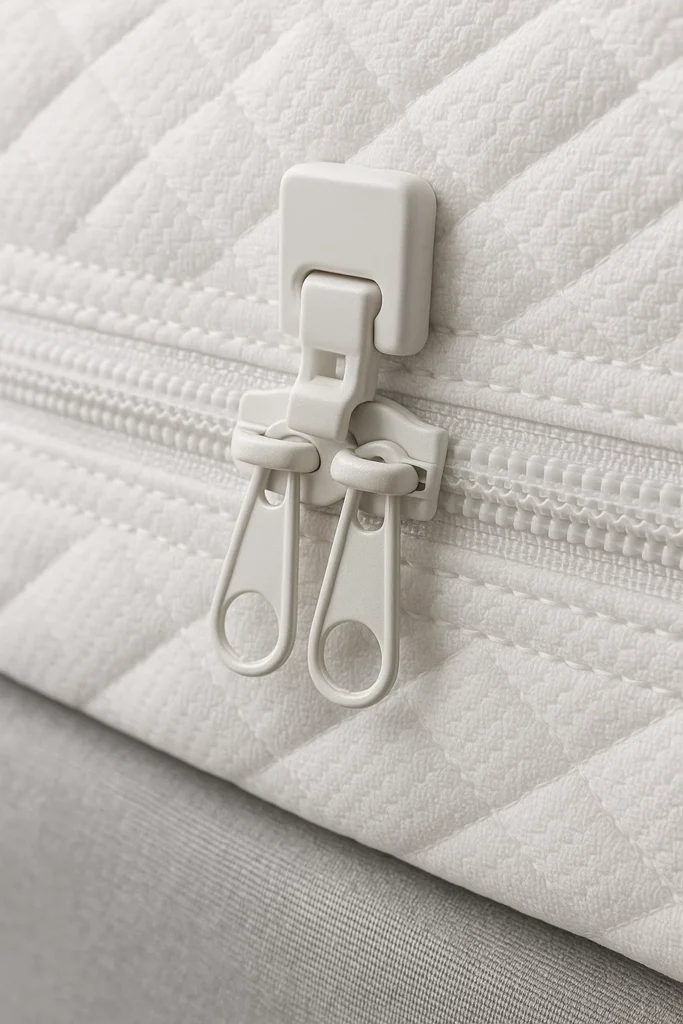
  1. Strip the bed completely. Put all bedding straight into heavy-duty trash bags or plastic bins beside the bed. Don’t carry loose sheets through the house.Close-up of bed bug–proof mattress encasement zipper and fabric seal.
  2. Wash and dry on high heat. Hot water and at least 30 minutes on high heat kills bed bugs and eggs. After drying, immediately seal items in clean bags or bins labeled CLEAN – DO NOT OPEN YET.
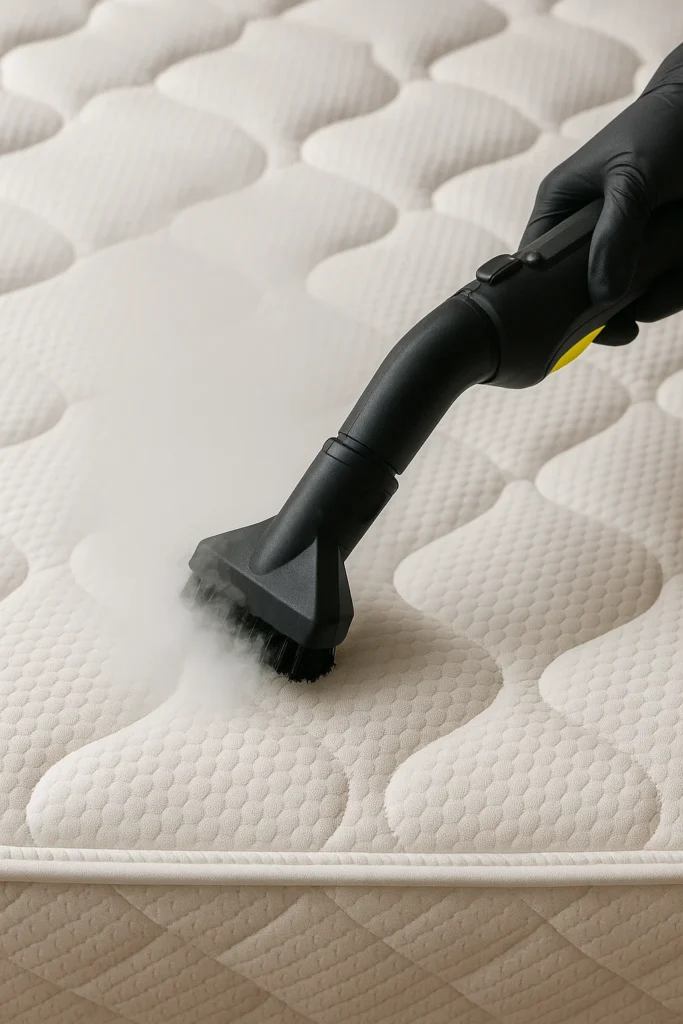
  3. Vacuum and steam the bed frame and mattress. Vacuum seams, edges, and cracks. Steam slowly — about 1 inch per second — to let the heat do its job. Let everything dry 30 minutes.
  4. Install mattress and box spring encasements. Zip them completely shut and check the zipper seal. These trap any bugs inside (they’ll starve) and block new ones from getting in. Leave them on for at least 12 months. You can sleep on them immediately.
  5. Add clean bedding. Use freshly laundered sheets and pillowcases from your sealed “clean” set. Keep extras sealed until you’re sure the infestation is gone.Bed legs placed in interceptor traps to capture bed bugs climbing up or down.
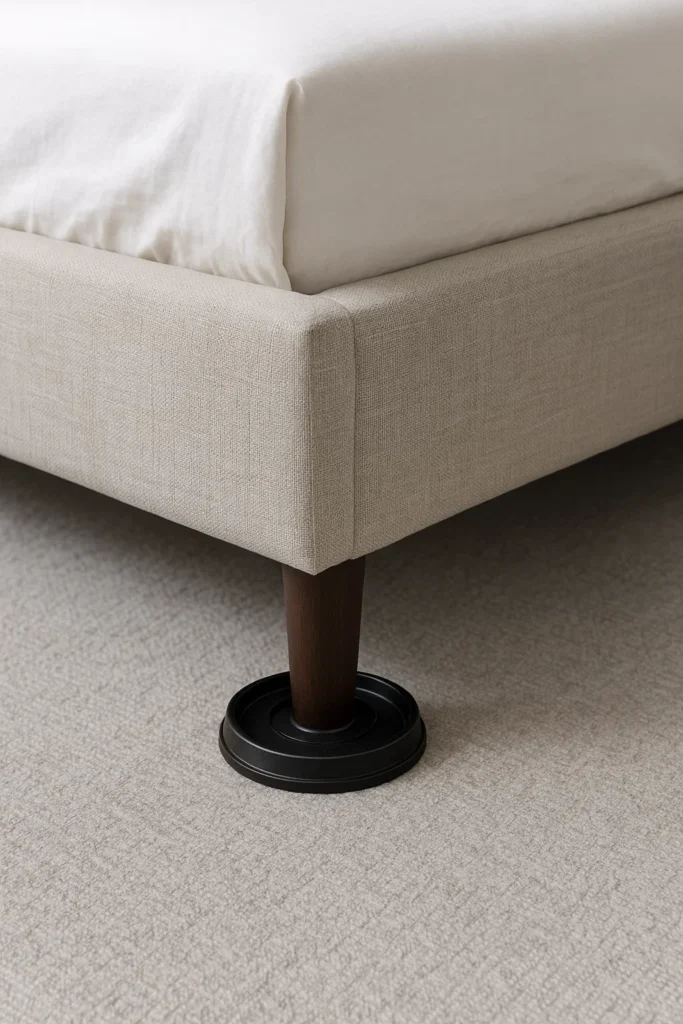
  6. Set up interceptor traps. Place them under each bed leg to catch bugs trying to climb up or down.
Can I sleep in my bed tonight? Yes — once your mattress and box spring are encased and the bed is freshly made, it’s actually better to sleep there. Your body heat and breath draw any remaining bugs toward the traps instead of spreading them elsewhere.

Step 2: Manage Your Clothes the Smart Way

  • Pick a clean rotation. Before sealing everything, choose ~1 week of outfits. Wash/dry on high heat and store in a sealed tote or bag you open only when dressing.
  • Keep the rest sealed ~2 weeks. Long enough for hidden bugs to die or starve. If activity persists after two weeks, rewash and keep sealed another week.
  • Re-wash as you rotate. When your wear set gets dirty, launder on high heat and return it to the clean tote.
  • Dirty clothes protocol. Toss worn items directly into a “to-wash” bag — never on the bed or floor.

Step 3: Vacuum and Steam Regularly

  • Vacuum daily for 2 weeks, then every other day for one more week. Focus on corners, baseboards, bed frame joints, and under furniture. Seal/dispose bags outdoors immediately.
  • Steam weekly to hit hatchlings that survived the first pass.

Handheld steam cleaner removing bed bugs from mattress seams.Step 4: Use EPA-Approved Bed Bug Sprays

Choose products that clearly list “bed bugs” on the label (e.g., Ortho Home Defense, EcoRaider, Harris, Bedlam). Apply carefully in cracks, furniture joints, and along baseboards. Repeat every 7–10 days for three cycles to catch newly hatched bugs, and ventilate rooms after use. For pesticide safety basics, see EPA: Controlling Bed Bugs.

Step 5: Sleep in Your Bed (Really)

It feels wrong, but it’s necessary. Once your bed is encased and clean, keep sleeping in it. If you start sleeping on the couch, the infestation spreads. Interceptors under the legs help confirm progress.

Step 6: Use Ozone for Odor Cleanup Only

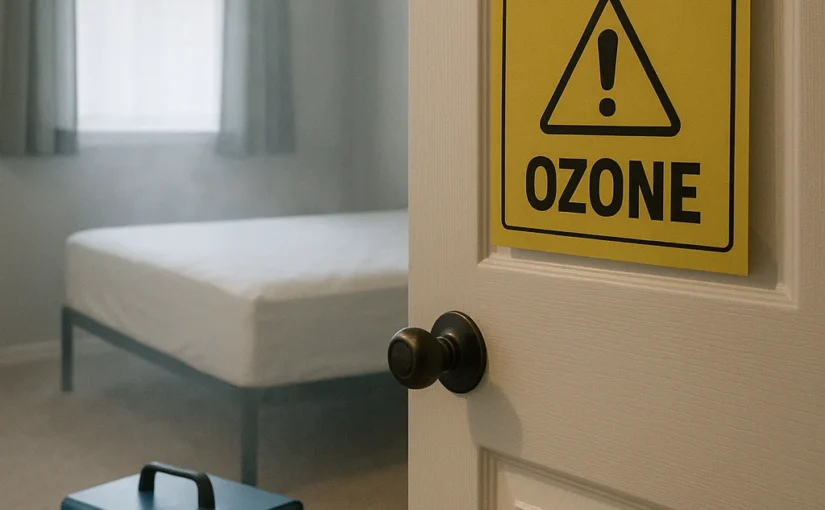
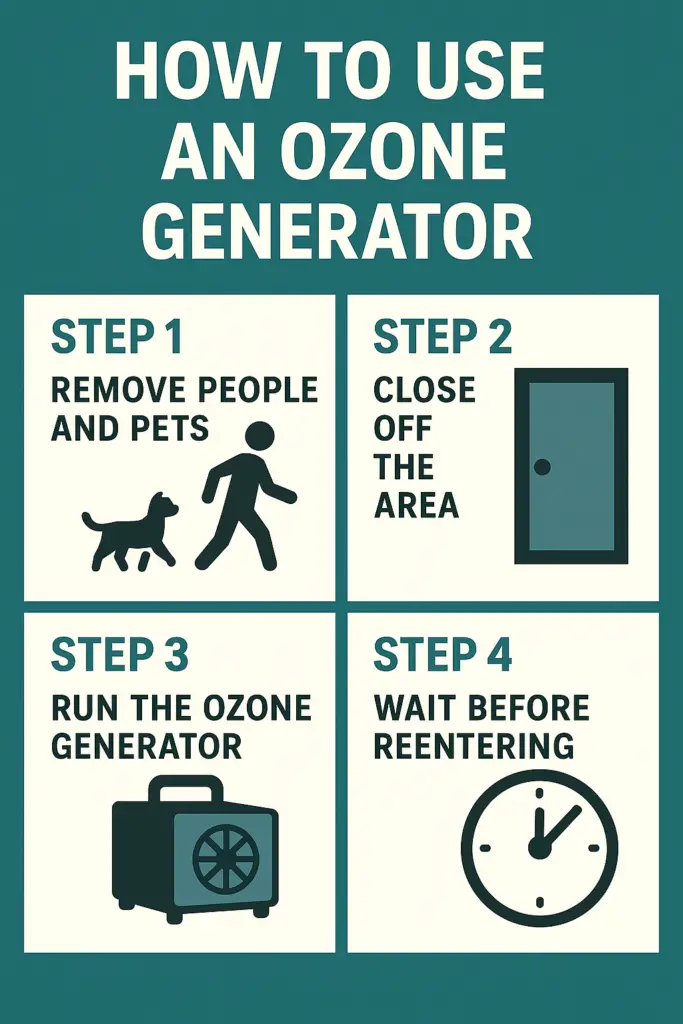
After your pest treatments are complete, ozone can be useful to remove musty or chemical odors. Run the generator in an empty room for 1–2 hours (3–4 hours for larger rooms). Air out for at least 12 hours before re-entry. Use ozone only for deodorizing — not for killing bed bugs.
If you are shopping for a machine to handle this final step, you can review our recommended ozone generators for home use to find a unit that balances performance with safety features.
For safety guidance and limitations of ozone indoors, see the EPA’s advisory: EPA: Ozone Generators that are Sold as Air Cleaners.

How Long It Takes to Reclaim Your Room

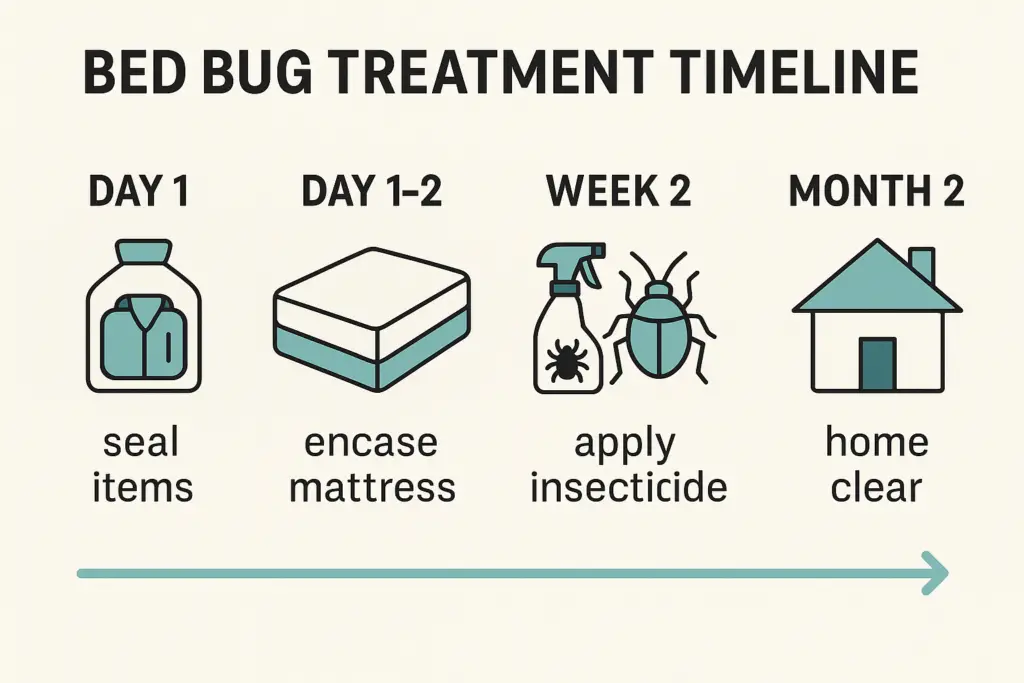
Infographic timeline from day 1 to month 2 showing cleaning, spraying, encasing, and achieving a bug-free home.Here’s the real timeline most people experience:
Phase What’s Happening What You Can Do Bed/Room Use
Days 1–3 First cleanup: wash, vacuum, encase, and trap. Bag laundry, set traps, encase mattress. Safe to sleep with encasement.
Week 1–2 Eggs hatch; traps catch wanderers. Vacuum daily, reapply spray after 7–10 days. Fully usable, but stay consistent.
Week 3–4 Population drops sharply. Steam again, inspect traps and seams. Normal use with caution.
Week 5–8 No new bites or spots; hidden bugs starve. Keep encasement and traps in place. Back to normal life.
Month 3–4 Complete eradication. Continue light monitoring. Maintain encasement as prevention.

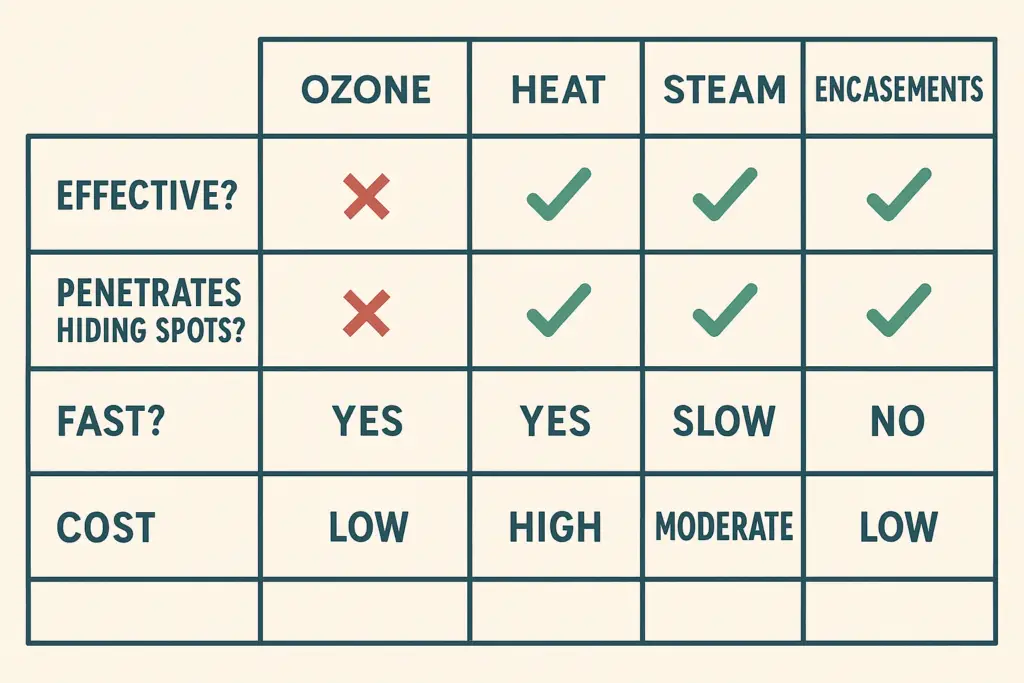
Comparison: Ozone vs. Other Bed Bug TreatmentsComparison chart of ozone, heat, steam, and encasement treatments showing effectiveness, speed, and cost.

Treatment Kills Eggs Safe Indoors DIY Option Cost Best For
Ozone No ⚠️ Not at effective levels ⚠️ Risky $$ Odor removal only
Heat Treatment (Pro) Yes Yes (professional) No $$$$ Full infestations
Steam Cleaning Yes Yes Yes $$ Mattresses & furniture
Encasements & Traps No (trap/starve) Yes Yes $ Prevention & monitoring
EPA Sprays Yes Use as directed Yes $ Light infestations

Common Myths About Ozone and Bed Bugs

Myth 1: “Ozone kills everything.”
Fact: It kills exposed organisms, not hidden insects or eggs. See EPA’s ozone advisory.

Myth 2: “You can just run it overnight.”
Fact: The ozone level needed would be unsafe to breathe.

Myth 3: “If it smells clean, the bugs are gone.”
Fact: Ozone removes odors but doesn’t confirm pest removal.

Myth 4: “You can’t sleep on your bed for months.”
Fact: Once encased, your mattress is safe to sleep on immediately.

Frequently Asked Questions

Can ozone kill bed bug eggs?
No. Bed bug eggs have thick shells that protect them from ozone exposure.

Is ozone safer than pesticides?
Not at the concentrations needed for pest control. Ozone can harm your lungs and corrode electronics. For indoor ozone risks, see EPA.

What kills bed bugs instantly?
Heat above 120°F kills them and their eggs on contact — that’s why steam and professional heat treatments are so effective. See EPA: Bed Bugs.

Can I use ozone on my mattress?
Only after extermination, for odor cleanup. Run ozone in an empty room and ventilate afterward.

How do I remove the ozone smell afterward?
Open windows, use fans, and wash fabrics. Baking soda and sunlight also help. See our guide: Ozone Smell on Clothes.

Final Thoughts

Ozone might make the room smell cleaner, but it won’t solve a bed bug problem. They’re stubborn, patient insects that require time and consistency — not just gas or chemicals.

The good news is, with heat, steam, encasements, and persistence, you can reclaim your bed and your sleep safely. Stick to the plan, stay consistent for a few weeks, and you’ll win.

Still wondering What ozone smells like? Learn why people describe ozone as smelling like chlorine, electricity, thunderstorms, and even burnt electronics.

Learn More

What is the Ideal Humidifier Setting in Winter?

What is the Ideal Humidity Setting in Winter?

It seems that humidity and humidification are a subject that are gaining interest as people are becoming more aware of the impact that moisture levels in the home, School, work or otherwise, can have not only on dry noses and cracking skin but even more importantly the transmission of viruses.

“The ideal humidity setting on a hygrometer or humidifier is 50 Percent. According to the National Library of Medicine: “the majority of adverse health effects caused by relative humidity would be minimized by maintaining indoor levels between 40 and 60%.”

When conditions are dry, airborne viral particles become smaller and or able to travel much further.

Humidity makes the particles wider and weighs them down so they are not able to float, which reduces the particles located in the ambient air (the air you breathe) and inhibits their capacity to spread.

Exciting.

It’s interesting that simply adding moisture to the air can create indoor conditions where viruses and bacteria along with other dust particles can reduce respiratory illness.

humidifier settings in winterHumidity levels in the winter are typically exceptionally low. The lack of moisture in the air creates all types of havoc with your body including:

  • Dry skin
  • Lowered immunity
  • Raw and bloody noses
  • Dry throat
  • Acne
  • Congestion
  • Static electricity
  • Frizzy hair

But you may be asking how do you know what your humidity actually is in the house?

That’s all good and fine knowing that humidity can affect your health but if you don’t know what your humidity is or how to correct it, what’s the use?

Humidity is measured with what’s called a hygrometer.

Hygrometers can be purchased as standalone devices but you will mostly find them as digital units combined with thermometers these days.

A thermohygrometer coupled with a humidifier to add moisture to the air is all the tools you will need to increase your relative humidity when conditions are too dry in your home or workplace.

This method works by using trial and error and increasing or decreasing the output of your humidifier as needed.

But even though it works, it’s not the most convenient as it will take a lot of monitoring between the humidifier and the hygrometer to achieve and maintain the proper humidity level.

humidifier winterLucky for us, humidifiers have raced into the new age and are among the upper echelon of appliances that come equipped with smart technology to auto control your humidifier, but it turns on and off as needed according to censored hygrometer technology.

In other words, it increases and decreases humidity automatically.

Smart humidifiers not only can be controlled using Alexis and Google Assistant, they can also tell you your home humidity levels directly from an app on your phone and let you control it as needed.

Smart technology is only the beginning of where this new generation of humidifiers get started.

For instance the Levoit 6 l whole house smart humidifier can be utilized as either a warm mist or a cool mist humidifier.

It is equipped with sleep mode, essential aromatherapy oil ready, and is ultra quiet.

And one of the smartest features of this new breed of humidifiers is that they are top fill.

Which means they are much easier to put water in than the old plastic pharmacy style humidifiers that had to have the tank taken off and turned upside down underneath a faucet to fill it.

Other advances in humidifiers include methods of keeping humidifiers cleaner longer.

Technologies like UV light and antimicrobial plastic or advancing humidification to a new level. see: Self Cleaning Humidifiers

It’s no secret that humidifiers are among the most maintenance heavy devices.

Humidifiers must be kept clean to avoid germs and bacteria from growing inside of the water.

Unfortunately the same device that can reduce your chances of getting sick in the winter can also make you sick if it is not maintained properly.

That’s what makes these new technologies like ultraviolet light and antimicrobial materials so exciting.

You can imagine that in the future we are going to see humidifiers that alert us when they are in danger of developing bacteria and humidifiers that simply clean themselves.

We’re not quite there yet. But it’s definitely on the horizon. (Vaporizers use boiling water to create steam. Since the water is brought to a high temperature, bacteria is not able to survive)

What Humidity Setting Should You Use in Winter?

According to PubMed, 40 to 60% relative humidity in the home, School, or workplace is the ideal humidity to minimize adverse health effects caused by humidity.

Humidity can adversely affect your health when it is too low or too high.

Though most people generally pull out the humidifier when they start getting bloody noses and congestion, humidifiers can relieve all types of conditions including dry and cracking skin, dried out nasal passages, acne, viral spread, and lowered immunity.

Though they can be purchased separately and used in conjunction with your humidifier, hygrometers, which are the tool that is used to measure humidity, come built in to humidifiers as a standard feature these days.

Smart humidifiers can automatically increase or decrease the humidity level inside of the house to maintain the optimal humidity of 40 to 60%.

They also give you the advantage and convenience of being able to control and schedule your humidifier with your phone or using an Alexis device or Google Assistant.

This new breed of humidifier offers features like the capacity to use the humidifier is either a warm mist or a cool mist device. Antibacterial features like ultraviolet light and antimicrobial plastic, and one of my favorites, the ability to fill it from the top.

Top fill humidifiers take a huge amount of hassle out of using a humidifier.

It hasn’t been that long since humidifiers only came with basins that had to be taken off and turned upside down in order to fill.

Top fill humidifiers can be filled with a water pitcher.

Dehumidifier Smells Musty?

Does Your Dehumidifier Smell Musty?

Musty is a word that describes the smell of mold.

When your dehumidifier smells musty, it is almost more than certain that it has mold and bacteria growing in the water or the filter and you need to give the whole unit a thorough disinfecting.

Dehumidifiers like their cousin, the humidifier have a predisposition for becoming moldy because of standing water.

And dehumidifiers even more so.

dehumidifier is moldy

Why?

1. The Dark

The fact that dehumidifiers are collecting water into a basin that is dark makes them more likely to grow mold and bacteria even faster. Low light and dark are essential for mold to grow.

2. Collect airborne contaminants

Dehumidifiers also have the added component of removing airborne germs like bacteria, molds, spores, and pollen from the air which go into the water tank and are allowed to grow and populate till the tank is emptied and cleaned.

3. Not visible

Unlike a humidifier that usually has a clear basin that you can see the water and get a visual idea of whether it is getting dirty, dehumidifiers collect water into a bucket that you cannot see.

And in this case, out of sight, out of mind, can mean that mold and bacteria can get a stronghold.

With all this in mind you can see that a dehumidifier has an even greater predisposition to growing bacteria and mold inside of the water than a humidifier.

This is a very serious situation when it is not taken care of in a timely manner.

Inhaling bacteria that has grown on water can make you very sick.

Legionnaires disease and Pontiac fever to a lesser degree or diseases that are caused by breathing in water grown bacteria.

Legionnaires disease is responsible for death in many people, especially the elderly and people with weakened immune systems.

Whether you’re talking about a dehumidifier, a humidifier, or an evaporative cooler, these types of appliances are prone to becoming germ farms.

And they all require a stricter attention to keeping them clean because of that fact.

Exception?

There is one caveat to helping you keep a dehumidifier cleaner longer. That is to run a continuous hose from it so that the water does not collect in the dehumidifier but goes outside.

But regardless, even with the continuous hose, they need to be cleaned often to ensure that they are kept safe and healthy.

how to clean a dehumidifier

How to Clean Your Dehumidifier

Routine cleaning of the dehumidifier is essential for keeping it from developing germs and bacteria and also for running efficiently.

The main components that you want to dial in on when cleaning a dehumidifier are:

  • The water basin
  • The filter
  • The coils
  • outside

1. The water basin

Arguably the most important part of cleaning a dehumidifier is keeping the water basin and around it disinfected.

Bacteria can begin to grow in water in as little as 48 hours. And since dehumidifiers have all the criteria; low light, dust, and moisture, for mold to flourish, Special attention should be given to the water basin to ensure that it is kept clean and disinfected thoroughly and often.

Fortunately it’s not a tough job.

a. unplug the machine

No use risking the chance of being shocked regardless.

To clean the water basin on your dehumidifier, simply take the basin off and dump the water out.

Using cleaning vinegar, which is a little more acidic than regular white vinegar, completely scrub out the basin and rinse it.

Add a couple of cups of vinegar back into the basin and fill it up. Allow it to sit for at least 30 minutes.

Dump the vinegar out, rinse it out with warm water and allow it to completely dry.

2. The filter

Dehumidifiers are almost identical to window air conditioners in their mechanics.

And if the filter is allowed to get dirty enough to inhibit the airflow, the machine will not do its job properly.

To clean the filter, simply pull it out and knock off the loose material into the trash.

To take a cleaning brush and scrub the rest of the debris out of the filter.

Knock it off again, into the trash.

At this point, if the air filter is particularly dirty, canned air can be used to blow the filter out even further.

And if it’s still grimy after that, wash it under the faucet using warm water.

If you end up having to clean the filter with water, be careful to let it dry completely before you reinsert it.

Since water is one of the components of mold taking root.

3. The coils

The coils are less likely to be dirty and are not considered an essential part of routine maintenance. But they can still get dirty over time.

If the coils on your dehumidifier or window AC get dirty. The machine will not run as efficiently and use more energy.

Dirty coils can also cause the machine to freeze up quicker.

To clean the coils, a can of coil cleaner can make the job very easy.

Coil cleaner foams up similar to bathroom cleaner. Simply spray the coil cleaner all over the coils, let it foam up and sit.

After it has sat for the amount of time that the direction says, wash the coils off with warm water, preferably with the spray bottle, and let it completely dry.

4. Outside

Wipe the outside thoroughly with cleaning vinegar. Sure to get into the nooks and crannies where water can get access to and eventually cause bacteria to grow on the outside of the machine.

Recap

Does the dehumidifier smell musty?

A musty smell is almost always certainly an indication that there is mold somewhere in the vicinity.

When you smell that mustiness coming from your dehumidifier, then the most logical reason is that it has mold and bacteria growing or starting to grow in the water or even around the water basin.

Since dehumidifiers pull moisture out of the air that is filled with bacteria and allergens like mold spores and dust mites,

The moisture that is collected inside of the dehumidifier has a chance of developing mold and bacteria even faster than just standing water on its own.

And you couple that with the fact that it is dark inside of the basin, you have all the ingredients for mold and bacteria to take root faster.

Bacteria growing on standing water can be dangerous to breathe.

Legionnaires disease is caused by inhaling a certain bacteria that has grown on water.

So keeping the water basin emptied and thoroughly cleaned on a dehumidifier is very important.

Fortunately it’s a job that you can do with some household items like a scrub brush and some vinegar.

And if the area where you have your dehumidifier can accommodate it, you can skip the water basin all together and hook up a continuous hose. So that the water coming into the machine goes outside instead of collecting into a bucket.

What is an Ionizing Air Conditioner? Unveiling the Power of Plasma Technology

Interestingly the ion/anion symbol on an ion air cooler is a pine tree. A reference to fact that negative ions exist in abundance in the forest.

Negative ions are prevalent in certain natural environments, including:

Forests: The dense vegetation, especially in pine forests, contributes to the high concentration of negative ions. The process of photosynthesis, along with the movement of water from rainfall and streams, facilitates the generation of ions.
Beaches: The constant crashing of waves and the presence of salt water facilitate the production of negative ions, making beach environments particularly rich in these particles.
After Thunderstorms: Lightning is a powerful natural phenomenon that generates a significant amount of negative ions, leading to the fresh and clean feeling in the air following a storm.

What is an Ionizing Air Conditioner?

An ionizing air conditioner, also known as an ionizer or ionic air purifier, is a type of air conditioning unit that incorporates technology to purify the air as it cools.

The use of ionization in air conditioners serves both purposes:

Cleaning the air and preventing the growth of mold and bacteria on the air conditioner itself.

Cleaning the Air: Ionization in air conditioners helps to purify the air by generating negative ions, which attach to airborne particles such as dust, pollen, allergens, and some microorganisms.

These particles then become too heavy to remain airborne and are either captured by the air conditioner’s filters or fall to surfaces where they can be cleaned away. This process helps reduce the concentration of harmful pollutants in the indoor air, contributing to a healthier environment.

Preventing Mold and Bacteria Growth: The ionization process also helps prevent the growth of mold and bacteria within the air conditioner unit itself. The ions can neutralize bacteria and mold spores, reducing their ability to grow on the air conditioner’s coils and other internal components.

This not only contributes to better air quality but also helps maintain the efficiency and lifespan of the air conditioner by preventing the buildup of biological contaminants that can hinder its performance.

What is a Plasma Air Conditioner?

While ionizing air conditioners are effective in improving air quality and maintaining unit cleanliness, plasma air conditioners represent a more advanced form of ionizing technology.
A plasma air conditioner utilizes a high-voltage electrical discharge to create plasma, a highly ionized gas that contains not only ions but also free electrons and neutral particles. As air passes through the plasma field generated within the unit, the plasma actively neutralizes a wide array of airborne contaminants, including viruses, bacteria, VOCs, and allergens, without the risk of producing harmful ozone.
This makes plasma air conditioners exceptionally efficient at purifying indoor air, offering a comprehensive solution to both particulate and microbial pollutants. The integration of plasma technology in air conditioning systems is seen as a significant advancement, providing superior air purification while still fulfilling the core function of cooling indoor environments.

Exploring Plasma Technology in Air Conditioning: A Detailed Overview

Feature Description Benefits Applications Considerations
Technology Utilizes electrical energy to create plasma, comprising ions, electrons, and neutral particles. Offers broad-spectrum air purification. Suitable for split ACs, central HVAC, and commercial systems. Opt for models designed to minimize ozone production.
Mechanism The generated plasma interacts with airborne contaminants, neutralizing particulate matter, VOCs, and microbes. Enhances energy efficiency by using existing airflow. Ideal for residential spaces, offices, and healthcare facilities. Regular maintenance is essential for optimal performance.
Target Pollutants Effective against a wide range of pollutants, including bacteria, viruses, dust, and odors. Safe for indoor use with minimal harmful byproducts. Used to improve overall indoor air quality. Ensure compatibility with existing HVAC systems.
Safety Engineered to be safe for indoor environments, with controlled ozone levels. Improves air quality without significant health risks. Recommended for areas with high air quality requirements. Verify safety with certifications and manufacturer standards.

Here are examples of Well-known Air Conditioner brands equipped with ionizing and plasma technologies:

Ionizing Air Conditioners:

  • Portable Air Conditioner: The LG LP1419IVSM portable unit is noted for its “Dual Inverter” technology and features that reduce bacteria and odors, akin to ionizing capabilities.
  • Window Air Conditioner: Frigidaire Gallery FGRC0844U1 is a smart window air conditioner with Wi-Fi and an ionizer to capture dust and enhance efficiency.
  • Split Air Conditioner: Panasonic XE12SKUA-1 from the Exterios XE series includes an advanced “nanoe-G” air purifying system that uses nano-technology to eliminate airborne particles.
  • Central Air Conditioning System: Systems like Trane CleanEffects™ Air Cleaner can be integrated into HVAC systems, providing high-efficiency air cleaning with ionizing technology.
  • Smart Air Conditioner: LG LW1817IVSM is a smart window unit with dual inverter technology, known for its ability to tackle bacteria and odors, suggesting ionizing functionality.

Plasma Air Conditioners:

  • Split Air Conditioners: Brands like Sharp offer split air conditioners with “Plasmacluster” technology, which employs plasma to combat airborne contaminants such as bacteria and viruses.
  • Portable Air Conditioners: Certain portable models, like those from Plasma Air, include plasma technology for air purification, offering a portable solution for improving air quality.
  • Central HVAC Systems: Reme Halo by RGF and Phenomenal Aire’s Cold Plasma Generators (CPG) are integrated into central HVAC systems, providing comprehensive air purification throughout the home or building.
  • Commercial Air Conditioning Systems: Plasma Air offers solutions for larger commercial and industrial HVAC systems to ensure high air quality standards in various spaces, including offices and hospitals.

These air conditioning brands showcase the integration of ionizing and plasma technologies to enhance air purification and improve indoor air quality in different types of air conditioners, including portable, window, split, central, and commercial systems.


In-Duct Ionizer and Plasma Solutions for HVAC Systems

In-duct ionizer and plasma solutions are innovative air purification technologies designed to be integrated directly into the ductwork of HVAC (Heating, Ventilation, and Air Conditioning) systems. These solutions offer a seamless way to improve indoor air quality throughout an entire building or home. Here’s a closer look at how they work and their benefits:

In-Duct Ionizers:

  • How They Work: In-duct ionizers release a high concentration of positive and negative ions into the circulating air within the HVAC ducts. These ions attach to airborne particles like dust, pollen, and microbes, causing them to clump together and become too heavy to stay airborne, thus removing them from the air you breathe.
  • Benefits: This system is particularly effective at reducing airborne allergens and pathogens, making it an excellent choice for environments where health and hygiene are paramount. Additionally, it operates silently and is hidden from view, maintaining the aesthetic appeal of the interior space.

In-Duct Plasma Solutions:

  • How They Work: Plasma air purifiers generate a plasma field within the HVAC ducts. Plasma, being a highly ionized gas, contains a mixture of ions, electrons, and neutral particles. When air passes through this plasma field, the reactive species within the plasma neutralize a broad range of contaminants, including volatile organic compounds (VOCs), odors, bacteria, and viruses.
  • Benefits: Plasma solutions are known for their broad-spectrum effectiveness, capable of addressing both particulate and gaseous pollutants. They can significantly improve the air quality in a space without introducing harmful byproducts like ozone, making them a safe choice for indoor environments.

Both in-duct ionizers and plasma solutions are low maintenance and energy-efficient, as they utilize the existing airflow within the HVAC system to purify the air, eliminating the need for additional fans or power sources. They are also scalable, making them suitable for small residential systems as well as large commercial buildings.

Incorporating these technologies into your HVAC system can dramatically enhance indoor air quality, creating a healthier and more comfortable environment for occupants. Whether you opt for an ionizer or plasma solution depends on your specific air quality needs and the types of contaminants you’re looking to target.

Deciding Between Ionizer and Plasma Air Conditioning Solutions

Feature Ionizers in Air Conditioners Plasma in Air Conditioners
Pros
  • Effective at removing particulate pollutants like dust, pollen, and pet dander.
  • Generally quieter operation.
  • Low maintenance, as many do not require filter replacements.
  • Can improve energy efficiency by keeping the air conditioner coils cleaner.
  • Broad-spectrum purification capable of neutralizing particulates, VOCs, bacteria, and viruses.
  • Typically produces less or no ozone, making it safer for indoor use.
  • Can handle both particulate and gaseous pollutants effectively.
  • Often integrated into advanced HVAC systems for whole-home or building purification.
Cons
  • May produce low levels of ozone, which can be a respiratory irritant.
  • Less effective against gaseous pollutants and VOCs.
  • The effectiveness can diminish if not maintained properly (e.g., cleaning of ionizing wires).
  • Can be more expensive due to advanced technology.
  • May require professional installation, especially for in-duct systems.
  • Maintenance and operational costs could be higher.
  • The effectiveness can vary based on the design and quality of the plasma system.

When it comes to enhancing indoor air quality through your air conditioning system, both ionizer and plasma technologies offer compelling benefits. However, choosing the right solution depends on your specific needs, preferences, and the nature of your indoor environment. Here’s a comparison to help you decide:

Ionizer Air Conditioning Solutions:

  • How They Work: Ionizers emit charged particles (ions) into the air, which attach to and neutralize airborne pollutants, making them heavier so they settle out of the air or are captured by filters.
  • Key Benefits: Effective at reducing particulate pollutants like dust, pollen, and pet dander. Often quieter and require less maintenance.
  • Best For: Those with allergies or respiratory issues who need relief from particulate allergens. Ideal for residential settings where particulate pollution is the primary concern.
  • Considerations: May produce low levels of ozone as a byproduct. Not as effective against gases or VOCs.

Plasma Air Conditioning Solutions:

  • How They Work: Plasma technology uses a high-voltage electrical discharge to create a plasma field that neutralizes a broad range of airborne contaminants, including VOCs, bacteria, and viruses.
  • Key Benefits: Broad-spectrum air purification capabilities. Can handle both particulate matter and gaseous pollutants. Generally safe with minimal ozone production.
  • Best For: Environments requiring comprehensive air purification, including commercial spaces, healthcare facilities, and homes in areas with high pollution levels.
  • Considerations: May come with a higher price tag. Requires proper installation and occasional maintenance to ensure optimal performance.

Making Your Decision:

  • Assess Your Needs: Evaluate the primary air quality concerns in your space. Is it particulate matter, gaseous pollutants, or a combination of both?
  • Consider Your Space: The size and function of your space can influence your choice. Plasma solutions might be more suitable for larger or more polluted environments.
  • Budget and Maintenance: Consider your budget not just for the initial purchase but also for ongoing maintenance. Ionizers might be more cost-effective and require less maintenance.
  • Safety Concerns: If ozone production is a concern, research models carefully to choose solutions that minimize or eliminate ozone output.

Ultimately, both ionizer and plasma air conditioning solutions can significantly improve indoor air quality, but the right choice depends on your specific air quality challenges, space requirements, and personal preferences.

But which is Creates Less Ozone?

Plasma air purification technology typically poses less risk of ozone production compared to some ionizer technologies. This is because plasma air purifiers are designed to target and neutralize contaminants without necessarily producing ozone as a byproduct. Plasma technology uses electrical discharges to create a plasma field that can effectively break down pollutants, bacteria, and viruses in the air without generating significant ozone levels.

Faq

Do you have to leave the fan running on your HVAC to have an in-duct ionizer or plasma air purifier going?

Yes, for optimal performance, it’s recommended to leave the fan running on your HVAC system to ensure proper circulation of the purified air throughout your space.

Where do you install an in-duct air purifier or ionizer in an HVAC?

In-duct air purifiers or ionizers are typically installed within the ductwork of your HVAC system, preferably near the air handler. This allows them to treat the air as it passes through the ducts before being distributed into your living space.

Does having an in-duct air purifier in the HVAC create less ozone or make it less noticeable?

In-duct air purifiers, especially plasma-based ones, typically produce minimal ozone compared to some standalone ionizers. They are designed to neutralize contaminants without significantly contributing to ozone levels, making them safe for indoor use. Additionally, proper installation and maintenance can help minimize any ozone production.

What is an ionizing air conditioner?

An ionizing air conditioner, also known as an ionizer or ionic air purifier, is a type of air conditioning unit that incorporates technology to purify the air as it cools by emitting charged particles, or ions, into the air.

How does an ionizing air conditioner work?

Ionizing air conditioners work by generating negative ions, which attach to airborne particles such as dust, pollen, allergens, and some microorganisms. These particles then become too heavy to remain airborne and are either captured by the air conditioner’s filters or fall to surfaces where they can be cleaned away.

What are the benefits of using an ionizing air conditioner?

Ionizing air conditioners help purify indoor air by reducing the concentration of airborne pollutants, contributing to a healthier environment. Additionally, they can help prevent the growth of mold and bacteria within the air conditioner unit itself, improving overall air quality.

What is a plasma air conditioner?

A plasma air conditioner utilizes plasma technology, which involves creating a highly ionized gas containing ions, electrons, and neutral particles, to purify the air. Plasma air conditioners are known for their comprehensive air purification capabilities, effectively neutralizing a wide array of airborne contaminants.

How does a plasma air conditioner differ from an ionizing air conditioner?

While both ionizing and plasma air conditioners aim to purify indoor air, plasma air conditioners use a more advanced form of ionizing technology, generating plasma to actively neutralize contaminants such as viruses, bacteria, VOCs, and allergens.

Do ionizing or plasma air conditioners produce ozone?

Plasma air conditioners typically produce minimal ozone compared to some ionizing air conditioners. However, it’s essential to choose models designed to minimize ozone production and ensure safe indoor air quality.

Where can ionizing and plasma air conditioners be installed?

Ionizing and plasma air conditioners are available in various types, including portable, window, split, central, and commercial systems, catering to different indoor environments and air quality needs.

Are ionizing and plasma air conditioners safe for residential use?

When installed and operated according to manufacturer guidelines, ionizing and plasma air conditioners are safe for residential use. They are designed to improve indoor air quality without posing significant health risks to occupants.

Do ionizing and plasma air conditioners require regular maintenance?

Yes, like any other air conditioning unit, ionizing and plasma air conditioners require regular maintenance to ensure optimal performance. This may include cleaning the unit, replacing filters or components as needed, and periodic inspections by qualified technicians.

Can ionizing and plasma air conditioners help with odors in the home?

Yes, ionizing and plasma air conditioners are effective at neutralizing odors by targeting the particles and microbes that cause them. Thiscan help freshen the air in your home and create a more pleasant indoor environment.

Are ionizing air conditioners safe for indoor plants and pets?

Ionizing air conditioners are generally safe for indoor plants and pets when operated within recommended guidelines. However, some sensitive plants may be affected by the increased concentration of negative ions, while certain pets, particularly birds, may be sensitive to ozone. It’s advisable to monitor plant and pet reactions and consult with a veterinarian or horticulturist if concerns arise.

Do ionizing air conditioners produce harmful levels of ozone?

While ionizing air conditioners may produce ozone as a byproduct of ionization, reputable models are designed to minimize ozone production and maintain safe indoor air quality levels. It’s essential to choose ionizing air conditioners certified by regulatory bodies and follow manufacturer recommendations for safe operation. Regular maintenance and proper ventilation can also help mitigate ozone levels.

Air Ionizer
What Does Ozone Smell Like?

Can Humidifiers Cause Mold?- The Answer May Surprise You

Mold is a very destructive agent, not only to your home and property but also to your health. Mold growth can also be very consuming when it is left unchecked. And damage can occur very quickly.

Finding the source and stopping it is of the essence when you are dealing with it.

Can Humidifiers Cause Mold?

“No. A well maintained humidifier that is operating in the right humidity range will not cause mold.”

But a humidifier that is not cleaned often and allowed to run with water that has been stagnated will not only accumulate mold and bacteria inside of the basin, it will dispense mold and bacteria into the air you breathe.

Poor air quality that is full of mold and bacteria can be dangerous and cause symptoms that are similar to pneumonia and the flu, etc.

However if a humidifier is being operated how it is intended to be when the humidity in the room has dropped below 40%, it will only benefit you.

Are there any special circumstances where a humidifier could cause mold to grow?

Yes. For instance, you were running a humidifier when the humidity is well above the need for the humidifier to be running.

If you already have 80% humidity and you’re doing something to add more humidity, like run a humidifier, then you’re going to have condensation, which given the right circumstances can begin to grow mold.

Another scenario is that you have a humidifier that has a physical leak and is allowed to drip onto the wall or behind a desk or other furniture.

Anywhere you have a leak in your house, regardless of the source, you have a good chance of finding mold.

allergy headache

But a good working humidifier will not cause mold in the right circumstances. A humidifier doesn’t even have the output to create a huge condensation situation. Even on the scale of taking a shower.

What about the opposite?

Can a Humidifier Prevent Mold?

Yes.

And yes you read that right. Studies have shown that excessively dry air creates a much easier path for allergens like mold spores, pollen, airborne bacteria and viruses, to be able to travel much further.

The idea is that when the humidity of the air in your home, business, School, etc. Is kept between 40 and 60%, the moisture in the air does not allow for these “airborne health threats” to travel nearly as far before they are forced to the surface by the weight of the humidity drops.

The right moisture level in the air will actually keep mold spores from being able to travel as far as they would be able to in dry air. And keep it out of the ambient air that you are breathing in.

Maintaining the optimal humidity in your home has so many benefits that it outweighs any of the potential negatives by a mile.

Benefits of a humidifier:

  1. Alleviate dry skin
  2. Stop nosebleeds
  3. Help control acne
  4. Keep viruses at Bay
  5. Control static shock
  6. Help control dust
  7. Helps immunity
  8. Help control allergies
  9. Increase oxygen

1. Alleviate dry skin

Dry skin is a universal problem that we all deal with from time to time. And it is a problem that is in direct correlation to the amount of moisture in our airstream.

Simply put; if the air is dry then your skin does not have the available moisture to be able to absorb. And to make matters worse, dry air means extra dust in the air, which pulls moisture out of your skin.

A humidifier is the perfect tool to add moisture back to a home that is suffering with low humidity.

2. Nosebleeds

Nosebleeds and congestion are the main telltale signs that it is time to pull out the humidifier for the season.

Whenever the air gets excessively dry because of the low humidity content in the air combined with the heater blasting, dry nasal passages become intolerable.

Humidifiers are one of the best things you can do when you are suffering from nosebleeds and dry nasal passages with congestion.

3. Help control acne

Acne is not something most people associate with low humidity. But according to Hadley King MD” dry conditions expose deeper layers of skin to the outside world”. Increasing the level of moisture in your room can help maintain the level of hydration needed to keep dry cracking skin from allowing acne to get a deeper root.

4. Keep viruses away

Where the air is excessively dry, there is a wide open pallet for particles including viruses, germs and bacteria, to be able to float in the ambient air and much further than when air is properly hydrated.

Humidifiers will add moisture back to the air which can keep viruses from being able to travel as long and as far as they can in dry air.

5. Control static shock/electricity

Static electricity is another one of those telltale signs that the humidity is low.

Without the proper humidity in the air, electrons have a lot less resistance and jump from one body to the next very easily.

Adding moisture to the air with the humidifier will cut down on the amount of static electricity that you are experiencing in your house.

6. Helps control dust

When there is a lack of humidity, dust does not have anything to keep it from floating and moving throughout the air settling on your skin and into your lungs.

Providing humidity back into the air with a humidifier will create moisture in the air that will bind with airborne dust and cause it to settle.

7. Helps immunity

A study published by medical news today states that the hair-like organelles outside of the cells that line the body’s airways, called cilia, do not function as well and dry conditions – they cannot expel viral particles as well as they otherwise would.

It’s Amazing how a humidifier can actually help your body resist viral particles much better when the air is too dry.

8. Help control allergies

Airborne allergies like pollen and mold spores that do not have any moisture in the air to keep them from floating will eventually make it into your airways and cause you to have a whole host of allergic symptoms.

Restoring the humidity in a room with a humidifier will help keep allergens from being able to float nearly as long and far as they are able to and dry air. Which can mean big relief for allergy sufferers.

9. Increase oxygen

Increasing the humidity with a humidifier when the air is dry can indirectly increase your oxygen intake.

“a humidifier is not an oxygen concentrator and it should not be mistaken for one or substituted for one”

The humidity droplets created by humidifiers can weigh down airborne allergens and dust by weighing them down and decreasing their ability to float in the ambient (air that you breathe)airstream.

Thus allowing for better oxygen intake.

Secondly, humidity combined with oxygen producing plants such as rubber plant, aloe vera, and mother-in-law’s tongue can create an oxygen-rich environment. Amazing.

Summary

Can a humidifier cause mold?

A humidifier used correctly at the right time will not cause mold.

Humidifiers are made to add moisture back to the room when the air is excessively dry and under the 40% relative humidity mark.

But a humidifier that is not used correctly or is allowed to be operated when it is unmaintained or has standing water in it, well more than likely has mold and bacteria growing in it and can create an air quality problem that can be very serious.

Other times that humidifiers could be responsible for mold is if they are run when the humidity is already high and does not constitute the use of a humidifier.

And secondly, if there is a physical problem with the humidifier and it is allowed to leak onto the furniture or floor.

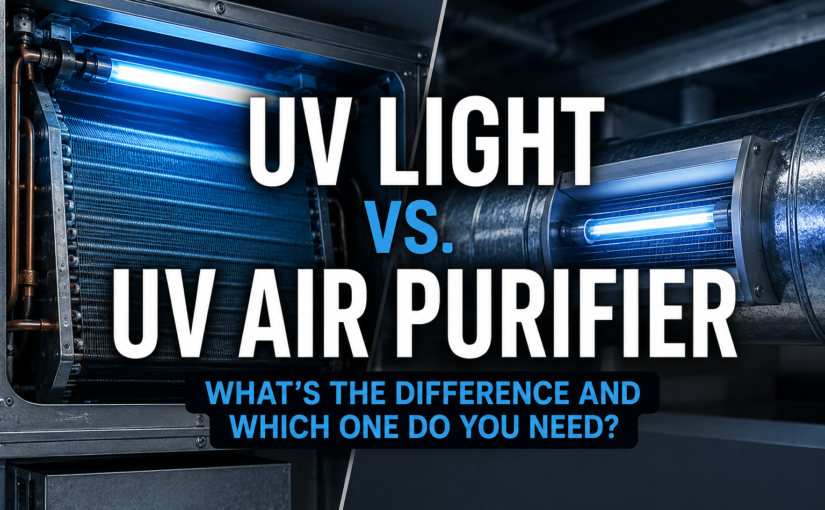
UV Lights vs. UV Air Purifiers in Your HVAC: What’s the Difference and Which One Do You Need?

UV Lights vs. UV Air Purifiers in Your HVAC: What’s the Difference?

Indoor air quality has become a major concern for homeowners. Modern homes are tightly sealed for energy efficiency, but that also means dust, allergens, odors, mold spores, and other pollutants can stay trapped indoors.

Your HVAC system moves air through the entire house, which makes it one of the best places to improve indoor air quality. But there is one big point of confusion: a standard HVAC UV coil light and an in-duct UV air purifier are not the same thing.

They both use ultraviolet technology, but they solve different problems. Choosing the wrong one can mean spending money on equipment that does not fix the issue you actually care about.

The good news is that choosing between them is pretty simple once you know what problem you are trying to solve.

The Core Difference in One Sentence:

A coil UV light helps keep the inside of your HVAC system clean, while an in-duct UV air purifier helps treat the air moving through your home.

Who This Article Is For

This guide is for homeowners trying to decide whether they need a simple UV light installed near the AC coil or a whole-house air purifier installed in the ductwork.

If your main problem is a musty smell from the vents, mold on the coil, or dirty HVAC equipment, you may only need a coil UV light. If your main concern is allergies, pet odors, cooking smells, smoke odors, or cleaner air throughout the whole house, an in-duct purifier is usually the better fit.

1. HVAC Coil UV Lights: Designed to Protect the Equipment

Coil UV lights, often called HVAC UV lights, are installed inside the air handler. They are usually mounted so the UV-C light shines directly on the evaporator coil and drain pan.

This matters because your AC coil is often cold, damp, and dark. That makes it one of the easiest places for mold, mildew, algae, and biological buildup to grow inside the system.

  • How it works: The UV-C light shines on the coil and nearby surfaces. It helps damage mold and bacteria so they cannot keep growing on those surfaces.
  • What it is good for: Reducing mold growth on the coil, helping with musty vent odors, and keeping the HVAC system cleaner.
  • The limitation: A coil UV light mostly treats the surfaces it shines on. It is not designed to clean all the air moving through your home.

For a deeper look at this specific use, see Does UV Light Really Kill Mold in HVAC?

2. In-Duct UV Air Purifiers: Designed to Treat the Air You Breathe

An in-duct UV air purifier is different. Instead of only shining on the coil, it is installed in the ductwork so it can treat air as it moves through the HVAC system.

These systems are usually aimed at whole-house air quality problems such as odors, airborne particles, bacteria, viruses, mold spores, and VOCs. Some models combine UV light with ionization, plasma, or other active air treatment technology.

It’s important to remember that no single technology solves every indoor air quality problem. Organizations such as ASHRAE recommend a layered approach that combines proper ventilation, effective filtration, humidity control, and air-cleaning technologies when appropriate.

  • How it works: Air passes through the duct system and across the purifier. Depending on the model, the purifier may use UV light, ionization, or other technology to reduce certain airborne pollutants.
  • What it is good for: Whole-home odor control, allergy support, reducing airborne irritants, and improving the way the air feels throughout the house.
  • The limitation: It costs more than a basic coil UV light and should usually be installed by an HVAC professional.

The Hidden Advantage Over Portable Air Purifiers

Portable air purifiers usually clean one room at a time. An in-duct air purifier uses your existing HVAC system to help treat air moving to the bedrooms, living room, bathrooms, and other areas of the house without adding extra machines in every room.

Side-by-Side Comparison: Which Problems Do They Solve?

The easiest way to choose between a coil UV light and a UV air purifier is to start with the problem you are trying to fix.

Air Quality Problem Coil UV Light In-Duct UV Air Purifier
Mold or slime on AC coils ✅ Best fit ➖ Not the main purpose
Musty smell from vents ✅ Often helps ✅ Often helps
Pet odors ➖ Not designed for this ✅ Better fit
Cooking odors ➖ Not designed for this ✅ Better fit
Allergy or asthma triggers ➖ Limited help ✅ Better fit
Airborne bacteria or viruses ➖ Surface-focused ✅ Better fit
Whole-house air freshness ➖ Limited ✅ Best fit


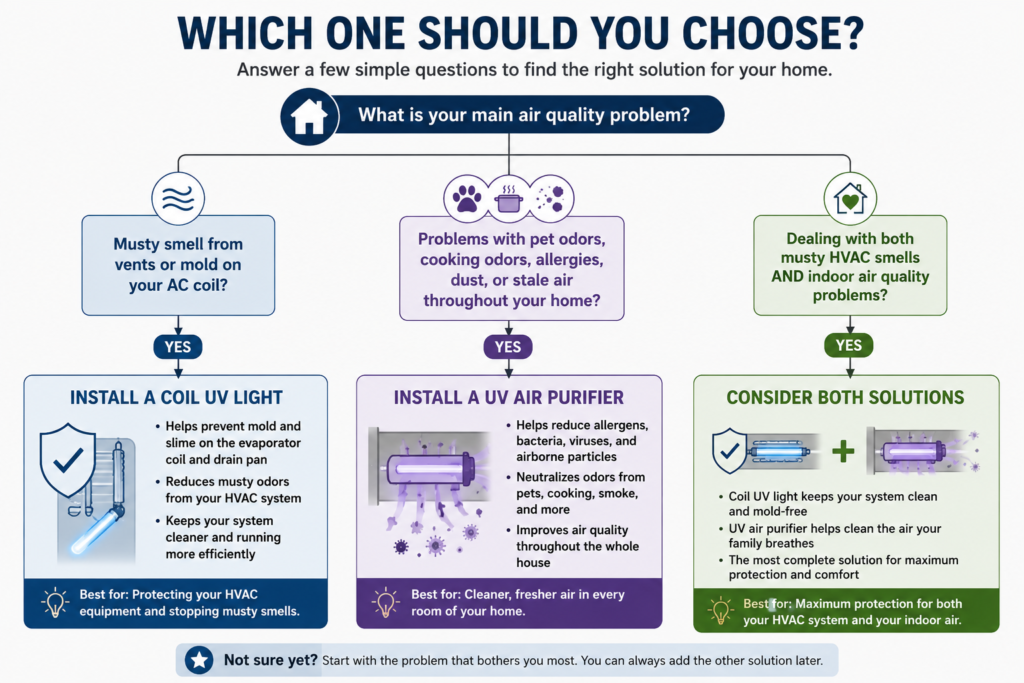
Quick Decision Guide: Which One Should You Buy?

Decision tree showing when to choose a UV coil light, a whole-house UV air purifier, or both based on mold, musty odors, allergies, pet odors, and indoor air quality concerns.If you are still unsure, use this simple decision guide.

Choose a coil UV light if:

  • Your AC has a musty smell when it starts.
  • Your evaporator coil keeps getting dirty or moldy.
  • You live in a humid climate.
  • You want the lower-cost option.
  • Your main goal is protecting the HVAC equipment.

Choose an in-duct UV air purifier if:

  • You want cleaner air throughout the whole house.
  • You have pet odors, cooking odors, smoke odors, or stale air.
  • Your family deals with allergies or asthma triggers.
  • You want something more powerful than a room air purifier.
  • Your main goal is improving the air you breathe.

Choose both if:

  • You want the coil protected and the air treated.
  • You have both musty HVAC odors and whole-house air quality problems.
  • You want the most complete setup and are comfortable with the higher cost.

Should You Upgrade to a Whole-Home Purifier?

uv-light-vs-uv-air-purifier-family-clean-airIf your main goals are allergy relief, odor reduction, and better air from room to room, a basic coil UV light may not be enough. That is where an in-duct air purifier makes more sense.
One of the best-known whole-house systems is the REME HALO Whole Home In-Duct Air Purifier. It combines UV technology with ionization to help reduce airborne particles, odors, and certain microorganisms moving through the HVAC system.

The main advantage is coverage. Instead of buying several portable air purifiers for different rooms, an in-duct purifier works with the central HVAC system you already have.

The tradeoff is cost and installation. These systems usually require a higher upfront investment and should be installed by a qualified HVAC contractor.

Safety: Coil UV Lights vs. UV Air Purifiers

Both coil UV lights and in-duct UV air purifiers are designed to operate inside the HVAC system, away from people and pets. The main safety concerns are installation, servicing, and choosing the right type of device.

  • Do not look directly at UV-C light. UV-C can irritate or damage eyes and skin. The power should be turned off before opening HVAC access panels.
  • Use proper placement. UV lights should be aimed at coils, drain pans, or the air stream, not directly at wiring, plastic parts, filters, or flexible duct for long periods.
  • Ask about ozone. Some air purification technologies can produce small amounts of ozone. If anyone in the home has asthma, COPD, or chemical sensitivity, ask for a low-ozone or no-ozone option.
  • Use professional installation. A good installer can place the device correctly, wire it safely, and make sure it only runs when appropriate.

Installed correctly, these systems are meant to treat HVAC surfaces and moving air — not people directly.

Cost vs. Long-Term Maintenance

Cost is usually the final deciding factor. Coil UV lights and whole-home UV air purifiers sit in different price ranges because they perform different jobs.

  • Coil UV lights: Usually the lower-cost option. Many basic systems fall in the hundreds of dollars, with replacement bulbs needed about once a year.
  • UV air purifiers: Usually more expensive upfront. Systems like the REME HALO also require replacement cells, often every 18 to 24 months depending on the model and usage.
  • Both together: This is the most complete setup, but also the most expensive. The coil light helps keep the HVAC equipment clean, while the in-duct purifier helps treat air throughout the home.
System Typical Cost Main Purpose Maintenance
Coil UV Light $150–$500 Helps keep coils and drain pans cleaner Replace bulb about every 12 months
In-Duct UV Air Purifier $500–$1,200+ Helps treat air moving through the home Replace purifier cell about every 18–24 months

Which One Is Right for You?

If your problem is mostly inside the HVAC system — mold on the coil, slime buildup, or a musty smell from the vents — start with a coil UV light.

If your problem is inside the living space — pet odors, cooking odors, stale air, allergy triggers, or wanting cleaner air throughout the whole house — an in-duct UV air purifier is usually the better choice.

If you have both problems, the two systems can work together. The coil light protects the equipment, and the purifier helps treat the air moving through the ductwork.

Final Thoughts

The difference between a UV light and a UV air purifier comes down to what you want the system to do.

A coil UV light is mainly an HVAC maintenance tool. It helps control growth on the evaporator coil and drain pan.

An in-duct UV air purifier is a whole-house air quality upgrade. It is better suited for odors, airborne irritants, and cleaner-smelling air throughout the home.

Before buying either one, decide whether you are trying to clean the HVAC equipment or improve the air in the rooms. That one decision usually tells you which system makes the most sense.

What to Read Next

Frequently Asked Questions

What is the main difference between a UV light and a UV air purifier?

A UV light usually refers to a coil light that shines on HVAC surfaces like the evaporator coil and drain pan. A UV air purifier is designed to treat air moving through the ductwork.

Does a coil UV light clean the air?

Not in the same way an air purifier does. A coil UV light mainly treats the surfaces it shines on. It may help with musty odors caused by coil growth, but it is not designed as a whole-house air cleaner.

Do UV air purifiers remove dust or pet hair?

No. UV air purifiers are not physical filters. You still need a good HVAC filter to capture dust, pet hair, and larger particles.

Can I install both a coil UV light and a UV air purifier?

Yes. Many homeowners use both. The coil UV light helps keep the HVAC equipment cleaner, while the in-duct purifier helps treat air moving through the house.

Are HVAC UV systems safe?

They can be safe when installed correctly inside the HVAC system. The UV light should not be exposed to people or pets, and the system should be turned off before service panels are opened.

Which one is better for allergies?

An in-duct UV air purifier is usually the better choice for allergy concerns because it is aimed at air moving through the home. A coil UV light is more focused on preventing growth inside the HVAC equipment.

Which one is better for musty AC smells?

A coil UV light is often the better first choice if the smell is coming from mold, mildew, or biological growth on the evaporator coil or drain pan.

Ozoning a House? Do’s and Dont’s

You can safely and effectively ozone a house only after the odor source has been removed, the area has been cleaned and dried, and the space can remain completely unoccupied during treatment and ventilation.

Not Sure If Ozone Is Right for Your Situation?

Before you waste your time or money, try the BreatheBetterAir Ozone Decision Machine.
Answer 6 quick questions and find out whether ozone makes sense for your situation.

  • 6 quick questions
  • Diagnostic only — nothing to buy
  • No email or credit card required


Check My Situation →

Ozoning a House: A Powerful Tool — If You Know the Rules

Ozone generators are often misunderstood. Some people swear by them for removing stubborn odors, while others warn about health risks and ruined furniture. The truth is somewhere in between: ozone can be a powerful home treatment tool — but only when used with care and precision.

Ozoning a House: A Powerful Tool — If You Know the Rules

Ozone generators are often misunderstood. Some people swear by them for removing stubborn odors, while others warn about health risks and ruined furniture. The truth is somewhere in between: ozone can be a powerful home treatment tool — but only when used with care and precision.

Ozoning a House: A Powerful Tool — If You Know the Rules

Ozone generators are often misunderstood. Some people swear by them for removing stubborn odors, while others warn about health risks and ruined furniture. The truth is somewhere in between: ozone can be a powerful home treatment tool — but only when used with care and precision.

In this guide, we’ll walk through the proven do’s and don’ts of ozoning a house. You’ll learn exactly how to prep your space, run the generator safely, and avoid the most common mistakes that lead to poor results or long-lasting smells. We’ll also dive into which odors ozone can actually remove, when it works (and when it doesn’t), and how to choose the right size generator for your needs.

Whether you’re tackling cigarette smoke, musty odors, or rental property cleanup, this step-by-step guide will show you how to use ozone the right way — and get your home smelling fresh again without causing damage or danger.

Ready to move from a quick checklist to a deeper understanding of the technology? If you’re new to ozone generators, start with our Ozone Generator Starter Guide. It explains how ozone works, when to use it, and how to use it safely before choosing a machine.

Looking for an Ozone Generator?

If you’ve decided ozone is appropriate for your situation,
you can check out this ozone generator on Amazon and compare it
with other available models.


Check Price & Options on Amazon →

As an Amazon Associate, BreatheBetterAir.org earns from qualifying purchases.

How to Use an Ozone Generator at Home Safely

Step-by-step visual showing how to use an ozone generator: remove people and pets, seal off the room, run the generator, and wait before re-entering.
Using an ozone generator isn’t like running an air purifier or setting up a fan. Ozone is powerful and potentially hazardous if misused. To keep things safe, follow these specific steps every time you use it. These are the non-negotiables.

Step 1: Evacuate the Area

Ozone is not safe to breathe — even in small doses over time. Always make sure the treatment area is completely free of:

  • People
  • Pets (including fish tanks!)
  • Houseplants

If you’re treating a whole home, everyone must leave during the treatment and stay out during the dissipation period.

Step 2: Seal the Room

Close all windows and interior doors. You want to contain the ozone within the treatment area so it can concentrate on the problem — not leak into the rest of the house. Cover HVAC vents if needed to keep ozone from spreading into your duct system.

Step 3: Set a Timer

Most generators have a built-in timer. If yours doesn’t, plug it into a wall timer so it automatically shuts off. This is crucial for safety — you should never enter the room just to turn the machine off. A typical cycle is 30 minutes to 2 hours depending on room size and odor strength.

Step 4: Post-Treatment Wait Time

After the generator shuts off, don’t rush back in. Ozone doesn’t just disappear instantly. Give it:

  • 30–60 minutes to break down in a small, well-ventilated space
  • 2–4 hours in large rooms or with high-output units

Ozone naturally converts back to oxygen, but the timing depends on airflow and how much was used. Crack windows and use a fan if you need to speed things up.
Illustration showing air flowing through a window and fan after ozone treatment, labeled 'Fresh Air In' and 'Ozone Out'.

Step 5: Re-Enter and Ventilate

Once it’s safe, re-enter the room and open windows and doors to flush out any lingering ozone. A portable fan blowing outward can help. If the room smells sharp or sterile (like chlorine), wait longer — that’s the ozone.

Bonus: Safety Signage

Consider taping a sign like “DO NOT ENTER — OZONE TREATMENT IN PROGRESS” on each entry point to the treated area. This is especially important in shared spaces, multi-unit homes, or rental properties where others may not be aware of the ozone treatment.

Even just 5 minutes of ozone exposure can cause irritation to the lungs, eyes, and throat. A clear warning helps prevent accidental entry and keeps everyone safe.

Getting the Best Results From an Ozone Generator

Ozone generators can be incredibly effective — but only if used strategically. Just plugging one in and hoping for the best often leads to weak results or, worse, an overpowering ozone smell that lingers. Here’s how to dial in your process and get the most value from each treatment.

1. Match the Generator Size to the Space

A common mistake is using an ozone machine that’s either too weak to work or so strong that it creates overkill. Use a unit sized appropriately for the room you’re treating. For example:

Quick Picks: Which Ozone Generator Size Fits Your Project?

Most homeowners don’t think in mg/hr—they think about the room they’re treating. Here are a few real-world examples to help translate ozone output into the type of machine you actually need.

  • ✅ 500–1,000 mg/hr for cars, bathrooms, and closets
  • ✅ 3,000–5,000 mg/hr for bedrooms or small apartments
  • ✅ 10,000+ mg/hr for large living spaces or full homes

Too little ozone won’t neutralize odors. Too much means longer wait times and potential ozone side effects. When in doubt, start small and scale up gradually.

2. Clean First — Ozone Is Not Magic

Ozone works by breaking down odor-causing molecules, but it won’t cut through layers of dust, food grease, or pet hair. Always prep your space:

  • ✅ Vacuum carpets and rugs
  • ✅ Mop or wipe down floors
  • ✅ Dust hard surfaces and baseboards

A cleaner room allows ozone to interact directly with odors instead of getting absorbed by surface grime.

3. Place the Generator Strategically

Don’t just drop the machine in a corner. Center it in the room if possible. If the room is large or oddly shaped, consider elevating it on a table or chair to help ozone circulate more evenly. Ozone is heavier than air, so a raised position can help it spread before settling.

4. Go Low and Slow First

If this is your first time using a machine, resist the urge to crank it up. Start with a low setting and short runtime (e.g., 30–45 minutes) and evaluate the results. You can always re-treat if the smell remains.

Overuse is a common issue. Too much ozone can create side effects like plastic smell, ozone haze, or VOC reactions with materials in the home.

5. Repeat for Stubborn Odors

Deep-set odors like smoke or mildew may require multiple treatments. It’s better to do 2–3 short sessions with ventilation in between than one long blast that oversaturates the air. “If you’re dealing with pests instead of odors, ozone won’t help. See the full guide on ozone and bed bugs.”

With proper planning and prep, ozone becomes a precise tool — not a blunt instrument. These extra steps often make the difference between “meh” and “wow.”

How to Pick the Right Size Ozone Generator

Infographic showing how to pick the right size ozone generator based on room type and odor severity, including small rooms, bedrooms, living spaces, and whole-home treatments.
Getting the size right isn’t just about results — it’s about safety. A generator that’s too small won’t neutralize odors. One that’s too big might leave ozone lingering for hours and cause damage to fabrics, rubber seals, or electronics.

Understand Ozone Output Ratings

Ozone machines are typically rated in milligrams per hour (mg/hr) — this tells you how much ozone they produce. The higher the number, the faster and more aggressively the ozone fills a space.

Here’s a rough guide for matching output to space size:

Area Treated Recommended Output
Cars / Bathrooms / Closets 500–1,000 mg/hr
Bedrooms / Small Offices 1,000–3,000 mg/hr
Living Rooms / Large Rooms 5,000–7,000 mg/hr
Whole Homes / Heavy Odor Jobs 10,000–15,000 mg/hr+

Why “Bigger Is Not Always Better”

You might be tempted to buy the most powerful unit available and just “let it rip.” But that can backfire:

  • Excess ozone takes much longer to break down
  • It increases the risk of damage to materials (rubber, plastic, upholstery)
  • It can lead to chemical reactions with VOCs, creating unwanted byproducts

Instead, aim for the minimum effective dose. Start on a lower setting and shorter time span. If odors persist, you can always repeat the process or increase exposure gradually.

Portable vs. Professional Units

Some consumer ozone generators are meant for cars and small rooms only — they max out under 1,000 mg/hr. Mid-range units often include timers, handles, and replaceable ozone plates. Large professional units are meant for entire homes or serious smoke damage, but they must be handled with caution.

If you’re deciding whether to rent or buy an ozone machine before treating your home, see my guide on when renting an ozone machine makes sense and when buying is cheaper

Need Help Choosing?

We’re building a dedicated sizing guide with examples and room calculators. Until then, follow the chart above and always test cautiously.

👉 New article: How to Pick the Right Ozone Generator for Your Space

🚗 Small Spaces (500–1,000 mg/hr)

Example: Airthereal MA500
Ideal for cars, closets, bathrooms, gym bags, and other confined spaces with light to moderate odors. Lower-output units are easier to control and are a good choice if you’re using an ozone generator for the first time.

🏠 Mid-Size Rooms (3,000–5,000 mg/hr)
Example: Airthereal MA5000
A great fit for bedrooms, apartments, offices, and moderate smoke or pet odors. This output range offers a good balance between effectiveness and control for most homeowners.

🏡 Large Areas & Heavy Odors (10,000+ mg/hr)
Example: Enerzen O-888 (35,000 mg/hr)
Designed for large living spaces, rental turnovers, smoke remediation, and severe odor problems. High-output machines work quickly but require extra attention to treatment time, ventilation, and safety procedures.

The goal isn’t to buy the most powerful machine. It’s to choose the smallest generator that can effectively treat your space. That gives you better control, shorter ventilation times, and reduces the chance of overdoing the treatment.

Before-and-After Ozone Checklist

If you want the best results from ozone — and to avoid common mistakes — preparation is key. Here’s a field-tested checklist you can follow every time you run a treatment. It’s simple, repeatable, and proven to work.

✅ Before You Turn It On

  • Clean the space. Vacuum carpets, sweep and mop floors, and wipe down dusty surfaces. Ozone works best when it’s not competing with layers of grime.
  • Remove living things. Take out people, pets, houseplants, and even fish tanks. Cover or remove food and any valuable or sensitive materials.
  • Close doors and vents. Seal off the treatment area to contain the ozone. Close HVAC vents and use painter’s tape or towels to block air leaks if necessary.
  • Use a timer. Set the generator to shut off automatically. This is especially important if you won’t be nearby.
  • Post a sign. Hang a warning on each entrance to prevent accidental entry. Something simple like “⚠️ DO NOT ENTER — OZONE TREATMENT IN PROGRESS” works great.

✅ After It Turns Off

  • Wait it out. Even after the machine shuts off, let ozone break down fully. This usually takes 30–90 minutes. For large rooms or high settings, wait 2–4 hours.
  • Ventilate thoroughly. Open windows and doors, turn on fans, and flush the room with fresh air. This speeds up the breakdown and clears any lingering smell.
  • Do a walkthrough. Smell the air. If it still smells strongly of ozone (sharp, metallic, or bleach-like), wait longer before re-entering fully.
  • Repeat if needed. If odors are still noticeable the next day, it’s okay to run a second treatment. Just go slow and ventilate each time.

With a good routine, ozoning a room becomes safe, efficient, and surprisingly simple.

Final Thoughts: Ozone Is Powerful — Respect It

Ozone generators aren’t miracle machines, but when used correctly, they can transform musty, smoky, or stale-smelling spaces into clean, fresh environments. The key is preparation, sizing, safety — and knowing when ozone is the right tool for the job.

Don’t expect ozone to fix mold problems, pest infestations, or deep cat urine damage. But for neutralizing airborne odors and refreshing a space after a flood, tenant turnover, or smoke exposure — few things work better. On going, day to day issues are better solved with UV air purifiers and HEPA in your HVAC.

Start small, ventilate well, and always stay on the safe side. That’s how you get great results without putting your health or home at risk.

Next up: Learn how to choose the right ozone generator for your home — with room-by-room breakdowns, pro tips, and model comparisons.

Do You Need a Carbon Monoxide Detector with a Propane Heater?

Carbon monoxide can be an issue anytime that there is fuel being burned as a source of heat.

It’s for this reason that almost every state has a law in place that requires carbon monoxide detectors in some capacity whether it be in homes or daycares.

At the very least it is highly encouraged to have a carbon monoxide detector in your home.

Carbon monoxide is invisible, tasteless, odorless, and is a hazard to your health.

Carbon monoxide poisoning can even result in death. It’s not be toyed with obviously.

A properly functioning propane heater will produce nearly zero carbon monoxide.

But a malfunction in a propane heater can cause incomplete combustion. Which will lead to the presence of carbon monoxide.

And could lead to carbon monoxide poisoning.

Do you need a carbon monoxide detector with a propane heater?

Carbon monoxide detectors are inexpensive and should be employed anytime you are using a propane heater. For any heater that uses gas.

And since the probability of you already having carbon monoxide detectors installed, it’s always a good time to make sure that they are working and that the battery is good.

Other Propane Heater safety measures

Oxygen depletion sensor (ODS)

Propane heaters that are meant for indoor use come with an oxygen depletion sensor as a standard protection mechanism.

This is a safety feature that causes the heater to shut off when the oxygen around the heater becomes depleted.

This is important because when the oxygen becomes low, it creates a void where carbon monoxide will fill it.

If the oxygen depletion sensor shuts down the heater, although there is a good chance of carbon monoxide, the ODS sensor will not detect it.

Another reason that a carbon monoxide detector is a must when using a propane heater indoors.

Propane additives

Propane is completely odor free at its origin. For that reason, a harmless chemical called Mercaptan is added to let you know when there is a leak.

The smell is similar to rotten eggs or a dead animal. So there is no mistaking when you smell it.

But relying on the sense of smell is not full proofed. One of symptoms common to cold and flu season is a reduced sense of smell.

For that reason, it is highly suggested that in addition to a carbon monoxide detector that you use a propane gas detector.

Multi function detectors like the Kidde Nighthawk Carbon Monoxide Detector & Propane, Natural, & Explosive Gas Detector

will add a higher level of protection from the threat of a propane leak or any other natural or explosive gas and serve a carbon monoxide detector in one.

Summary

Do you need a carbon monoxide detector with a propane heater?

A Carbon monoxide detector is highly suggested with the use of a propane because even though a propane heater may come with an oxygen depletion sensor, it does not have a carbon monoxide detector on board.

Carbon monoxide poisoning can be deadly and is not something worth risking since the price of a carbon monoxide detector is fairly inexpensive.

Many people opt for multi-detectors that can measure carbon monoxide as well as gases like propane and other natural gases. And sound a loud alarm when they are detected.