The first half of this guide explained what ozone is, how it works, and how to use it safely around your home.
This second half focuses on applying those principles to real-world odor problems and restoration projects. You’ll learn when ozone can help with smoke, pet odors, vehicles, flood damage, and musty spaces—and just as importantly, when another solution should come first.
You’ll also find practical troubleshooting advice, a restoration workflow, answers to common questions, and a final safety checklist you can use before every treatment.
Table of Contents
One Principle to Remember
Ozone is a finishing tool—not a cleaning tool.
The correct sequence is to remove the source first, clean contaminated materials, dry the affected area completely, and consider ozone—if appropriate—only for certain residual odors.
Whether you’re treating smoke odors after a fire, pet urine in carpet, a musty basement, or odors trapped inside a vehicle, the process is always the same: identify the source, restore the space properly, and use ozone safely and responsibly.
Let’s begin with some of the most common real-world applications for ozone generators.
Chapter 11 — Smoke Odors
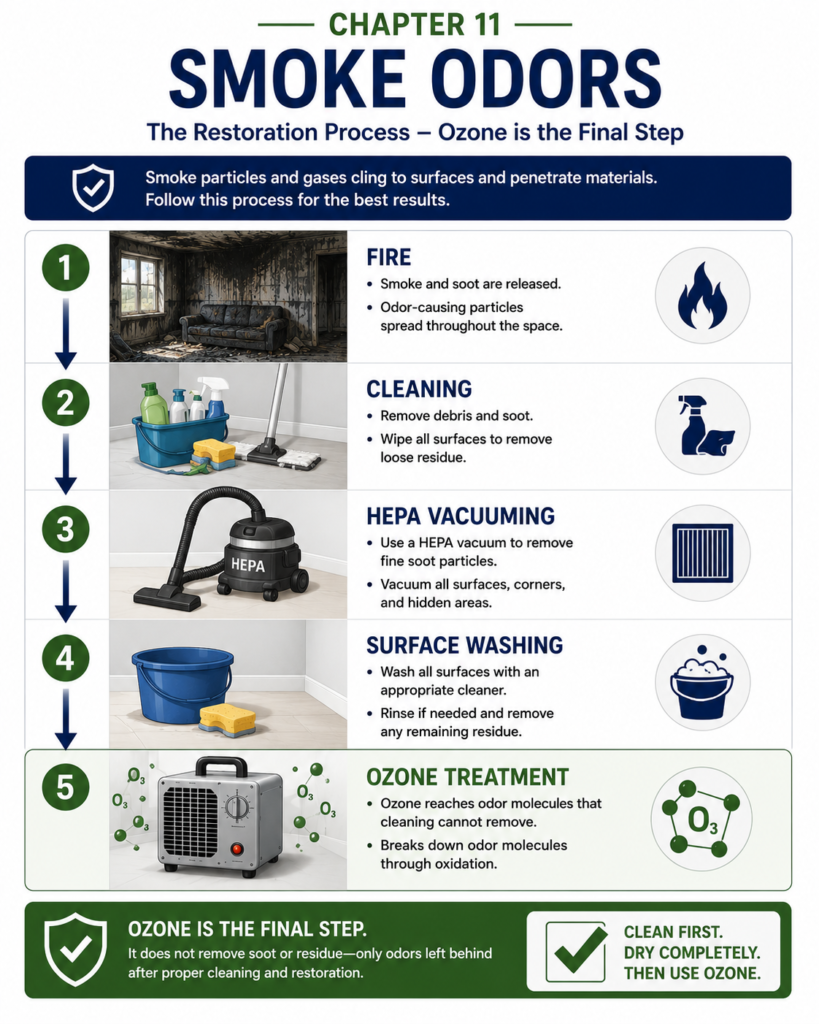 Smoke odor is one of the most common reasons homeowners buy ozone generators—and one of the most misunderstood.
Under controlled, completely unoccupied conditions, ozone may reduce certain residual smoke odors after physical contamination has been removed. Effectiveness varies, and the EPA warns that ozone can be ineffective against many indoor contaminants while also creating irritating or corrosive byproducts. See the EPA’s ozone-generator guidance.
But smoke odor is not just “bad air.”
Smoke leaves behind particles, gases, residues, films, and chemical contamination that can cling to surfaces and penetrate porous materials.
Many of these compounds continue releasing odor long after the visible smoke has disappeared, which is why smoke odors often seem to return even after a room has been aired out.
If contaminated materials are not cleaned first, ozone may reduce the smell temporarily without solving the underlying problem.
This chapter explains when ozone can help with smoke odors, when it is not enough, and how to avoid the most common mistakes homeowners make during smoke odor treatment.
Why Smoke Odors Are So Difficult to Remove
Smoke odor is difficult because it does not remain only in the air.
Smoke contains tiny particles and gases produced by combustion. These contaminants can travel throughout a room, settle onto surfaces, and become embedded inside porous materials.
Common smoke reservoirs include:
- Drywall
- Insulation
- Carpet and padding
- Upholstery
- Curtains
- Clothing
- Cabinets
- Ceiling tiles
- HVAC ducts
- Vehicle headliners and seat foam
Once smoke residue settles into these materials, it can continue releasing odor for weeks, months, or even years.
That is why a room can still smell like smoke long after smoking stopped or a fire was extinguished.
Fresh Smoke, Lingering Smoke Odor, and Thirdhand Smoke
Not all smoke problems are the same.
Understanding the difference helps determine whether ozone is likely to help.
Fresh Smoke
Fresh smoke is the active mixture of gases and particles present during or immediately after combustion.
This includes smoke from cigarettes, cigars, burned food, candles, wildfire smoke, or structural fires.
During this stage, ventilation and filtration are usually the first priorities. Ozone should never be used while people are present in an attempt to clean fresh smoke from occupied air.
Lingering Smoke Odor
Lingering smoke odor remains after the visible smoke has cleared.
This is the smell homeowners usually try to remove with ozone. It comes from odor molecules trapped in fabrics, walls, furniture, carpet, ductwork, and other materials.
Ozone may reduce some residual odor at this stage, but it cannot substitute for removing physical smoke residue.
Thirdhand Smoke
Thirdhand smoke refers to the chemical residue left behind after tobacco smoke has cleared.
It includes nicotine, tar, and many other combustion byproducts that cling to walls, furniture, flooring, fabrics, dust, and HVAC components.
Over time, some of these residues can continue reacting with indoor air and surfaces, contributing to persistent odors.
Thirdhand smoke is one reason old cigarette odor can be so difficult to eliminate.
Even if ozone reduces the smell, it does not necessarily remove all of the chemical residue that created the odor in the first place.
The EPA defines thirdhand smoke as contamination that persists after secondhand smoke has entered the air and notes that tobacco-related gases and particles can become embedded in carpet, walls, furniture, blankets, and toys. See the EPA’s thirdhand-smoke guidance.
Important Distinction
Ozone can reduce smoke odor, but odor reduction is not the same as removing every smoke-related contaminant from a room.
A room may smell better while still containing nicotine, tar, soot, or other residues that require physical cleaning.
How Ozone Helps With Smoke Odor
Ozone may react with some smoke-related odor compounds through oxidation.
When ozone contacts certain odor-causing smoke molecules, it changes their chemical structure. Once those molecules are altered, they may no longer produce the same smell.
This is why ozone can be useful after normal cleaning has already removed soot, ash, nicotine film, and other visible contamination.
As a gas, ozone may enter some exposed cracks, fibers, vents, and compartments, but contact does not guarantee effective or harmless treatment. Possible contact areas include:
- Fabric fibers
- Small cracks
- Vehicle vents
- Closets
- Cabinet interiors
- Other hidden air spaces
However, ozone still has limits.
The heavier the smoke contamination, the more important thorough cleaning and professional assessment become. Ozone should not be considered until soot, ash, nicotine residue, and other deposits have been removed.
It can only react with odor molecules it can physically reach. If smoke contamination is sealed deep inside insulation, drywall, carpet padding, or wall cavities, ozone may not reach enough of the source to permanently remove the odor.
Cleaning Comes Before Ozone
The biggest mistake homeowners make with smoke odor is assuming ozone can replace physical cleaning.
It cannot.
Ozone should be used as the final deodorization step after soot, ash, nicotine, tar, and other smoke residue have been removed as thoroughly as practical.
If that contamination remains on surfaces or inside porous materials, it will continue releasing odor after the ozone treatment ends.
The full restoration framework is explained earlier in this guide. This section focuses specifically on the cleaning steps most important for smoke contamination.
Recommended Smoke-Cleanup Sequence
Step 1: Remove Heavily Damaged Materials
Begin by removing anything that is permanently damaged or too contaminated to clean effectively.
This may include:
- Burned furniture
- Charred building materials
- Smoke-damaged insulation
- Heavily contaminated fabrics
- Items that cannot realistically be restored
Removing unsalvageable materials eliminates major odor reservoirs before deodorization begins.
Step 2: HEPA Vacuum Loose Particles
Fine soot and smoke particles settle throughout the room.
Before washing surfaces, vacuum them carefully using equipment fitted with a HEPA filter.
Pay particular attention to:
- Floors
- Baseboards
- Walls
- Ceilings
- Furniture
- Window coverings
- Air vents and registers
HEPA filtration helps capture fine particles instead of redistributing them into the air.
Step 3: Wash Hard Surfaces
Cigarette smoke and fire smoke often leave an oily film containing nicotine, tar, soot, and other combustion residue.
That film must be physically removed.
Clean walls, ceilings, cabinets, doors, trim, and other hard surfaces with products appropriate for the affected material and type of smoke residue.
The goal is to remove contamination—not simply cover the odor with fragrance.
Step 4: Clean or Replace Soft Materials
Smoke penetrates fabrics and other porous materials easily.
Depending on the item, cleanup may require:
- Professional carpet extraction
- Cleaning upholstered furniture
- Laundering curtains
- Washing bedding and clothing
- Cleaning removable fabric covers
- Replacing materials that remain heavily contaminated
If carpet padding, upholstery foam, or other porous materials remain saturated with smoke residue, ozone alone is unlikely to provide a permanent solution.
Best Practice
Cleaning removes the physical contamination.
Ozone treats the lingering odor that remains afterward.
Using them in the correct order produces much better results than relying on ozone alone.
Preparing a Smoke-Damaged Room for Ozone
Once cleaning is complete, prepare the room according to the procedures in Chapter 7.
At a minimum:
- Remove all people, pets, birds, and plants.
- Make sure the room and its contents are completely dry.
- Close exterior windows and doors.
- Turn off the HVAC system unless the ductwork is intentionally being treated in a fully vacant building.
- Seal vents or other air pathways when necessary.
- Open closets, cabinets, and drawers that are part of the treatment area.
- Remove or protect ozone-sensitive materials.
- Position the generator where airflow is unobstructed.
- Set the timer so no one needs to re-enter during treatment.
Do not begin treatment while wet cleaning products, damp carpet, or recently washed upholstery are still drying.
Different Types of Smoke Require Different Approaches
Cigarette and Cigar Smoke
Tobacco smoke leaves a sticky nicotine and tar film on walls, ceilings, cabinets, furniture, and other exposed surfaces.
Thorough detergent cleaning is especially important before ozone is used.
If the residue remains, the odor will often return after treatment.
Wildfire Smoke
Wildfire smoke can enter through windows, doors, attic vents, and HVAC systems.
Even after visible ash has been removed, fine smoke particles may remain in carpets, upholstery, insulation, and ventilation components.
Ozone may help reduce lingering odor after cleanup, but filtration and physical particle removal usually come first.
Structural Fire Smoke
Smoke from a building fire is often more complex than tobacco smoke.
Burned plastics, wiring, insulation, finishes, and household contents may create soot and chemical residues that require specialized cleaning and material removal.
Significant structural fire damage should usually be handled by a professional restoration company.
In these situations, ozone may be used during final deodorization, but it is only one part of a much larger restoration process.
Smoke Odor Removal in Vehicles
Vehicle interiors are small and enclosed, which can allow ozone concentrations to rise quickly and makes strict vacancy, controlled activation, waiting, and ventilation especially important.
Even so, vehicle treatments begin with cleaning—not ozone.
Before treatment:
- Remove trash and personal belongings.
- Vacuum the seats, carpets, floor mats, trunk, and cargo areas.
- Clean hard surfaces to remove nicotine and smoke film.
- Clean or extract fabric upholstery when necessary.
- Replace a contaminated cabin air filter.
Use HVAC recirculation only if permitted by both the vehicle and ozone-generator instructions, configure it before activation, and never enter the vehicle to change controls during treatment. The Car Ozone Readiness Check explanation covers these prerequisites.
The vehicle must remain completely unoccupied while the generator is operating.
After treatment, follow the generator manufacturer’s shutdown and waiting instructions, then ventilate thoroughly before driving or allowing passengers inside.
Rental Properties and Hotel Rooms
Property managers, hotels, and vacation rental operators sometimes use ozone to treat smoke odors between occupants.
These treatments should occur only after normal turnover cleaning and smoke-residue removal have been completed.
Preparation may include:
- Cleaning walls, ceilings, doors, and hard surfaces.
- Laundering or replacing curtains and linens.
- Vacuuming or extracting carpet and upholstery.
- Cleaning cabinets, closets, and other enclosed areas.
- Replacing materials that remain heavily contaminated.
Only after the room is clean, dry, vacant, and isolated should ozone be considered for the remaining odor.
In apartments, condominiums, and other shared buildings, do not use ozone unless you can prevent it from migrating into hallways, neighboring units, or shared ventilation systems.
Before Repeating a Treatment
If smoke odor remains after cleaning, do not automatically increase runtime or assume several short cycles are safe. Every additional cycle increases ozone exposure to materials.
After each cycle:
- Follow the manufacturer’s shutdown and waiting instructions.
- Ventilate thoroughly.
- Evaluate the room only after the ozone odor has cleared.
- Determine whether another treatment is actually justified.
If repeated treatments produce little lasting improvement, stop and look for hidden smoke residue rather than continuing to increase the runtime.
Best Practice
Use only the manufacturer-directed procedure for the exact model and application.
If the smoke odor returns, investigate the source before treating the room again.
When DIY Treatment Is Not Enough
Some smoke contamination extends beyond what a homeowner can realistically correct with portable equipment.
Professional restoration should be considered when:
- Smoke has entered wall or ceiling cavities.
- Insulation is heavily contaminated.
- The HVAC system contains significant soot or smoke residue.
- Large amounts of soot remain throughout the building.
- The odor returns quickly after repeated cleaning and treatment.
- The property experienced a major structural fire.
- Contaminated materials require demolition or specialized cleaning.
Professional restoration companies have inspection tools, commercial air scrubbers, specialty cleaning products, containment equipment, and methods for reaching contamination that a portable ozone generator cannot correct.
Know When to Stop
If you have cleaned thoroughly, completed more than one controlled ozone treatment, and the odor continues returning, the problem is probably not a lack of ozone.
It is more likely that smoke contamination remains somewhere the gas cannot reach effectively.
Repeated Treatments and Material Damage
Every ozone treatment exposes the room and its contents to oxidation.
Repeated or unnecessarily long smoke treatments increase the risk of cumulative damage to ozone-sensitive materials.
Pay particular attention to materials the EPA identifies as susceptible, including natural rubber, electrical wire coatings, certain fabrics, and artwork containing susceptible dyes or pigments.
Chapter 7 contains the complete material-protection guidance. Do not assume inspection between cycles prevents cumulative damage.
Common Smoke-Treatment Mistakes
- Using ozone instead of cleaning smoke residue.
- Leaving soot, ash, or smoke-damaged debris in the treatment area.
- Ignoring contaminated carpet padding, upholstery foam, insulation, or ductwork.
- Running treatments longer than necessary.
- Assuming a stronger treatment will correct hidden contamination.
- Failing to allow the waiting period and full ventilation before re-entry.
Most unsuccessful smoke treatments can be traced to incomplete cleaning, hidden contamination, or excessive reliance on ozone.
How to Know Whether the Treatment Worked
Evaluate the results only after the treatment area has completed the waiting period and has been thoroughly ventilated.
Ask:
- Is the original smoke odor gone after the ozone smell has cleared?
- Does the improvement remain over the following days?
- Have visible soot, nicotine, tar, and other smoke residues been removed?
- Does the room smell normal without fragrances or masking products?
If the smoke odor returns, further inspection and cleaning are usually more appropriate than immediately running another ozone cycle.
For the supporting article, read Can an Ozone Generator Get Rid of Cigarette Smoke?.
The Bottom Line
Ozone may reduce certain lingering smoke odors, but results vary and it should be considered only after physical smoke contamination has been removed as thoroughly as possible.
Clean first, use a controlled treatment, ventilate thoroughly, and stop treating when the improvement lasts.
Chapter Summary
- Smoke odor comes from gases, particles, and residues trapped on surfaces and inside porous materials.
- Cleaning soot, nicotine, tar, ash, and contaminated fabrics must come before ozone treatment.
- Ozone may be considered for certain residual odors only after cleanup.
- Vehicles and vacant rental rooms are often good candidates when they can be cleaned, isolated, and ventilated properly.
- Multiple short treatments are not automatically safe; each cycle adds exposure to materials.
- Returning odors usually indicate hidden contamination rather than insufficient ozone.
- Serious structural fire damage, contaminated insulation, and heavily affected HVAC systems generally require professional restoration.
Next Chapter: Pet odors present a different challenge because urine is a liquid contaminant that can soak deeply into carpet, padding, wood, concrete, and subfloors. The next chapter explains why enzyme cleaning comes first, why urine odors often return, and when ozone can provide a useful finishing treatment.
Chapter 12 — Pet Odors
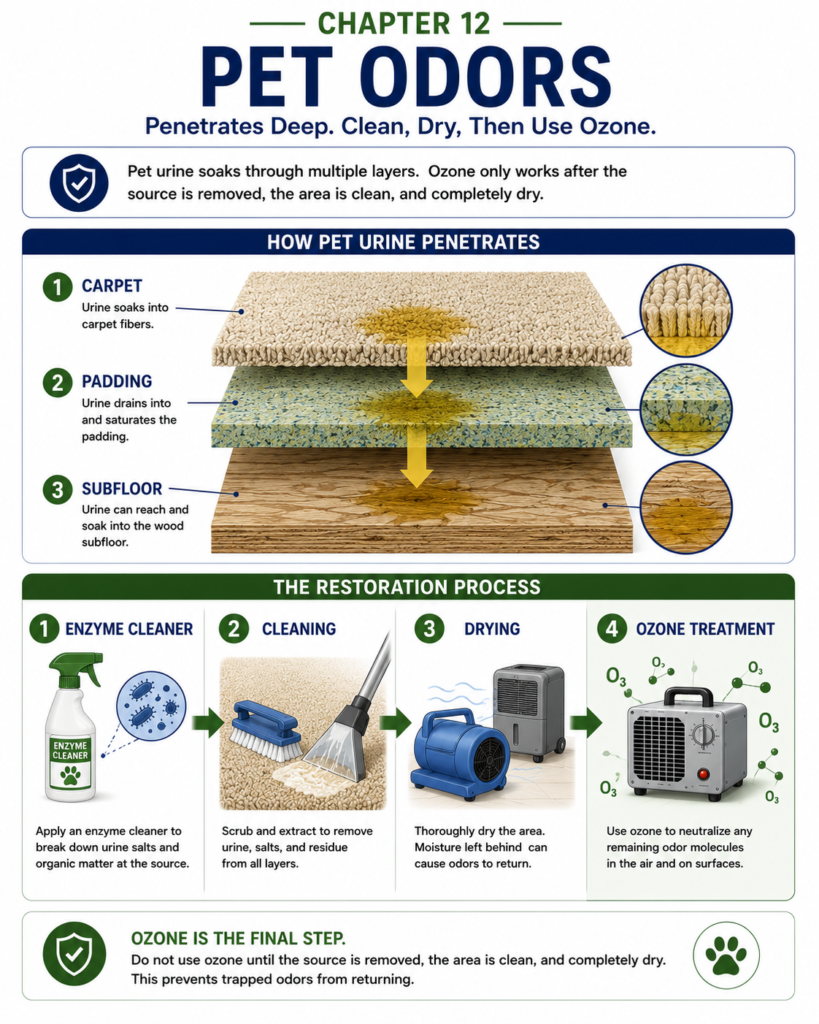 Pet odors are not just smells in the air. In many cases, they are signs of contamination hidden deep inside building materials and furnishings.
As discussed in Chapter 5, ozone should be considered, if at all, only after the odor source has been removed. That principle is especially important with pet odors.
Ozone can help reduce some lingering pet odors, but it is often misunderstood—particularly when urine is involved.
Smoke odor usually comes from particles and gases that settle onto surfaces. Pet urine is different. It is a liquid biological contaminant that can soak downward into carpet, carpet padding, upholstery, wood, concrete, cushions, and subfloors.
That difference changes everything.
If the urine source remains trapped inside those materials, ozone may temporarily improve the smell in the room, but the odor often returns as new odor-causing compounds continue escaping from the contaminated area.
This chapter explains ozone’s limits with pet odors, why product-appropriate cleaning and physical removal come first, and when contaminated materials may need to be removed or replaced.
Why Pet Odors Are Different From Smoke Odors
Chapter 11 explained that smoke odors usually come from residue left on surfaces and inside porous materials after combustion.
Pet odors are different because they often originate from a liquid contaminant that has soaked into the material itself.
A dog smell on a blanket may disappear after laundering.
A pet accident on a tile floor may be removed with proper cleaning.
But urine that has soaked through carpet into the padding or subfloor is a very different problem.
In that situation, the source is no longer sitting on the surface—it is hidden inside the material.
Ozone can only react with odor molecules it can physically reach. If the contamination is buried beneath carpet, absorbed into wood, or trapped inside a cushion, ozone may never reach enough of the source to eliminate the odor permanently.
The Pet Odor Rule
If the odor source is still inside the material, ozone is not the first solution.
Locate the contamination, clean it thoroughly, allow it to dry completely, and only then consider ozone as a finishing treatment.
Why Cat Urine Is So Difficult to Remove
Cat urine is one of the most persistent household odors because it is concentrated, often deposited repeatedly in the same locations, and frequently penetrates deep into porous materials before it is discovered.
As the contamination ages, the odor often becomes stronger and more noticeable. Changes in humidity and temperature can cause old contamination to release odor again, even after the room seemed improved.
This is why homeowners often say:
“The smell went away, but then it came back.”
In many cases, the ozone did reduce the odor molecules present in the air at that moment. However, if urine remained inside the carpet padding, wood, concrete, upholstery, or subfloor, the contamination continued generating new odor.
Ozone cannot permanently solve that problem by itself.
Fresh Urine vs. Old Urine Contamination
Fresh urine is usually much easier to remove because it has had less time to penetrate deeply into surrounding materials.
If it is located quickly, extracted thoroughly, and treated with an appropriate enzyme cleaner, much of the contamination may remain near the surface where it can be removed effectively.
Older contamination behaves very differently.
Over time, urine may:
- Soak through carpet into the padding.
- Spread beneath flooring.
- Penetrate wood or concrete.
- Contaminate baseboards or drywall edges.
- Continue releasing odor long after the surface appears clean.
Once contamination has reached this stage, deodorization alone is rarely enough. The source must be located and physically cleaned, sealed, or removed before ozone can provide lasting improvement.
Why Masking Pet Odor Does Not Work
Many homeowners first try air fresheners, scented sprays, candles, plug-in fragrance devices, or strongly scented cleaners.
These products may temporarily cover the odor, but they do not remove the contamination causing it.
Sometimes they make the problem worse by combining perfume with urine odor.
Ozone is occasionally misused the same way—as an attempt to change the smell of the room without addressing the source.
As explained in Chapter 5 and reinforced in Chapter 11, ozone cannot replace source removal.
The correct sequence is:
- Locate the contaminated area.
- Clean, remove, or repair the source.
- Allow the area to dry completely.
- Use ozone only if a lingering odor remains.
Even after that sequence, ozone results vary and a recurring odor points back to remaining contamination or moisture.
Finding the Source Comes First
As discussed in Chapter 5, source identification and removal come before any deodorizing step.
Before an ozone generator is ever turned on, the most important job is finding where the odor is actually coming from.
Many homeowners treat an entire room when only one small section of carpet or flooring is contaminated.
The opposite also happens.
Someone cleans one visible stain while several hidden urine deposits continue producing odor elsewhere in the room.
The goal is to locate the contamination—not simply the smell.
If you don’t know where the urine is, you don’t know what actually needs to be cleaned.
The Proper Cleaning Sequence
Successful pet odor removal follows the same basic restoration process every time. Ozone should be the final step—not the first.
Step 1: Locate the Contamination
Identify every area affected by urine before beginning treatment.
If multiple accidents have occurred over time, assume there may be more than one contaminated location.
Inspection may involve careful visual and odor-source investigation, moisture assessment, and—in some circumstances—a UV light. UV fluorescence is not specific to urine, so suspicious areas still require confirmation and appropriate cleaning.
Step 2: Use an Enzyme Cleaner
Some enzyme or bacteria-based products are formulated for pet urine, but formulations and compatible surfaces vary. Select a product labeled for the contaminant and material involved, test it as directed, and never mix cleaners unless the labels expressly permit it.
Follow the manufacturer’s instructions carefully and allow enough contact time for the product to work before evaluating the results.
Step 3: Deep Clean the Area
After enzyme treatment, remove as much remaining contamination as possible.
This may include:
- Hot water extraction of carpet.
- Carpet shampooing.
- Mopping hard floors.
- Cleaning nearby walls and baseboards.
- Removing contaminated debris.
The objective is to remove the source—not simply improve the smell.
Step 4: Allow Everything to Dry
As explained in Chapter 7, ozone treatments should never begin while affected materials are still wet.
Wet materials indicate that cleaning or drying is incomplete. Do not begin ozone treatment until the source and moisture problem have been addressed and the material has dried according to the restoration plan.
Remember
Cleaning removes contamination.
Drying removes moisture.
Ozone may alter some remaining odor-producing compounds.
Each step has a different purpose, and none of them replace the others.
When Materials Need to Be Replaced
Sometimes cleaning simply is not enough.
If urine has deeply saturated carpet padding, plywood, particle board, drywall, or other porous materials, replacement may be the only permanent solution.
No ozone generator can remove contamination that remains locked inside building materials.
In these situations, replacing the affected material often eliminates the source far more effectively than repeated deodorization attempts.
As difficult as replacement may seem, it is often faster, less expensive, and more successful than performing repeated ozone treatments that never address the underlying contamination.
Where Ozone Fits In
Once contaminated materials have been cleaned—or replaced when necessary—and the area is dry, ozone may be considered for certain residual odors if the space can be fully vacated and isolated.
Its possible role is limited to reacting with some accessible odor-producing compounds that remain after proper cleanup.
It is particularly useful for treating:
- Walls.
- Hard flooring.
- Cabinets.
- Closets.
- Air spaces.
- Other surfaces that may still hold residual odor.
This is the same restoration approach discussed throughout this manual: remove the source first, then use ozone to address the odor that remains.
Before Repeating a Pet-Odor Treatment
If a noticeable odor remains after the first ozone treatment, resist the temptation to immediately double the runtime.
Follow the ventilation and re-entry procedures described in Chapters 9 and 10, then reevaluate the source. Do not assume another short treatment is safe or effective merely because it is shorter.
If repeated treatments produce little improvement, it is usually a sign that contamination still remains somewhere inside the room—not that more ozone is needed.
At that point, spend more time looking for the hidden source instead of simply increasing ozone exposure.
Pet Odor Treatment in Vehicles
Vehicle interiors can reach high ozone concentrations quickly because of their small volume. Cleaning, complete vacancy, controlled activation, manufacturer-directed waiting, and thorough ventilation remain mandatory.
As discussed in Chapter 11, the same restoration principle applies whether you’re treating smoke or pet odors: clean first, deodorize second.
Before using an ozone generator:
- Vacuum all carpeting and upholstery.
- Clean hard surfaces.
- Remove pet hair and dander.
- Treat any urine contamination with an enzyme cleaner.
- Allow all cleaned areas to dry completely.
Use HVAC recirculation only if both the vehicle and ozone-generator instructions permit it, configure the controls before activation, and never enter during treatment. Start with the Car Ozone Readiness Check explanation.
After treatment, follow the ventilation procedures covered in Chapter 9 by opening all doors and windows and allowing the vehicle to air out thoroughly before driving it.
Apartments, Condos, and Rental Properties
Pet odors are a common problem in rental housing, but extra care is required when ozone generators are used in multi-unit buildings.
Shared walls, common HVAC systems, and air leaks around doors may allow ozone to migrate into neighboring units.
If you cannot completely isolate the treatment area, ozone may not be an appropriate solution.
Property owners should always complete normal cleaning before considering ozone treatment and should follow all building rules regarding its use.
The room should also be prepared according to the procedures described in Chapter 7, including removing occupants, isolating the treatment area, and protecting neighboring spaces from ozone migration.
When to Call a Professional
Some pet odor problems extend beyond what a homeowner can realistically correct.
Professional odor restoration should be considered when:
- The odor keeps returning after thorough cleaning.
- Urine has soaked into subfloors or structural materials.
- Large areas of carpet padding are contaminated.
- Multiple pets have repeatedly soiled the same areas.
- The source cannot be located.
- The contamination has spread into wall cavities or other concealed spaces.
Professional restoration companies have specialized equipment and experience that allow them to locate hidden contamination and determine whether cleaning or material replacement is the better solution.
If the Odor Keeps Coming Back…
Repeated ozone treatments rarely solve a pet odor problem if the contamination itself is still present.
When the odor returns again and again, the source almost always needs additional cleaning or removal—not additional ozone.
Repeated Treatments and Material Damage
Repeated ozone treatments expose the same household materials to oxidation over and over.
As explained in Chapter 6, excessive ozone exposure can gradually damage certain materials over time.
The EPA directly identifies materials such as natural rubber, electrical wire coatings, certain fabrics, and artwork containing susceptible dyes or pigments. Other materials may also be affected depending on formulation and exposure.
See the EPA’s discussion of material damage from ozone.
- Natural rubber seals and weatherstripping.
- Electrical wire coatings.
- Susceptible fabrics, dyes, pigments, and artwork.
If repeated treatments become necessary, inspect sensitive materials periodically and avoid operating the generator longer than required.
Common Homeowner Mistakes
- Using ozone before locating the source.
- Skipping a cleaner labeled for the contaminant and compatible with the material.
- Expecting ozone to remove urine soaked into carpet padding or subfloors.
- Running excessively long treatments instead of addressing hidden contamination.
- Leaving pets, people, or houseplants in the treatment area.
- Failing to ventilate thoroughly before re-entry.
Nearly all unsuccessful pet odor treatments can be traced to one of these mistakes.
How to Evaluate Success
Do not judge the results immediately after the ozone generator shuts off.
Instead, follow the waiting and ventilation procedures described in Chapters 9 and 10, then evaluate the original odor.
Ask yourself:
- Has the original pet odor disappeared?
- Does the room remain odor-free over the next several days?
- Has every contaminated area been cleaned or replaced?
- Does the odor return after changes in humidity or temperature?
If the odor comes back after ventilation or returns a few days later, the contamination itself probably remains somewhere within the room.
For the supporting article, read Can Ozone Remove Cat Urine Smell?.
Chapter Summary
- Pet urine is a biological contaminant, not simply an odor in the air.
- Cat urine is one of the most difficult household odors to eliminate permanently.
- Use a cleaner labeled for the contaminant and compatible with the affected material before considering deodorization.
- Ozone may be considered for certain residual odors, but it is not a substitute for cleaning.
- Deep contamination inside carpet padding, wood, or subfloors often requires material removal or replacement.
- Multiple short ozone treatments are not automatically safe; each cycle adds exposure to materials.
- If pet odors continue returning, additional cleaning or professional restoration is usually needed.
- Always follow the preparation, operating, ventilation, and re-entry procedures covered throughout this manual.
Next Chapter: Water damage and musty odors introduce another common misconception—that ozone removes mold. In reality, successful treatment begins with stopping the moisture source, drying the structure, and correcting the conditions that allowed the odor to develop in the first place. place.
Chapter 13 — Water Damage and Musty Odors
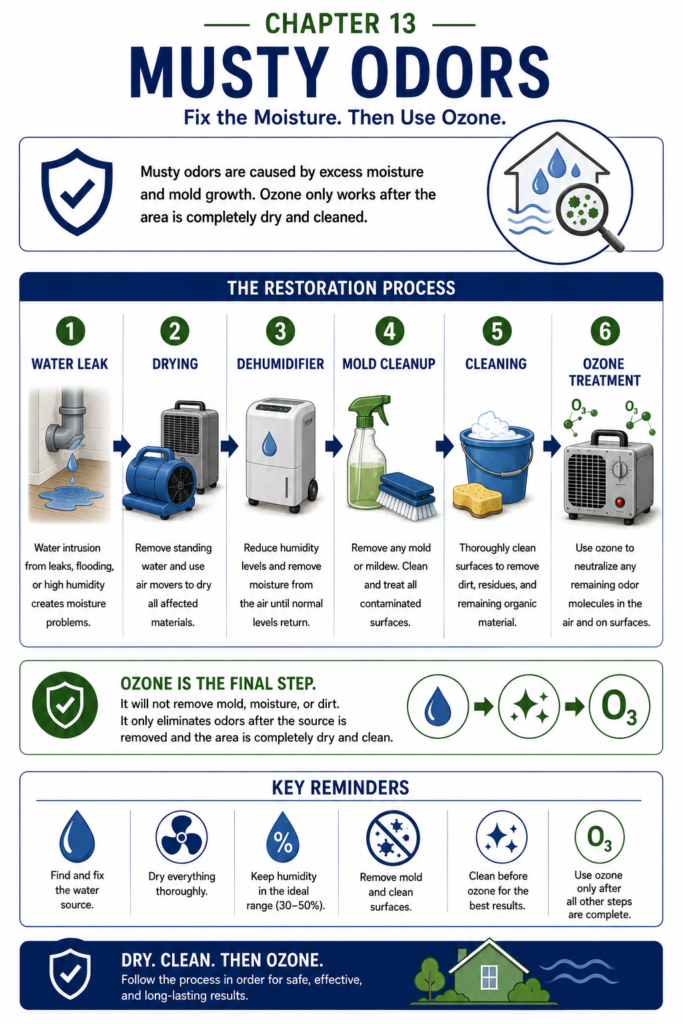 Musty odors are often a warning sign—not the actual problem.
Many homeowners notice a damp, stale smell after a plumbing leak, basement flood, roof leak, or period of high humidity. Their first instinct is often to look for something that will eliminate the odor.
While ozone can sometimes reduce lingering musty smells, it cannot repair the conditions that created them.
As discussed in Chapter 5, ozone should be viewed as a finishing tool—not a replacement for correcting the underlying problem.
This chapter explains why musty odors develop, how they relate to moisture and microbial growth, and where ozone fits into the restoration process after water damage.
Why Musty Odors Develop
A musty smell often points to a moisture problem and may accompany mold or other microbial growth.
Microbial volatile organic compounds can contribute to the familiar damp, earthy odor, but odor alone cannot confirm whether mold is present or how extensive it is.
The smell itself is only one symptom.
The underlying condition to correct is excess moisture. The U.S. Environmental Protection Agency’s mold and moisture guide advises fixing the water problem, cleaning up mold promptly, and drying water-damaged areas and items within 24 to 48 hours when possible.
If that moisture remains, the odor usually returns no matter how many deodorizing products are used.
Musty Odor vs. Active Mold Growth
One of the biggest misconceptions is that a musty smell automatically means mold is growing everywhere.
Sometimes that’s true.
Sometimes it isn’t.
A lingering musty odor may remain after water damage has already been repaired and the structure has been cleaned.
Active mold growth, however, means living contamination is still present within the building materials.
This distinction is important because ozone addresses odors—not moisture problems or structural mold contamination.
Important Reminder
Removing the smell does not necessarily remove the mold.
If active mold growth remains inside walls, insulation, flooring, or other building materials, proper remediation is still required even if the room smells better afterward.
Moisture Is Always the First Problem to Solve
The first objective after any water damage event is stopping the moisture.
This may involve repairing a plumbing leak, fixing a roof, correcting drainage problems, replacing damaged pipes, or controlling indoor humidity.
As long as excess moisture remains, microbial growth can continue and new odors can develop.
Ozone has no ability to:
- Stop a leak.
- Remove standing water.
- Dry wet building materials.
- Lower humidity.
- Prevent future water intrusion.
Those problems must always be corrected before ozone is considered.
The Proper Restoration Sequence
Successful water damage restoration follows a logical sequence.
- Stop the water source.
- Remove standing water.
- Dry the structure completely.
- Remove damaged or contaminated materials.
- Clean affected surfaces.
- Verify the building is dry.
- Use ozone only if lingering odors remain.
This is the same restoration-first approach discussed throughout this manual and reinforced in Chapters 5, 7, and 8.
When homeowners reverse this order and begin with ozone, they often become frustrated because the musty odor eventually returns.
The odor returned because the moisture problem never went away.
Drying Comes Before Deodorizing
As covered in Chapter 7, do not use ozone while water removal, drying, or mold cleanup is still underway. Ozone is not a drying or remediation method.
One of the biggest differences between successful and unsuccessful water damage restoration is how completely the building is dried.
Ozone should never be used to “cover up” the smell of a damp building.
If walls, flooring, insulation, carpet, or structural framing still contain excess moisture, microbial growth may continue and musty odors will likely return.
The building must first be returned to a dry condition before deodorization can be expected to produce lasting results.
The Tools Used to Dry a Building
Professional restoration companies rely on specialized equipment that serves very different purposes than an ozone generator.
Air Movers
Air movers increase airflow across wet surfaces, helping moisture evaporate more quickly.
Rather than drying the air directly, they accelerate evaporation from materials such as carpet, drywall, wood flooring, and framing.
Dehumidifiers
As moisture evaporates into the air, it must be removed from the building.
Dehumidifiers collect that moisture and lower indoor humidity, allowing wet materials to continue drying.
Without dehumidification, evaporation slows dramatically and drying can stall.
Moisture Meters
Professional restorers do not rely on appearance alone.
Materials that feel dry on the surface may still contain significant moisture internally.
Moisture meters help verify when walls, flooring, and structural materials have actually dried enough to move on to the next stage of restoration.
HEPA Air Scrubbers
Water damage often disturbs dust, mold spores, and other airborne particles.
Properly selected HEPA air scrubbers can capture airborne particles while cleanup is underway; they do not correct the moisture source or replace removal of contaminated materials.
Unlike ozone generators, HEPA filtration removes contaminants without introducing another gas into the environment.
Each Tool Has a Different Job
- Air movers remove moisture from materials.
- Dehumidifiers remove moisture from the air.
- Moisture meters confirm drying.
- HEPA air scrubbers remove airborne particles.
- Ozone may reduce some lingering odors after restoration is complete, but it is not a substitute for source removal.
No single machine performs all of these functions.
When Ozone Can Help
Once the building is dry, cleaned, and free of active water intrusion, an unoccupied-space ozone treatment may reduce some lingering musty odors. Results vary, and ozone should not be presented as mold remediation or guaranteed odor removal.
Examples include:
- Finished basements after flooding.
- Dry crawlspaces with residual odor.
- Flood-damaged furniture that has already been cleaned and dried.
- Rooms that retain a musty smell after successful restoration.
As explained in Chapter 5, ozone should be considered only as an optional finishing step after the real restoration work has been completed. For a more focused explanation, see Ozone After Flooding: Miracle Cure or Temporary Cover-Up?
Basements and Crawlspaces
Basements and crawlspaces are especially prone to musty odors because they often have limited ventilation and naturally higher humidity levels.
Before using ozone, make sure:
- The moisture source has been corrected.
- Standing water has been removed.
- The area is completely dry.
- Any mold remediation has already been completed.
- The space can be isolated from occupied areas of the home.
Place the generator on a dry, stable surface with its intake and outlet unobstructed, following the manufacturer’s instructions in Chapter 7. Do not rely on the idea that ozone will simply settle into low areas; air movement and room layout affect how it disperses.
Musty HVAC Systems
Sometimes the musty odor seems strongest whenever the heating or air conditioning system starts.
This may indicate contamination somewhere within the HVAC system.
Do not send ozone through a central HVAC system unless the generator and HVAC instructions expressly permit the procedure and the entire connected building is vacant. Ozone can travel anywhere the air system reaches, including areas outside the intended treatment zone.
Follow the HVAC preparation and ventilation procedures described in Chapters 7 and 9. If the system serves another unit or an area that cannot be secured and kept vacant, do not use it to distribute ozone.
If mold growth or heavy contamination exists inside the HVAC system, cleaning or professional duct restoration may be required. The EPA’s mold-cleanup guidance emphasizes correcting water problems, cleaning mold from suitable surfaces, drying completely, and discarding some moldy porous materials that cannot be adequately cleaned.
When Ozone Is Unlikely to Help
Ozone is unlikely to solve a musty odor problem if:
- The leak has not been repaired.
- Building materials are still wet.
- Humidity remains consistently high.
- Mold is actively growing.
- Wet insulation or drywall remains in place.
- The odor source is hidden behind walls or beneath flooring.
In each of these situations, the source of the odor is still active.
Until that source is corrected, deodorization alone is unlikely to produce lasting results.
Flood Damage vs. Humidity Problems
Not every musty odor has the same cause.
A flooded basement, a slow plumbing leak, and a humid crawlspace may all smell similar, but they require different solutions.
Flood damage usually involves a large amount of water entering the building over a short period of time. Humidity-related odors, on the other hand, often develop slowly as moisture accumulates over weeks or months.
Regardless of the cause, the restoration priorities remain the same:
- Eliminate the moisture source.
- Dry the structure completely.
- Remove contaminated materials.
- Clean affected surfaces.
- Deodorize only after restoration is complete.
This is the same restoration-first approach discussed throughout this manual, especially in Chapters 5 and 7.
Common Homeowner Mistakes After Water Damage
Many odor problems persist because one or more critical restoration steps were skipped.
The most common mistakes include:
- Using ozone before the building is dry.
- Ignoring a continuing leak or moisture source.
- Leaving wet drywall, insulation, or carpet padding in place.
- Assuming that if the smell improves, the mold is gone.
- Running repeated ozone treatments instead of correcting the moisture problem.
- Failing to ventilate properly after treatment.
These mistakes often lead to repeated odor problems because the source of contamination remains active.
When Professional Restoration Is Needed
Some water damage situations go beyond what homeowners can safely or effectively handle themselves.
Professional restoration should be considered when:
- Floodwater has affected large portions of the home.
- Water has entered walls, ceilings, or structural cavities.
- Mold growth is widespread or continues returning.
- The source of moisture cannot be located.
- The musty odor returns after proper drying and cleaning.
- Building materials require specialized drying equipment.
Professional restoration companies use moisture mapping, commercial drying equipment, and specialized cleaning methods that are often beyond the capabilities of typical homeowner equipment.
A Good Rule to Remember
If the odor keeps coming back after everything appears clean, there is usually still moisture or contamination hiding somewhere in the structure.
Another ozone treatment is rarely the permanent answer.
Repeated Ozone Treatments and Material Damage
Repeatedly treating the same damp room with ozone exposes household materials to unnecessary oxidation without addressing the underlying problem.
As explained in Chapter 6, repeated ozone exposure can gradually damage certain household materials over time.
Repeated treatments may contribute to deterioration of:
- Natural rubber seals and weatherstripping.
- Foam cushions and padding.
- Certain plastics.
- Leather goods.
- Sensitive fabrics.
- Rubber components inside appliances and HVAC equipment.
If multiple ozone treatments become necessary, stop and determine why the odor continues returning before running the generator again.
Safety Reminders for Water-Damaged Areas
Water damage creates additional hazards beyond ozone exposure.
Before beginning any ozone treatment:
- Confirm the area is electrically safe.
- Make sure standing water has been removed.
- Verify the structure is dry.
- Remove all people, pets, and plants.
- Seal the treatment area from occupied portions of the home.
- Place the generator on a dry, stable surface with unobstructed airflow, exactly as the manufacturer directs.
Follow the room preparation and operating procedures described in Chapters 7 and 8, then complete the waiting and ventilation procedures covered in Chapters 9 and 10.
Never operate an ozone generator in a wet environment where electrical hazards may still exist.
Chapter Summary
- Musty odors are usually symptoms of excess moisture.
- Stopping the water source is always the first priority.
- Ozone cannot dry a building or stop mold growth.
- Structural drying must be completed before deodorization begins.
- Air movers, dehumidifiers, moisture meters, and HEPA filtration each perform jobs that ozone cannot.
- Ozone should be considered only as an optional finishing step after cleaning and drying are complete.
- If musty odors continue returning, hidden moisture or contamination is probably still present.
- Always follow the preparation, operating, ventilation, and re-entry procedures covered throughout this manual.
Next Chapter: Vehicles, RVs, hotels, and rental properties present unique odor-removal challenges because they are smaller enclosed spaces with upholstery, HVAC systems, and multiple surfaces that readily absorb smoke, pet odors, and moisture-related smells. Although ozone is commonly used in these environments, the same safety principles—and the same limitations—still apply.
Chapter 14 — Vehicles, RVs, Hotels, and Rental Properties
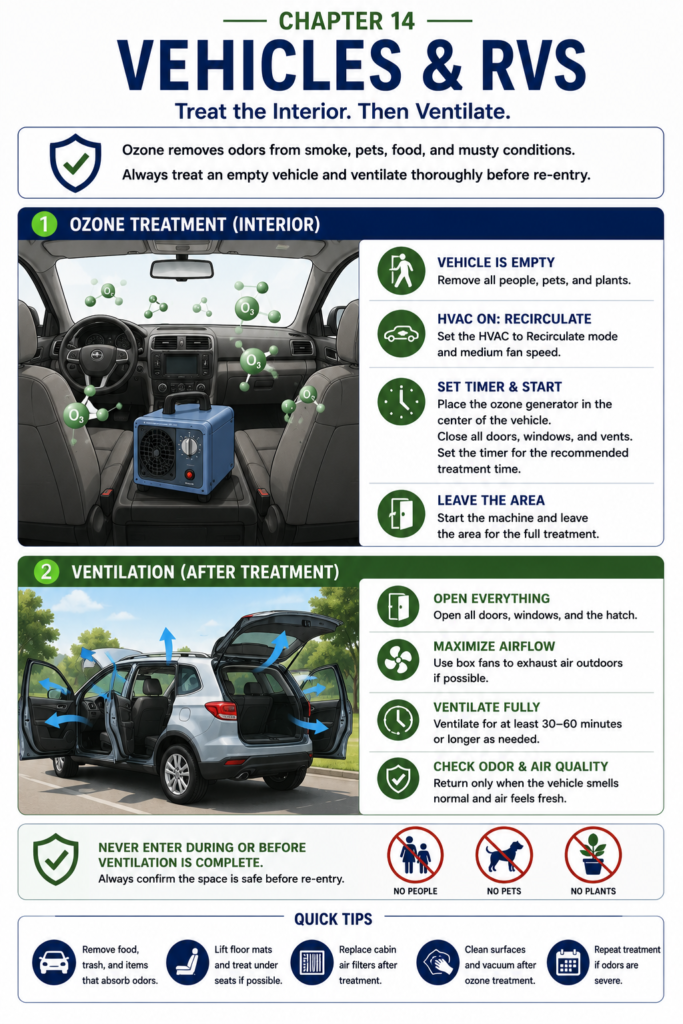 Small enclosed spaces are some of the most common places ozone generators are used—but they still require the same safety discipline as a full room treatment.
Vehicles, RVs, hotel rooms, vacation rentals, apartments, and rental homes often develop stubborn odors because they contain many surfaces that absorb smells. Upholstery, carpet, curtains, bedding, cabinets, wall materials, air vents, and HVAC systems can all hold odor long after the original source has been removed.
These spaces may be easier to isolate than a large home, but their small volume can also allow ozone concentrations to rise quickly and unpredictably.
But that does not make ozone safe to use around people.
The same rule applies everywhere:
No person, pet, or plant should ever remain in the treatment area while an ozone generator is operating. The U.S. EPA states that no federal agency has approved ozone generators for use in occupied spaces, and the California Air Resources Board recommends against consumer ozone generators except in controlled industrial applications that prevent harmful exposure.
Why Small Enclosed Spaces Require Extra Caution
As discussed in Chapter 6, room volume, generator output, ventilation, temperature, humidity, furnishings, and other conditions all affect the concentration produced. A universal dose or runtime cannot be inferred from size alone.
Small enclosed environments are often good candidates because they can usually be sealed more easily than large open homes.
Examples include:
- Cars
- Trucks
- SUVs
- RVs
- Hotel rooms
- Vacation rentals
- Closets
- Small apartments
- Rental bedrooms
Because the air volume is smaller, ozone concentrations may rise more quickly than they would in a large house.
That is also why treatment must follow the generator and vehicle or property instructions, with complete vacancy, controlled access, and a plan for outdoor-air ventilation.
However, smaller spaces also create a different risk:
Ozone concentrations can rise quickly.
That makes timers, short treatments, ventilation, and vacancy especially important.
Small Space Warning
A small space can be easier to treat, but it can also become over-treated more quickly.
Never improvise a dose or runtime. Follow the manufacturer’s instructions and ventilate thoroughly before anyone returns.
Common Odors in Vehicles and Rental Spaces
The odors found in vehicles, RVs, hotels, and rentals are usually not random. They often come from a handful of common sources.
Cigarette and Cigar Smoke
As discussed in Chapter 11, smoke odor is one of the most common reasons ozone is used in vehicles and rental properties.
Ozone may reduce some lingering smoke odor after cleaning, but it cannot remove nicotine, tar, soot, or smoke residue by itself. See Can an Ozone Generator Get Rid of Cigarette Smoke? for the complete restoration-first approach.
For best results, surfaces should be cleaned before treatment, especially headliners, dashboards, walls, cabinets, upholstery, carpets, and HVAC components.
Pet Odors
As covered in Chapter 12, pet odors can come from dander, body oils, urine, bedding, carpet, upholstery, and HVAC vents.
Ozone may help with lingering odor after cleaning, but it cannot remove urine that has soaked into carpet padding, foam, wood, or subflooring.
Pet urine should be treated with an appropriate cleaning method first, and heavily contaminated materials may need replacement. The related guide, Can Ozone Remove Cat Urine Smell?, explains why source removal comes before deodorization.
Food and Beverage Odors
Food spills, spoiled groceries, fast food, milk, coffee, alcohol, and other beverage spills can create stubborn odors in vehicles and rental spaces.
Before ozone is used, all food residue should be physically removed and affected surfaces should be cleaned.
Ozone may help with the remaining odor after the source has been eliminated.
Mold, Mildew, and Moisture Odors
As explained in Chapter 13, musty odors in vehicles, RVs, basements, and rentals often point to a moisture problem.
Ozone should not be used until the source of moisture has been corrected and the affected materials are completely dry.
If mold is actively growing, proper mold remediation must occur before deodorization.
HVAC and Air Conditioning Odors
Odors often collect inside ventilation systems.
In vehicles, smells may linger inside the evaporator housing, cabin filter area, or ductwork.
In rental properties or hotel rooms, odors may be spread by HVAC systems or trapped in filters and vents.
Ozone can help deodorize air pathways, but it does not replace cleaning contaminated filters, coils, ductwork, or drain pans.
Cleaning Still Comes First
One theme has appeared throughout this manual, and it applies strongly here:
Clean first. Ozone second.
Before treating any vehicle, RV, hotel room, or rental property:
- Remove trash and personal items.
- Vacuum carpets, seats, upholstery, and floor mats.
- Clean hard surfaces.
- Wash or replace contaminated fabrics when necessary.
- Treat urine with enzyme cleaner.
- Remove spoiled food or beverage residue.
- Dry any damp materials completely.
This follows the same restoration-first approach described throughout Chapters 5, 11, 12, and 13.
If the source of the odor remains, ozone may improve the smell temporarily, but the odor is likely to return.
Preparing a Vehicle for Ozone Treatment
The same preparation steps covered in Chapter 7 apply to vehicles, RVs, hotel rooms, and rental properties.
A clean, dry vehicle removes the sources that ozone cannot address and makes it easier to judge whether any finishing treatment is warranted. Before treating a car, use the Car Ozone Readiness Check explanation to confirm that cleaning, drying, and repairs are complete.
Before operating the generator:
- Remove all people, pets, and plants.
- Remove trash and food.
- Vacuum the entire interior.
- Clean hard surfaces.
- Treat biological contamination with enzyme cleaners.
- Allow carpets and upholstery to dry completely.
- Inspect for standing water or active leaks.
If flood damage or water intrusion has occurred, correct the leak and dry the vehicle before considering ozone treatment, as discussed in Chapter 13.
Using the Vehicle HVAC System
Many persistent vehicle odors hide inside the heating and air conditioning system.
Some treatment instructions call for the vehicle HVAC system to be configured on recirculate so air passes through the interior ductwork. Do this only when both the vehicle and generator instructions permit it. Configure the controls before treatment begins, use remote or timer-based operation where required, and never enter or remain in the vehicle while ozone is being generated.
This may help reduce lingering odors trapped inside the ventilation system.
However, ozone should never be viewed as a substitute for cleaning dirty evaporator coils, replacing cabin air filters, or repairing mold or water damage within the HVAC system.
Generator Placement
Proper placement improves both safety and effectiveness.
Vehicles
Place the generator on a stable surface where the air intake and outlet remain unobstructed.
Avoid placing the unit where it can tip over or where airflow is blocked by seats, bags, or clothing.
Hotel Rooms and Rental Properties
Place the generator on a dry, stable surface with its intake and outlet unobstructed, following the manufacturer’s placement and clearance instructions in Chapter 7.
Do not assume that a fixed height guarantees even distribution. Air movement, furnishings, and room layout all affect how ozone disperses.
Avoid placing the generator directly against walls or inside confined spaces where airflow is restricted.
Opening Hidden Spaces
Odors frequently linger inside enclosed storage areas.
Before treatment, open:
- Closets.
- Cabinets.
- Bathroom vanities.
- Kitchen cabinets.
- Drawers.
- Vehicle consoles.
- RV storage compartments.
This allows ozone to circulate into areas that would otherwise receive little airflow.
Different Environments Require Different Strategies
Cars, Trucks, and SUVs
Many odor problems improve after thorough source removal and cleaning. If ozone is still considered, follow the vehicle and generator instructions plus the waiting, ventilation, and re-entry procedures covered in Chapters 8 through 10.
Recreational Vehicles
RVs often combine many odor sources in one enclosed structure, including cooking odors, moisture, pets, upholstery, holding tanks, and HVAC systems.
Correct moisture problems and remove waste odors before using ozone.
Hotels and Vacation Rentals
Hotels frequently use ozone between guests to reduce smoke and other persistent odors.
Housekeeping and normal cleaning should always be completed before deodorization begins.
Rental Homes and Apartments
Rental properties often contain years of accumulated odors from previous occupants.
Cleaning walls, flooring, appliances, HVAC systems, and soft furnishings should always come before ozone treatment.
In apartments, condominiums, hotels, and other multi-unit buildings, verify that ozone cannot migrate into neighboring units or common areas through shared ventilation systems, wall cavities, or gaps around doors. If the space cannot be isolated and exhausted outdoors without exposing other people, do not use ozone there.
Property Turnover Tip
Property managers often achieve the best results by following a consistent sequence:
- Remove trash and debris.
- Complete all repairs.
- Deep clean every surface.
- Dry the property completely.
- Perform ozone treatment if needed.
- Ventilate thoroughly before the next occupant arrives.
This follows the restoration-first approach described throughout this guide. Skipping the cleaning step usually results in odors returning after the property is occupied again.
Repeated Treatments Are Not the Answer
If a vehicle or rental property requires repeated ozone treatments to control the same odor, stop and investigate why.
Persistent odors usually indicate that:
- The original contamination remains.
- Moisture is still present.
- HVAC components need cleaning.
- Hidden structural contamination exists.
As discussed in Chapters 11 through 13, running longer or more frequent ozone treatments rarely fixes these underlying problems.
Protecting Vehicle and Property Materials
As discussed in Chapter 6, ozone is a powerful oxidizer. Vehicles and rental properties contain many materials that can gradually deteriorate after repeated or excessive ozone exposure.
Material sensitivity varies, and damage cannot be ruled out even during a single treatment. Longer or repeated exposure increases the risk to susceptible materials.
Pay particular attention to:
- Natural rubber weatherstripping.
- Door seals and window gaskets.
- Leather upholstery.
- Foam cushions and seat padding.
- Certain plastics.
- Rubber-coated wiring.
- Sensitive electronics.
Material damage can be cumulative, but there is no universal treatment duration that is safe for every vehicle, room, or material. Follow manufacturer limits and remove or protect susceptible items when feasible.
Common Mistakes
Most unsuccessful ozone treatments are caused by preparation mistakes rather than problems with the generator itself.
The most common mistakes include:
- Skipping physical cleaning.
- Leaving moisture inside the vehicle or room.
- Using ozone to cover odors instead of removing their source.
- Running excessively long treatment cycles.
- Using an oversized generator for a very small space.
- Leaving pets or people inside during treatment.
- Failing to ventilate thoroughly before re-entry.
When an odor returns, investigate for remaining contamination, moisture, HVAC problems, or another source before repeating treatment.
Remember
Ozone may change or reduce some odor-causing compounds under controlled conditions.
It does not remove dirt.
It does not remove tar.
It does not remove pet urine.
It does not remove mold.
Those problems must be corrected before ozone can provide lasting results.
Waiting Before Re-entry
Once the treatment cycle has finished, follow the waiting procedures described in Chapter 9.
Allow the ozone to begin naturally breaking down before entering to ventilate.
There is no universal waiting period that makes every vehicle or room safe. Follow the generator manufacturer’s shutdown and re-entry instructions. When direct entry would be unsafe, arrange remote shutdown or professional handling rather than entering solely to begin ventilation.
Ventilating the Space
Proper ventilation is just as important as the ozone treatment itself.
For vehicles:
- Open all doors.
- Open all windows.
- Allow fresh outdoor air to circulate through the cabin.
For hotel rooms, apartments, and rental homes:
- Open exterior windows and doors.
- Use fans to exhaust indoor air outdoors.
- Avoid using the HVAC system to spread ozone into other occupied areas.
Continue outdoor-air ventilation for as long as the manufacturer requires and longer when needed. A timer or the absence of odor does not prove that the air is safe.
Whenever possible, verify with a suitable ozone monitor that the concentration has returned to the re-entry level specified by applicable guidance and the manufacturer before allowing normal occupancy, as discussed in Chapters 9 and 10. For the full explanation, see How Long to Wait After Using an Ozone Generator.
When Professional Help Makes More Sense
Sometimes repeated deodorization attempts simply indicate a larger problem.
Professional detailing or restoration should be considered when:
- Smoke odors continue returning.
- Pet urine has penetrated structural materials.
- Flood damage affected the vehicle or building.
- Mold contamination is suspected.
- Hidden odor sources cannot be located.
- Multiple ozone treatments have produced little improvement.
Professionals have equipment and restoration methods that address the source of the odor instead of repeatedly treating its symptoms.
Safety Reminders
- Never remain inside a vehicle or room while an ozone generator is operating.
- Remove all pets, including birds and aquarium animals.
- Remove or protect sensitive materials whenever practical.
- Never improvise the dose or runtime; follow the manufacturer’s instructions and applicable rules.
- Follow the manufacturer’s instructions.
- Wait for natural ozone decay before beginning ventilation.
- Ventilate thoroughly before allowing anyone to re-enter.
- Never rely solely on the smell of the air to judge safety.
Chapter Summary
- Small enclosed spaces require extra caution because ozone concentrations can rise quickly.
- Vehicles, RVs, hotels, and rental properties should always be cleaned before ozone treatment.
- Use a vehicle HVAC recirculation procedure only when both the vehicle and generator instructions permit it, and never while anyone is inside.
- Repeated ozone treatments should never replace proper cleaning or restoration.
- Natural rubber, leather, certain plastics, foam, and electronics may be affected by excessive ozone exposure.
- Always wait for natural ozone decay, then ventilate thoroughly before re-entry.
- If odors continue returning, hidden contamination or moisture is probably still present.
- Follow the same safety principles throughout this guide regardless of where ozone is being used.
Next Chapter: When Things Don’t Go As Planned covers troubleshooting common problems such as odors returning after treatment, lingering ozone smells, headaches, coughing, material damage, electronics concerns, and generator malfunctions. It explains how to identify the cause of these issues and the safest way to respond.
Chapter 15 — Ozone’s Place in the Restoration Process
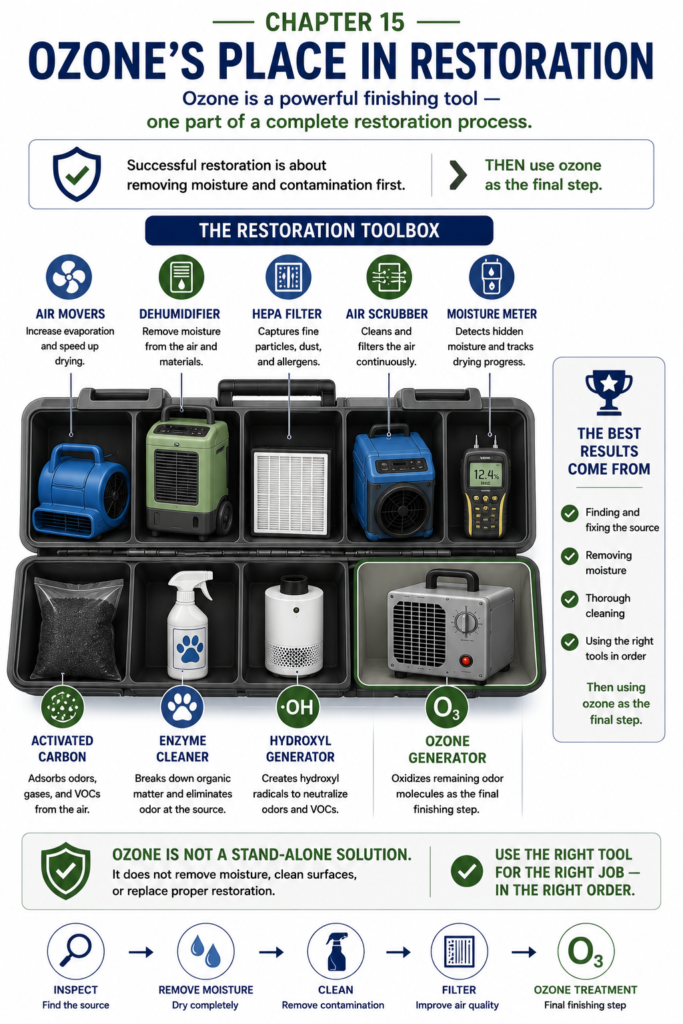 One of the biggest misconceptions about ozone generators is that they are complete restoration machines. They are not.
Throughout this guide, one lesson has appeared repeatedly:
Ozone should be considered only after the real problem has already been corrected.
Whether the issue is smoke, pet urine, water damage, mildew, or vehicle odors, successful restoration almost always follows the same sequence.
Professionals don’t begin with ozone.
They begin by identifying the source of the problem.
This chapter brings together many of the concepts introduced in earlier chapters and shows where ozone fits into the much larger restoration process.
Restoration Is a Process, Not a Product
When homeowners discover a bad odor, their first instinct is usually to ask:
“What can I spray?”
Or…
“What machine can I buy?”
Professional restoration companies ask a very different question.
“What caused this problem?”
That difference changes everything.
An odor is rarely the actual problem.
Instead, it is usually evidence of something else:
- Smoke residue.
- Pet contamination.
- Water damage.
- Hidden moisture.
- Mold growth.
- Sewage contamination.
- Food waste.
- Poor ventilation.
Until that underlying problem is corrected, deodorizing alone rarely produces permanent results.
Think Like a Restoration Professional
Don’t ask:
“How do I get rid of this smell?”
Instead ask:
“Why does this smell exist?”
Finding that answer almost always determines which restoration tools are needed.
Every Tool Has a Different Job
As discussed in Chapter 13, professional restoration relies on using the right tool for the right problem. No single machine solves every issue.
Each piece of equipment performs one specific job.
| Problem | Primary Solution |
|---|---|
| Standing water | Water extraction |
| Wet building materials | Air movers |
| High humidity | Dehumidifiers |
| Airborne particles | HEPA filtration |
| Smoke residue | Physical cleaning |
| Pet urine | Enzyme cleaning and extraction |
| Hidden moisture | Inspection and moisture detection |
| Lingering odors | Source-specific deodorization; ozone only for a controlled, unoccupied treatment when appropriate |
Notice that ozone appears near the bottom of the list—not because it is less important, but because it usually comes after the rest of the restoration work has already been completed.
Why Professionals Don’t Start With Ozone
Many homeowners are surprised to learn that professional restoration companies often wait until the very end of a project before using ozone.
Instead, they typically begin by asking questions such as:
- Where did the contamination come from?
- Is moisture still present?
- Has everything been cleaned?
- Do damaged materials need to be removed?
- Is the structure completely dry?
Those same principles were applied throughout Chapters 11 through 14, whether the problem involved smoke, pet odors, water damage, or vehicles.
Only after those questions have been answered should any optional deodorization step be evaluated.
This approach is one of the reasons professional odor removal is often much more successful than repeatedly running an ozone generator without correcting the underlying cause.
The Restoration Workflow
By now you’ve seen this same pattern repeated throughout the guide.
Whether the problem involved smoke (Chapter 11), pet odors (Chapter 12), water damage (Chapter 13), or vehicles and rental properties (Chapter 14), successful restoration followed the same basic workflow.
The exact equipment may change from one job to another, but the sequence rarely does.
The Restoration Workflow
🚨 Emergency or Odor Problem
⬇
🔍 Identify the Source
⬇
🛑 Stop the Damage
(Repair leaks, remove the cause, stop further contamination.)
⬇
🧹 Remove Contamination
(Vacuum, wash, extract, remove debris and waste.)
⬇
💧 Dry the Structure
(Air movers, dehumidifiers, moisture control.)
⬇
🧱 Replace Unsalvageable Materials
(Carpet padding, drywall, insulation, flooring, etc.)
⬇
🌬 Clean the Air
(HEPA filtration, ventilation, air scrubbers.)
⬇
✨ Final Deodorization
(A source-appropriate method; ozone only when a controlled, completely unoccupied treatment is appropriate.)
⬇
✅ Verify Results
(Moisture readings, odor evaluation, safe occupancy.)
⬇
🏠 Return to Normal Occupancy
Notice Where Ozone Appears
Ozone is not the first step.
It is not the second step.
It is one of the last steps.
That surprises many homeowners because advertisements often present ozone as though it is capable of solving the entire problem by itself.
Professional restoration follows a different philosophy.
First remove the source.
Then remove the contamination.
Then restore the structure.
Only after those steps have been completed should ozone be considered as an optional finishing tool. Results vary, and the U.S. EPA cautions that ozone concentrations that remain within public-health standards generally have little ability to remove many indoor contaminants.
The Biggest Lesson in This Guide
Ozone should finish a restoration project—not begin one.
If you remember only one idea from this manual, remember that one.
Hydroxyl vs. Ozone
As discussed earlier in this guide, both technologies are valuable odor-control tools, but they are designed for different situations.
Some devices marketed as hydroxyl generators are promoted for use while work continues, but the word hydroxyl is not by itself a safety guarantee. Occupancy must follow the specific device’s tested instructions, emissions information, and applicable rules. See Ozone vs. Hydroxyl Generators for a fuller comparison.
Ozone generators require the treatment area to be completely vacant. No person, pet, or plant should be exposed during treatment, and ozone must not migrate into adjoining occupied areas.
Neither technology replaces cleaning, drying, or source removal.
Instead, both are specialty tools that fit into different stages of the restoration process.
Every Odor Has a Story
One of the easiest mistakes is to think of odor as the problem.
Professionals think of odor as evidence.
A smoke odor tells the story of fire or tobacco residue.
A musty odor tells the story of excess moisture.
A sewage odor points toward biological contamination.
A pet odor usually points toward contamination hidden inside porous materials.
Finding that story—and correcting it—is what successful restoration is really about.
When Ozone Isn’t Working
If you’ve followed the safety procedures in this guide and your ozone treatments still aren’t producing lasting results, the generator may not be the problem.
In many cases, repeated failure simply means the original source of the odor is still present.
Ask yourself these questions:
- Has the contamination actually been removed?
- Is there still an active moisture problem?
- Has the structure been completely dried?
- Could hidden contamination still be inside walls, flooring, insulation, or HVAC ducts?
- Am I trying to deodorize something that really needs to be cleaned or replaced?
If the answer to any of these questions is “yes,” another ozone treatment is unlikely to provide a permanent solution.
The restoration process simply hasn’t reached the deodorization stage yet.
The Restoration Mindset
Throughout this manual, you’ve seen the same principle applied to many different situations.
- Smoke requires cleaning before deodorization (Chapter 11).
- Pet urine requires decontamination before deodorization (Chapter 12).
- Water damage requires drying before deodorization (Chapter 13).
- Mold and musty odors require remediation before deodorization (Chapter 13).
- Vehicles require detailing before deodorization (Chapter 14).
Although the situations are different, the thinking is exactly the same.
Professionals don’t chase odors.
They solve the conditions that created the odors.
Once those conditions have been corrected, deodorization becomes the final polishing step instead of the primary repair.
A Better Way to Think About Ozone
Imagine repainting a wall without repairing the hole behind it.
The paint may make the wall look better for a while, but the damage is still there.
Ozone works much the same way.
When used by itself, it may temporarily improve the smell of a room.
When used after proper restoration, it helps complete the job.
The Restoration Toolbox
Every successful restoration project relies on multiple tools working together.
No single machine can remove water, kill mold, filter particles, clean surfaces, repair damage, and eliminate odors.
Each tool has a specific purpose.
Understanding which tool solves which problem is one of the biggest differences between temporary odor control and permanent restoration.
Ozone is an important member of that toolbox—but it is only one member.
What This Means for Homeowners
You do not need to own every piece of restoration equipment to solve most household odor problems.
What you do need is an understanding of the proper sequence.
Sometimes the answer is as simple as improving ventilation or using a dehumidifier.
Sometimes an enzyme cleaner is the correct solution.
Sometimes damaged materials must be removed.
And sometimes, after all of that work has been completed, a controlled unoccupied-space ozone treatment may be considered as a finishing step.
Choosing the right tool at the right time almost always produces better results than relying on ozone alone.
Chapter Summary
- Restoration is a process, not a single treatment.
- Every odor has an underlying cause that should be identified first.
- Different restoration tools solve different problems.
- Cleaning, drying, and source removal usually come before deodorization.
- Hydroxyl and ozone are specialty odor-control tools—not replacements for restoration.
- If ozone treatments repeatedly fail, an unresolved source is probably still present.
- The most successful restoration projects solve the problem first and remove the odor last.
Next Chapter: When Things Don’t Go As Planned shifts from prevention to troubleshooting. It explains what to do if odors return, ozone smells linger, occupants experience irritation, materials appear damaged, or the generator itself doesn’t perform as expected.
Chapter 16 — When Things Don’t Go As Planned
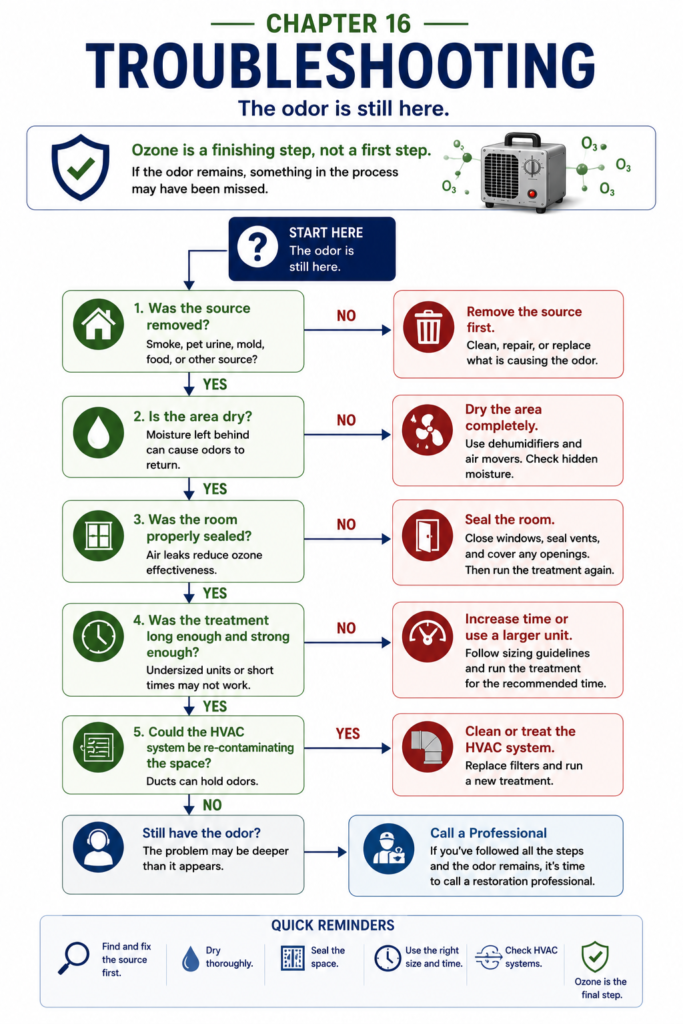 Even when an ozone generator is used correctly, things don’t always go as expected. Sometimes odors remain, sometimes they return, and sometimes new concerns appear after treatment.
The good news is that most problems can be traced to a small number of common causes.
As you’ve seen throughout this guide, successful ozone treatment depends just as much on proper cleaning, drying, and preparation as it does on the generator itself. This chapter explains how to troubleshoot common problems safely while helping you decide when another ozone treatment makes sense—and when it doesn’t.
Odor Returned—Did the Treatment Fail?
One of the most common frustrations homeowners experience is a smell that seems to disappear after treatment but returns a day or two later.
Although this feels like an ozone failure, it usually isn’t.
In many cases, the treatment changed some odor-causing compounds that were present during treatment, but it did not remove the source.
The problem is that the source of those odor molecules was never completely removed.
As the remaining contamination continues to release new odor molecules, the smell gradually returns.
This is called odor recurrence, and it is very different from equipment failure.
Odor Recurrence vs. Treatment Failure
Odor recurrence means the source of the odor is still present.
Treatment failure means the expected improvement did not occur. That does not prove that the generator was undersized or that a longer treatment is appropriate.
Understanding which one you’re dealing with determines what to do next.
Common Reasons Treatments Don’t Work
If an ozone treatment produces disappointing results, one or more of these issues is usually responsible.
- The physical odor source was never removed.
- The room was not properly cleaned before treatment.
- Moisture was still present.
- The room was not sealed adequately.
- The treatment could not reach or react effectively with the remaining odor source.
- Airflow, room contents, humidity, or ventilation changed the ozone concentration.
These possibilities should be investigated before assuming that the answer is a larger generator or a longer runtime. For more detail, see Ozone Generator Didn’t Work? Common Reasons the Smell Came Back.
Instead, they almost always involve preparation or the restoration process discussed in Chapter 15. Problems involving smoke, pet urine, or musty odors also often trace back to the source-removal principles covered in Chapters 11 through 14.
Before Running Another Treatment
Before deciding to use ozone again, stop and ask a few simple questions.
- Has every possible odor source been removed?
- Is the area completely dry?
- Has everything been cleaned thoroughly?
- Could contamination still be hidden inside walls, carpet padding, insulation, furniture, or HVAC ducts?
- Was the room properly sealed during the previous treatment?
If the answer to any of these questions is “no,” another ozone treatment is unlikely to solve the problem permanently.
Correcting the underlying issue should always come before repeating the treatment.
When Another Treatment May Be Considered
Another treatment should not be automatic.
A second ozone treatment may help if:
- The room has already been thoroughly cleaned.
- The contamination source has been removed.
- The structure is completely dry.
- The previous treatment was intentionally kept short.
- Only a faint residual odor remains.
In these situations, another treatment may be considered only if it remains within the manufacturer’s instructions, the space can be secured against entry and ozone migration, and the materials have not shown signs of damage. No repeated-treatment pattern is universally safe.
What If Someone Enters Too Soon?
Despite careful planning, accidents sometimes happen.
A family member may open the door.
A child may enter the room.
Someone may simply forget that treatment is still underway.
If this happens, do not panic—but do act quickly.
The first priority is to remove the person from the contaminated area and into fresh air without sending another unprotected person into the space.
Do not allow them to remain inside the treatment area to “see if they feel better.”
After the person is safe, follow the ventilation and re-entry procedures described in Chapter 9 before anyone returns to the treatment area. Do not re-enter solely to switch off or retrieve the generator when the air may still be hazardous.
Common Symptoms of Ozone Exposure
Ozone is a respiratory irritant. The U.S. EPA lists coughing, throat irritation, pain with deep breathing, chest tightness, wheezing, and shortness of breath among possible effects.
Symptoms can begin within minutes of exposure and vary depending on concentration, exposure time, and individual sensitivity.
Common symptoms include:
- Eye irritation.
- Burning or scratchy throat.
- Coughing.
- Chest tightness.
- Difficulty taking a deep breath.
- Airway or throat irritation.
- Shortness of breath.
People with asthma, COPD, emphysema, or other respiratory diseases may be at greater risk, but healthy people can also experience breathing problems.
What To Do Immediately
If someone is accidentally exposed:
- Move them into fresh outdoor air immediately.
- Do not allow additional exposure.
- Call 911 immediately for severe breathing difficulty, collapse, blue or gray lips, confusion, or another life-threatening symptom.
- Seek medical advice for persistent or worsening symptoms.
- Do not return to the treatment area.
The NIOSH Pocket Guide for ozone directs inhalation exposure to fresh air and medical attention as appropriate. Symptoms that continue or worsen should never be ignored.
Seek Immediate Medical Care If…
- Breathing becomes difficult.
- Chest pain develops.
- Bluish lips or fingertips appear.
- The person faints.
- Symptoms persist or worsen after reaching fresh air.
- The exposed person has asthma or another serious lung condition and symptoms are worsening.
When in doubt, contact Poison Control at 1-800-222-1222 in the United States or seek medical care. Call 911 for a medical emergency.
Why the Room Still Smells Like Ozone
Another common concern is a sharp “electrical” smell that remains after treatment.
Smell cannot identify the chemical or show whether the space is safe. The generator may be off while residual ozone or reaction products remain.
Several things may be happening:
- Residual ozone is still breaking down.
- The room has not been ventilated long enough.
- Secondary reaction products are still present.
- The treatment lasted longer than necessary.
One of the most common mistakes is assuming that because the machine has stopped, the room is immediately safe to occupy.
It isn’t.
Ozone continues reacting with materials and naturally breaking down long after the generator shuts off.
If this happens, leave again and continue ventilating the space as described in Chapter 9 rather than relying on smell alone. See Why Does My Room Smell Worse After Ozone Treatment?.
Secondary Pollutants
As ozone reacts with smoke residue, fragrances, cleaning products, building materials, and other household chemicals, new compounds can be formed.
Some of these reaction products may be irritating even after the ozone concentration itself has dropped.
This is one reason ventilation is such an important part of every treatment.
Fresh outdoor air helps remove both the remaining ozone and many of the byproducts created during oxidation.
If the Air Still Feels Irritating
If you notice eye irritation, coughing, throat irritation, or a sharp odor after returning to the room, leave the area again.
Do not assume the discomfort will simply go away if you stay inside.
Instead:
- Open additional windows.
- Increase fresh-air ventilation.
- Use fans to exhaust indoor air outdoors.
- Allow more time before attempting re-entry.
If a suitable ozone meter is available, use the guidance in Chapter 10 to compare the reading with the re-entry level specified by applicable guidance and the manufacturer. Do not use odor as a substitute for measurement. See How Long to Wait After Using an Ozone Generator.
Think of irritation as a warning sign that more ventilation is needed—not as something to tolerate.
Can Ozone Damage Household Materials?
Yes—but the amount of damage depends on the concentration, exposure time, frequency of treatment, and the materials involved.
Ozone works by oxidation. Unfortunately, the same chemical reaction that attacks odor molecules can also attack certain household materials.
Material sensitivity varies, and damage cannot be ruled out after a single treatment. Repeated or prolonged exposure can increase the risk.
As discussed in Chapter 7, protecting vulnerable materials before treatment is much easier than replacing them afterward.
Materials Most Vulnerable to Ozone
Natural Rubber
Natural rubber is by far the material most susceptible to ozone damage.
Over time, ozone causes rubber to lose elasticity and develop tiny surface cracks—a process known as ozonolysis.
This damage may appear on:
- Door weatherstripping.
- Window seals.
- Appliance gaskets.
- Rubber hoses.
- Vehicle weather seals.
Once cracking begins, the damage cannot be reversed.
Foam and Plastics
Some plastics tolerate ozone well, while others gradually become brittle after repeated exposure.
Foam cushions and padding may also lose flexibility over time.
Signs of damage include:
- Cracking.
- Discoloration.
- Loss of flexibility.
- Surface deterioration.
Leather and Fabrics
Repeated ozone treatments can dry natural leather and gradually weaken certain fabrics.
Vehicle interiors, upholstered furniture, curtains, and decorative fabrics may eventually show fading or loss of flexibility if exposed repeatedly.
This is another reason to use only the shortest treatment that accomplishes the job, as discussed in Chapter 8.
Artwork and Photographs
Organic dyes, pigments, paper, and photographs may gradually fade after repeated ozone exposure.
If valuable artwork or collectibles are present, remove them whenever practical before treatment begins.
Electronics
Modern electronics are generally less vulnerable than natural rubber, but ozone can still affect certain components.
Possible long-term concerns include:
- Corrosion of metal contacts.
- Deterioration of rubber insulation.
- Embrittlement of wire coatings.
- Damage to flexible rubber connectors.
Risk depends on concentration, duration, materials, and device construction. Repeated or high-concentration exposure can increase the chance of corrosion or deterioration.
Good Rule of Thumb
If an item is valuable, difficult to replace, or contains natural rubber, leather, artwork, or delicate materials, consider removing it before treatment whenever practical.
Signs Your Generator May Have a Problem
Sometimes poor results have nothing to do with room preparation.
The generator itself may need maintenance.
Watch for signs such as:
- Very little noticeable ozone production.
- Treatments taking much longer than they once did.
- Excessive heat.
- Smoke.
- Sparking.
- Burning odors.
- Unusual vibration or noise.
- The timer failing to operate correctly.
If any of these occur, discontinue use until the problem has been identified.
Dirty Ozone Plates
One of the most common causes of declining performance is dirty ozone plates.
Dust and residue gradually build up on the plates, reducing their ability to generate ozone efficiently.
Clean or replace ozone plates only at the interval and by the method specified by the manufacturer. Some units are not designed for homeowner service.
Disconnect power before any manufacturer-authorized maintenance. Do not open or service the unit if its instructions require a qualified technician.
What If the Generator Stops During Treatment?
If the machine suddenly shuts off, resist the temptation to immediately enter the treatment area.
The room may still contain hazardous ozone concentrations.
Follow the waiting, ventilation, and re-entry procedures described in Chapters 9 and 10 before investigating the problem.
Once it is safe to enter, inspect the unit for blocked air vents, dirty filters, overheating, or obvious electrical damage.
If you notice smoke, melted components, burning odors, or damaged wiring, discontinue use and have the generator repaired or replaced before operating it again.
When It’s Time to Stop DIY Troubleshooting
Sometimes the smartest solution is not another ozone treatment.
If you’ve cleaned thoroughly, followed the safety procedures, and completed multiple treatments without lasting improvement, the problem is probably beyond what ozone can solve.
At that point, continuing to run the generator may simply expose your home and belongings to unnecessary ozone without addressing the real source of the odor.
Professional restoration should be considered if:
- Smoke odors continue returning after repeated cleaning and treatment.
- Pet urine has penetrated carpet padding, wood flooring, or subfloors.
- Hidden moisture or mold is suspected inside walls or ceilings.
- Sewage contamination is extensive.
- Odors appear to be coming from HVAC ductwork or inaccessible areas.
- You live in an apartment or condominium where ozone could migrate into neighboring units.
Professional restoration companies have equipment and inspection tools that can locate hidden contamination, verify moisture levels, and safely perform large-scale remediation when needed.
When Another Ozone Treatment Is NOT the Right Answer
Running another treatment is usually the wrong choice if:
- The original contamination has not been removed.
- The area is still damp.
- Materials are already showing signs of ozone damage.
- People are experiencing irritation after previous treatments.
- The generator is malfunctioning.
- The odor keeps returning without improvement.
More ozone rarely fixes a problem caused by poor preparation or an active contamination source. As emphasized throughout this guide—and especially in Chapter 15—successful restoration starts by solving the underlying problem, not by repeating deodorization.
A Simple Troubleshooting Guide
| Problem | Most Likely Cause | Recommended Action |
|---|---|---|
| Odor returned | Hidden contamination remains | Locate and remove the source before retreating. |
| Room still smells like ozone | Insufficient ventilation or reaction byproducts | Increase fresh-air ventilation and allow more time. |
| Eyes or throat burn after re-entry | Ozone or byproducts still present | Leave the area and continue ventilating. |
| Generator seems weak | Dirty plates or maintenance needed | Inspect, clean, or replace components according to the manufacturer. |
| Generator overheats | Blocked airflow or mechanical failure | Stop using the unit until the problem is corrected. |
| Materials appear damaged | Excessive ozone exposure | Stop further treatment, document the damage, and follow manufacturer or professional guidance. |
Safety Always Comes First
Successful odor removal is never worth risking your health.
If a treatment causes breathing problems, eye irritation, headache, or chest discomfort, leave for fresh air and seek medical advice when symptoms persist or worsen. Return only after the shutdown, ventilation, measurement when available, and re-entry requirements in Chapters 9 and 10 have been satisfied.
Remember that ozone is intended to be used in empty spaces only.
If something doesn’t seem right, treat it as a safety issue—not simply an inconvenience.
When in Doubt
If you’re unsure whether another treatment is safe or appropriate:
- Do not re-enter an irritating room.
- Do not keep increasing treatment times.
- Do not assume stronger ozone will solve the problem.
- Go back to the source of the odor and verify it has actually been corrected.
Most unsuccessful ozone treatments are restoration problems—not ozone problems.
Chapter Summary
- Odor recurrence usually means the contamination source still exists.
- Treatment failure is often caused by preparation mistakes rather than equipment failure.
- People experiencing irritation should immediately leave the area and move to fresh air.
- Repeated ozone exposure can damage rubber, leather, foam, plastics, artwork, and some electronics.
- Dirty ozone plates and poor maintenance reduce generator performance.
- Do not enter a treatment area to troubleshoot a generator until it is safe to do so.
- Repeated unsuccessful treatments usually indicate the need for further cleaning, restoration, or professional assistance.
- Safety should always take priority over finishing an ozone treatment.
Next Chapter: Frequently Asked Questions About Ozone Generators answers the questions homeowners ask most often—from how long ozone lasts and whether it kills mold to whether it can remove cigarette smoke, pet odors, VOCs, viruses, and more.
Chapter 17 — Frequently Asked Questions About Ozone Generators
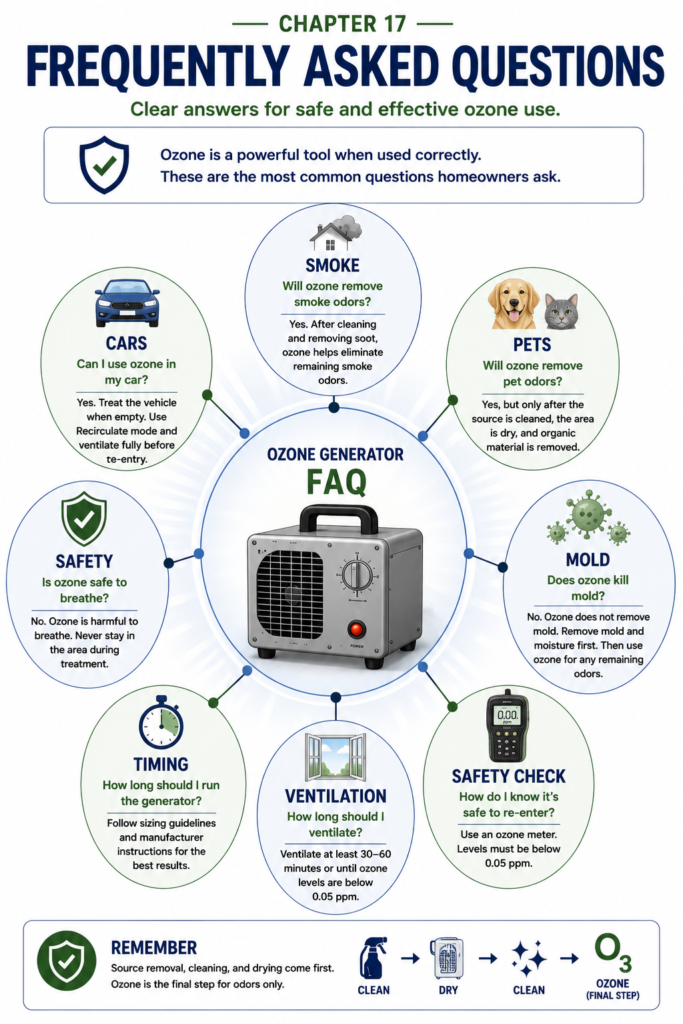 This chapter answers the questions homeowners ask most often about ozone generators. If you’ve read the previous chapters, many of these answers reinforce what you’ve already learned. If you’re using this guide as a reference, this chapter provides quick answers to the most common concerns.
How Long Does Ozone Stay in a Room?
After production stops, ozone is removed through chemical reactions, contact with surfaces, and ventilation.
There is no dependable universal indoor half-life. Temperature, humidity, airflow, room volume, generator output, outdoor ozone, and the amount and type of material in the room can all change the concentration and decay rate. The U.S. EPA explains that these factors make indoor ozone concentrations difficult to control.
Even though ozone begins reacting and decaying immediately, elapsed time alone cannot prove that the room is ready for re-entry.
For a complete explanation of ozone decay and waiting periods, see Chapter 9 — Ventilation and Re-entry.
How Long Should I Wait Before Going Back Inside?
There is no single waiting-and-ventilation schedule that is safe for every generator, room, or treatment. Follow the manufacturer’s shutdown, ventilation, and re-entry instructions and any applicable professional or regulatory requirements.
Never rush the ventilation process simply because the timer has expired.
If the required conditions cannot be verified, keep the space vacant and obtain qualified help. See How Long to Wait After Using an Ozone Generator for the detailed procedure.
Can I Sleep in the Room After Treatment?
Not immediately.
The room should remain unoccupied until it has been thoroughly ventilated and any remaining ozone has dissipated.
If there is any uncertainty about whether the room meets the re-entry requirements, sleep somewhere else and keep the space vacant.
Waiting longer does not replace outdoor-air ventilation or measurement when measurement is required or available.
Can I Stay Somewhere Else While the Generator Is Running?
Yes—the treatment area must remain completely unoccupied.
Everyone—including children, pets, and houseplants—should be out of the treatment area while the generator operates.
Plan shutdown and ventilation before starting so no one must enter a potentially hazardous space merely to operate the machine or open a window.
Can I Stay in Another Room?
Generally, no.
Ozone does not always remain confined to one room.
It can migrate through:
- Door gaps.
- Shared walls.
- HVAC ductwork.
- Air returns.
- Open floor plans.
Unless the treatment area has been professionally isolated, it is safest to keep the entire home vacant during treatment.
Quick Answer
Running an ozone generator while simply moving into another bedroom is not considered a safe practice.
The safest option is for everyone to leave the home until the treatment and ventilation are complete.
Will Ozone Kill Mold?
Not reliably.
Ozone may change some odors, but it does not replace proper mold remediation. At concentrations that do not exceed public-health standards, the EPA reports that ozone is generally ineffective against mold and other biological pollutants.
It cannot eliminate the moisture source that allowed mold to grow, nor does it remove mold colonies embedded inside building materials.
If mold is present, the moisture problem must be corrected first, contaminated materials cleaned or removed, and the structure dried before ozone is considered as a final deodorization step.
For a detailed discussion of mold, moisture, and musty odors, see Chapter 13 — Water Damage and Musty Odors and Can Ozone Get Rid of Mold Smell in a House?
Will Ozone Permanently Remove Cigarette Smoke?
Sometimes—but not by itself.
Ozone may reduce some smoke odors after proper cleaning, but results vary and should not be guaranteed.
However, it cannot remove tar, nicotine, soot, or smoke residue that remains embedded in walls, ceilings, upholstery, insulation, or HVAC systems.
If those materials remain contaminated, the odor will often return after the ozone dissipates.
For complete guidance on smoke restoration, see Chapter 11 — Smoke Odors and Can an Ozone Generator Get Rid of Cigarette Smoke?
Will Ozone Remove Pet Urine Odors?
Only under certain conditions.
Ozone can reduce lingering pet odors after the urine has been properly cleaned and the affected materials have dried completely.
However, ozone cannot permanently eliminate odors that continue to originate from urine trapped deep inside:
- Carpet padding.
- Subfloors.
- Wood flooring.
- Concrete.
- Furniture cushions.
If the biological contamination remains, the odor will usually return after the ozone treatment ends.
Source-appropriate cleaners and, in severe cases, replacement of contaminated materials may be necessary before any finishing deodorization is considered.
For a complete discussion of pet urine restoration, see Chapter 12 — Pet Odors and Can Ozone Remove Cat Urine Smell?
Can Ozone Remove VOCs?
Only to a limited extent.
Some volatile organic compounds (VOCs) react with ozone, while others react slowly or very little.
An important concern is that ozone can also react with certain VOCs to produce secondary pollutants, including compounds such as formaldehyde.
Because of this, ozone should not be viewed as a general-purpose VOC removal system.
Source removal, ventilation, and activated carbon filtration are often more appropriate solutions.
Does Ozone Remove Dust, Pollen, or Pet Dander?
No.
Ozone does not filter the air.
Unlike a HEPA air purifier, an ozone generator has no mechanical filter capable of trapping airborne particles.
For removing:
- Dust.
- Pollen.
- Pet dander.
- Mold spores.
- Many allergens.
a HEPA filtration system is the better choice.
Can Ozone Damage Furniture?
Yes.
Repeated or excessive ozone exposure can gradually damage certain furniture materials.
Possible effects include:
- Dulling of wood finishes.
- Fading of fabrics.
- Weakening of upholstery fibers.
- Drying of leather surfaces.
Material sensitivity varies, and damage cannot be ruled out after a single treatment. Repeated or prolonged exposure can increase the risk.
See Chapter 16 — When Things Don’t Go As Planned for more information about material damage caused by excessive ozone exposure.
Can Ozone Damage Electronics?
Yes.
Most electronic components themselves are fairly resistant to ozone, but supporting materials inside electronic devices are not always as durable.
Long-term or repeated exposure may contribute to:
- Corrosion of metal contacts.
- Deterioration of rubber seals.
- Embrittlement of wire insulation.
- Degradation of certain plastic components.
If valuable electronics can easily be removed before treatment, doing so reduces unnecessary exposure.
Can Ozone Damage Rubber Seals?
Absolutely.
Natural rubber is one of the materials most susceptible to ozone damage.
Over time, ozone causes rubber to lose elasticity and develop fine surface cracks.
This process is commonly called ozone cracking or dry rot.
Items commonly affected include:
- Vehicle weatherstripping.
- Refrigerator door gaskets.
- Appliance seals.
- Rubber hoses.
- Window seals.
Can Ozone Damage Leather?
Yes.
Repeated ozone exposure can dry natural leather, causing it to become stiff and more prone to cracking.
Leather furniture and vehicle interiors should not be subjected to unnecessary or excessive ozone treatments.
Can Ozone Bleach Fabrics?
Yes.
High concentrations or repeated treatments may:
- Fade dyes.
- Change colors.
- Weaken fibers.
- Reduce the life of delicate fabrics.
This risk is generally greatest with decorative fabrics, curtains, artwork, and older textiles.
Can I Use an Ozone Generator Every Week?
No.
Ozone generators are not intended to function as everyday air purifiers.
They intentionally generate ozone and must not be operated as routine air cleaners in occupied spaces.
Frequent treatments increase:
- The likelihood of respiratory exposure.
- Cumulative damage to household materials.
- The formation of oxidation byproducts.
If you find yourself needing ozone every week, the underlying source of the odor probably has not been corrected.
A Good Rule to Remember
If an odor keeps returning after repeated ozone treatments, stop treating the odor and start looking for the source.
Most recurring odor problems are restoration problems—not ozone problems.
Is More Ozone Always Better?
No.
This is one of the biggest misconceptions about ozone generators.
Higher ozone concentrations do not automatically produce better odor removal.
Instead, excessive ozone increases the risk of:
- Respiratory irritation.
- Material damage.
- Formation of irritating reaction byproducts.
- Longer ventilation times.
The goal is not to produce the highest possible ozone concentration.
Never improvise a dose or keep increasing runtime. Follow the manufacturer’s instructions and applicable rules, and stop if the treatment is not appropriate for the space or materials.
Why Does the Room Still Smell?
If the original odor returns after treatment, the most likely explanation is that the contamination source still exists.
Common examples include:
- Smoke residue inside walls.
- Pet urine in carpet padding.
- Hidden moisture.
- Mold behind drywall.
- Dirty HVAC components.
Ozone can react only with compounds it reaches, and those reactions do not remove the contamination producing new odor.
If new odor molecules continue being produced, the smell will eventually return.
For more on why this happens, see Chapter 15 — Ozone’s Place in the Restoration Process and Ozone Generator Didn’t Work? Common Reasons the Smell Came Back.
Why Does It Still Smell Like Ozone?
A lingering sharp or “electrical” smell cannot identify a chemical or prove whether a room is safe. Possible explanations include:
- Residual ozone is still present.
- The room has not been ventilated long enough.
- Reaction byproducts remain in the air.
Leave the area and continue outdoor-air ventilation according to the equipment instructions. Do not use another ozone treatment. See Why Does My Room Smell Worse After Ozone Treatment?
Is Ozone Safe for Babies?
No.
Children are among the groups at greater risk from ozone exposure because their lungs are still developing. The EPA identifies children, older adults, and people with asthma as groups at increased risk.
Children should never remain in a space during ozone treatment and should not return until the room has been fully ventilated.
Is Ozone Safe for Older Adults?
No.
Older adults are among the groups the EPA identifies as being at greater risk from ozone exposure.
For this reason, they are considered a sensitive population and should never be present during ozone treatment.
Is Ozone Safe for People with Asthma or COPD?
No.
Ozone is a respiratory irritant that can worsen asthma and other chronic respiratory diseases and inflame the airways.
People with respiratory disease should avoid ozone exposure entirely.
Is Ozone Safe for Pets?
No.
Ozone can harm animals as well as people. Do not leave any animal in the treatment area or in a connected space where ozone could migrate. This includes birds, reptiles, small mammals, insects, and aquarium animals.
All pets should be removed before treatment begins.
Can I Smell Dangerous Levels of Ozone?
Not reliably.
Although ozone has a distinctive odor, smell varies by person and can become less noticeable during exposure.
This means hazardous ozone concentrations may still be present even after you no longer notice the smell.
Never use your nose as your primary safety monitor.
Are Inexpensive Ozone Meters Accurate?
Many inexpensive consumer meters may not accurately measure low ozone concentrations or distinguish ozone from interfering gases. There is also no single meter reading that overrides the manufacturer’s re-entry instructions and applicable guidance.
They may be useful for general trend monitoring, but they should not be relied upon as the sole basis for critical safety decisions.
If measurements are important, use a quality meter designed for low-level ozone detection and follow the manufacturer’s calibration recommendations.
See Chapter 10 — Measuring Safety for a detailed discussion of ozone meters, calibration, and measurement limitations.
Should I Buy an Ozone Generator or Hire a Professional?
That depends on the problem.
For homeowners, the safer default is source removal, cleaning, ventilation, and filtration. Consider professional help before using an intentional ozone generator, especially when the source is uncertain or the space cannot be isolated.
Professional restoration is usually the better choice when:
- Fire damage is extensive.
- Mold contamination is widespread.
- Sewage contamination is present.
- Hidden moisture is suspected.
- Odors continue returning despite repeated cleaning.
Professionals have specialized equipment and restoration methods that address problems ozone alone cannot solve.
What Do the EPA and CARB Say?
The U.S. Environmental Protection Agency states that no federal agency has approved ozone generators for use in occupied spaces. The California Air Resources Board recommends that consumers not use ozone generators except for approved industrial purposes where harmful exposure is prevented.
They emphasize that ozone should not be considered a substitute for proper cleaning, filtration, source removal, or ventilation.
CARB also regulates ozone emissions from indoor air-cleaning devices sold in California. Certification of an air cleaner is not approval of a high-output ozone-generator treatment.
Those recommendations support source removal, cleaning, filtration, and ventilation and warn against exposure to intentionally generated ozone.
What Are the Biggest Myths About Ozone?
- Myth: Ozone is just fresh oxygen.
Fact: Ozone is a reactive air pollutant and respiratory irritant. - Myth: If I can’t smell ozone, it’s gone.
Fact: Your sense of smell becomes unreliable quickly. - Myth: Ozone removes the source of an odor.
Fact: It may react with some odor-causing compounds, but it does not remove the contamination producing them. - Myth: More ozone always works better.
Fact: Excessive ozone increases health risks and material damage. - Myth: An N95 mask protects against ozone gas.
Fact: N95 respirators filter particles, not ozone gas.
Chapter Summary
- Ozone is a specialized restoration tool—not an everyday air purifier.
- Always wait, ventilate, and verify before re-entering a treated space.
- Ozone cannot replace cleaning, drying, or source removal.
- Repeated treatments usually indicate an unresolved contamination problem.
- Sensitive people and pets should never be exposed to ozone.
- HEPA filters, activated carbon, hydroxyl generators, and ozone each have different roles in restoration.
- Ozone should never replace proper restoration practices, and intentional ozone generators must not be used in occupied spaces.
Next Chapter: Glossary of Ozone and Restoration Terms defines the technical words and phrases used throughout this guide, making it easy to understand ozone, restoration, indoor air quality, and remediation terminology.
Chapter 18 — Glossary of Ozone, Restoration, and Indoor Air Quality Terms
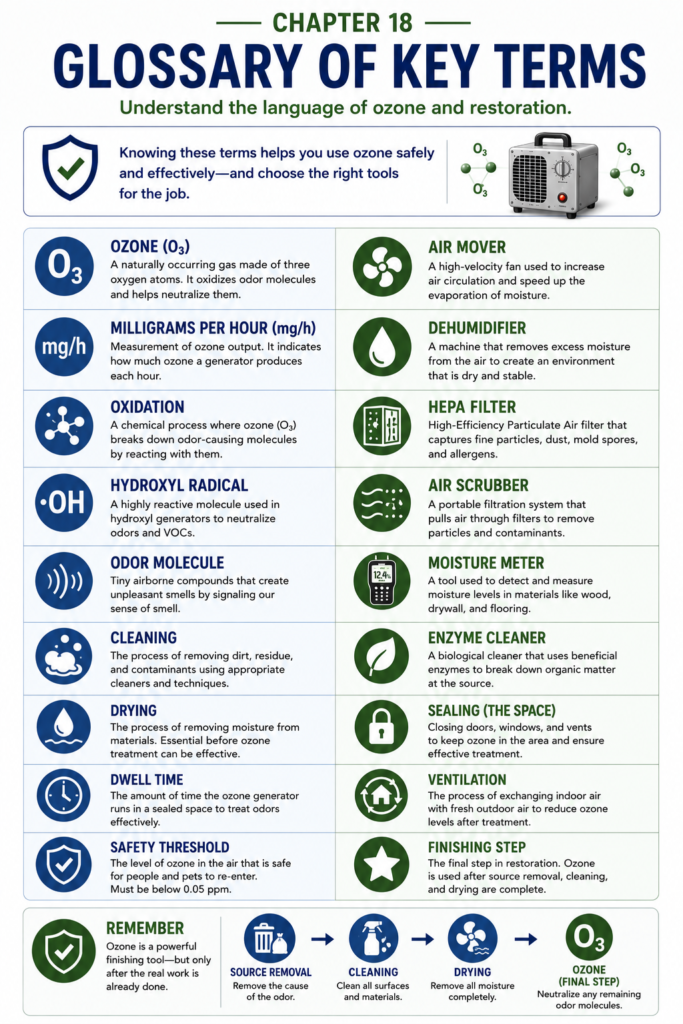 This glossary explains many of the technical terms used throughout this guide. The definitions are written for homeowners and are intended to provide quick, easy-to-understand explanations without requiring a scientific background.
A
Activated Carbon
A highly porous sorbent used in some air filters to capture certain gases and odors. Performance varies by contaminant, carbon type, amount of media, airflow, and replacement schedule. Unlike an ozone generator, activated carbon does not intentionally add ozone to the air.
Adsorption
The process by which gases and odor molecules stick to the surface of a material, such as activated carbon.
Air Changes Per Hour (ACH)
A measurement relating airflow to room volume. More outdoor-air exchange can help dilute and remove indoor contaminants, although actual clearance time depends on mixing and other conditions.
Air Mover
A high-powered fan used during water damage restoration to speed the drying of wet building materials.
Air Scrubber
A portable filtration machine that removes airborne particles using HEPA filters and other filtration media.
Airflow
The movement of air through a room or building. During ozone treatment, airflow helps distribute ozone more evenly. After treatment, airflow—especially fresh outdoor air—helps remove remaining ozone and reaction byproducts during ventilation.
Asthma
A chronic respiratory disease that causes inflammation and narrowing of the airways. Ozone exposure can trigger asthma attacks and worsen symptoms.
B
Biohazard
Biological contamination—such as sewage, blood, or extensive mold growth—that can threaten human health and often requires professional remediation.
Building Materials
The structural components of a building, including drywall, insulation, flooring, wood framing, and concrete. Many odors become trapped inside these materials.
C
CARB (California Air Resources Board)
The California agency that regulates ozone emissions from many air-cleaning devices sold in the state and establishes strict ozone emission limits for consumer products.
Ceiling Concentration
A workplace exposure limit that should never be exceeded, even briefly.
Chain Scission
The chemical breaking apart of long molecular chains within materials such as rubber and plastics. Ozone can cause chain scission, leading to cracking and loss of strength.
Contamination
Any unwanted material—such as smoke residue, mold, sewage, pet urine, or biological waste—that causes odors or health concerns.
Corona Discharge
The most common method used by ozone generators to create ozone by passing high-voltage electricity through oxygen.
Cubic Feet
A measurement of three-dimensional space used to determine the volume of a room.
Cubic Volume
The total amount of air inside a room, calculated by multiplying the room’s length, width, and height. Volume is one factor affecting ozone concentration, but it cannot by itself determine a safe generator size, dose, or runtime.
D
Dehumidifier
A machine that removes excess moisture from the air to help dry buildings and prevent mold growth.
Drying
The process of removing moisture from building materials before odor treatment begins. Ozone should never be used as a substitute for proper structural drying.
E
Enzyme Cleaner
A cleaning product that uses enzymes to break down biological contamination such as pet urine before deodorization with ozone.
EPA (Environmental Protection Agency)
The U.S. government agency responsible for protecting human health and the environment. The EPA states that no federal agency has approved ozone generators for use in occupied spaces and emphasizes source control and ventilation.
F
Formaldehyde
A hazardous air pollutant that can be produced or increased by some reactions between ozone and chemicals already present indoors.
H
Half-Life
The time required for a concentration to decrease by half under specified conditions. Indoor ozone does not have one dependable half-life because chemical reactions, surfaces, temperature, humidity, airflow, ventilation, and room contents all affect its removal.
HEPA Filter (High-Efficiency Particulate Air Filter)
A mechanical air filter capable of capturing at least 99.97% of particles that are 0.3 microns in diameter. HEPA filters remove dust, pollen, pet dander, mold spores, and many other airborne particles that ozone generators cannot remove.
HVAC (Heating, Ventilation, and Air Conditioning)
A building’s heating and cooling system. Never use an HVAC system to distribute ozone unless the equipment instructions expressly permit it, the entire connected building is secured and vacant, and ozone cannot migrate to another occupied area.
I
IDLH (Immediately Dangerous to Life or Health)
A concentration capable of causing immediate danger to life or irreversible health effects. For ozone, NIOSH identifies 5 ppm as the IDLH concentration.
Indoor Air Quality (IAQ)
A general description of how clean and healthy the air inside a building is. Good indoor air quality depends on controlling pollutants, moisture, ventilation, and airborne particles.
Ionizer
An air-cleaning device that electrically charges airborne particles so they attach to nearby surfaces or collection plates. Some ionizers intentionally or unintentionally produce ozone as a byproduct.
M
Moisture Meter
A measuring instrument used to determine whether wood, drywall, flooring, or other building materials have dried sufficiently following water damage.
Mold
A fungus that grows where excess moisture is present. Mold often produces musty odors and can affect indoor air quality. Ozone may reduce odors associated with mold but is not considered a substitute for proper mold remediation.
O
Off-Gassing
The gradual release of trapped chemicals or odor molecules from porous materials such as carpet, drywall, furniture, insulation, and smoke-damaged surfaces.
Olfactory Fatigue
A temporary loss of sensitivity to an odor after continuous exposure. This is one reason homeowners should never rely on their sense of smell to determine whether ozone has completely dissipated.
Oxidation
A chemical reaction in which ozone changes other compounds. Those reactions may alter some odor-causing compounds, can form secondary pollutants, and can damage susceptible materials.
Ozone (O₃)
A gas made of three oxygen atoms. Ozone is a powerful oxidizer used for odor remediation, but it is also a known respiratory irritant that should never be inhaled intentionally.
Ozone Generator
A machine that intentionally produces ozone gas for odor removal in completely unoccupied spaces.
Ozone Plate
The internal component of some ozone generators that creates ozone through corona discharge. Service requirements vary; clean or replace a plate only as the manufacturer directs, and do not open units that require qualified service.
Ozonolysis
The chemical process in which ozone attacks certain molecular bonds, particularly those found in natural rubber, causing cracking, brittleness, and loss of elasticity.
P
Parts Per Billion (ppb)
A unit used to measure extremely small concentrations of a gas. One thousand parts per billion equals one part per million.
Parts Per Million (ppm)
The most common unit used to describe ozone concentration. Workplace and residential exposure guidelines are often expressed in parts per million.
PEL (Permissible Exposure Limit)
A legally enforceable workplace exposure limit established by OSHA. For ozone, the OSHA permissible exposure limit varies depending on workload and exposure conditions; many general discussions reference an 8-hour exposure limit of 0.1 ppm. Workplace limits should not be used as residential safety targets.
Pet Dander
Tiny flakes of skin shed by animals. Pet dander is a physical airborne particle that ozone does not remove. HEPA filtration is the preferred method for controlling dander.
Porous Material
Materials containing tiny openings that allow liquids, smoke residues, and odors to penetrate below the surface. Examples include carpet, upholstery, drywall, insulation, unfinished wood, and concrete.
R
Relative Humidity (RH)
The amount of moisture present in the air compared with the maximum amount the air can hold at the same temperature. Humidity can affect ozone production, reactions, and decay; the direction and size of the effect depend on the equipment and conditions.
REL (Recommended Exposure Limit)
A health-based occupational exposure guideline published by NIOSH. Unlike OSHA exposure limits, RELs are recommendations rather than legally enforceable standards.
Remediation
The process of identifying, removing, cleaning, and correcting contamination such as mold, smoke damage, sewage, or water damage. Ozone is normally one of the final steps—not the first step—in a remediation project.
Restoration
The process of returning a building or property to a safe, clean, and usable condition after damage from fire, flooding, smoke, mold, or other disasters.
S
Secondary Pollutants
New chemicals formed when ozone reacts with substances already present in a home. Some secondary pollutants, including formaldehyde and ultrafine particles, may remain after ozone itself has dissipated.
Smoke Residue
The tar, soot, nicotine, and other combustion byproducts left behind after smoking or a fire. Smoke residue must be physically cleaned because ozone cannot remove the residue itself.
Source Removal
The process of physically eliminating whatever is causing the odor, such as mold, pet urine, spoiled food, smoke residue, or standing water. Successful odor removal almost always begins with source removal.
Structural Drying
The professional process of removing moisture from walls, flooring, insulation, and other building materials following water damage. Proper structural drying helps prevent recurring mold growth and musty odors.
Subfloor
The structural flooring beneath finished flooring materials. Pet urine, floodwater, and other contaminants often soak into subfloors, making odors difficult to remove.
Surface Spores
Mold spores located on the surface of materials. While ozone may affect some exposed spores, it cannot reliably eliminate mold growing inside walls or other building materials.
T
Timer
An automatic shutoff feature included on some ozone generators. A timer can end production at a selected time, but it does not determine a safe dose, prevent ozone migration, ventilate the space, or prove that re-entry is safe.
TWA (Time-Weighted Average)
An average exposure concentration calculated over a standard workday, typically eight hours. Many occupational ozone exposure limits are based on a time-weighted average.
U
UV Ozone Generator
A type of ozone generator that uses ultraviolet light rather than a corona-discharge plate. Output varies by design and must be confirmed from tested manufacturer specifications.
V
Ventilation
The process of replacing contaminated indoor air with fresh outdoor air. Proper ventilation is one of the most important safety steps following any ozone treatment.
VOC (Volatile Organic Compound)
A group of chemicals that easily evaporate into the air from products such as paints, cleaners, solvents, adhesives, flooring, and furnishings. Some VOCs react with ozone to form irritating secondary pollutants.
W
Water Damage
Damage caused by flooding, plumbing leaks, roof leaks, or excess moisture. Water damage must be corrected and the structure completely dried before ozone is used to remove lingering odors.
Weatherstripping
The rubber or foam seals around doors, windows, and vehicles that help prevent air leaks. Natural rubber weatherstripping is especially vulnerable to ozone cracking after repeated exposure.
Glossary Tip
If you encounter an unfamiliar technical term while reading this guide, refer back to this glossary before continuing. Understanding these terms can help you recognize the limits of ozone and when source removal, ventilation, filtration, remediation, or professional help is more appropriate.
Chapter Summary
This glossary provides quick, homeowner-friendly definitions for the most important ozone, restoration, and indoor air quality terms used throughout this manual. While understanding the terminology is helpful, remember that successful odor removal always comes back to the same principles repeated throughout this guide:
- Remove the source before treating the odor.
- Use ozone only in completely unoccupied spaces.
- Wait, ventilate, and verify before re-entry.
- When in doubt, choose the safer approach.
Next Chapter: Additional Resources and Emergency Cleanup References connects everything you’ve learned in this guide to the broader world of professional restoration, drying, mold remediation, smoke cleanup, and indoor air quality resources—helping you determine when ozone is the right tool and when another solution is the better choice.
Chapter 19 — Additional Resources and Emergency Cleanup References
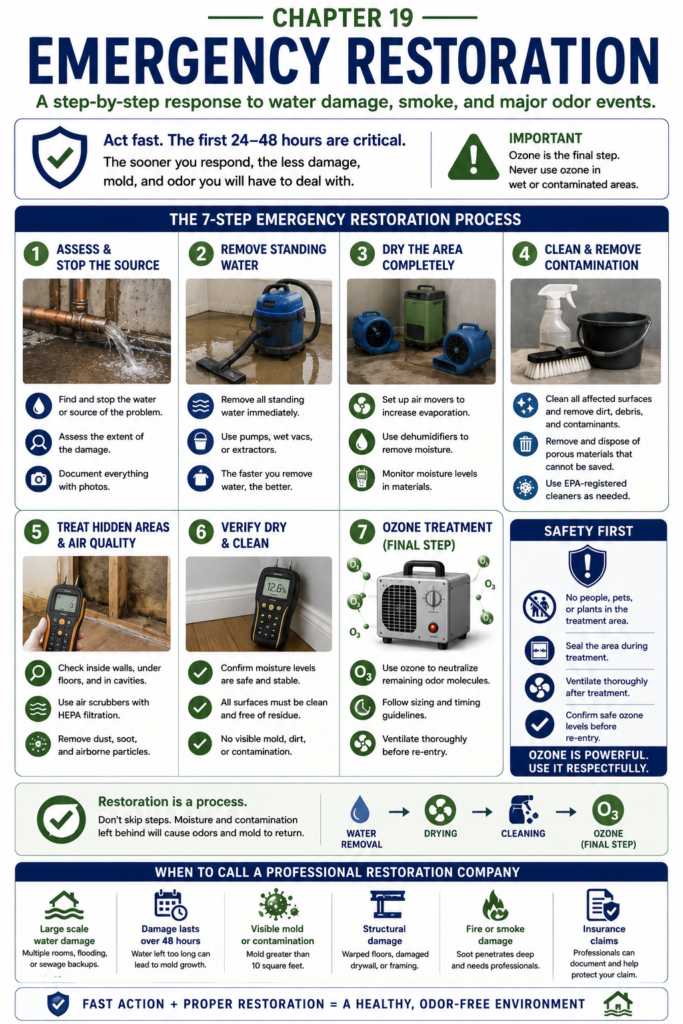 One of the most valuable lessons in this guide is knowing when not to use an ozone generator.
Throughout this manual you’ve learned that ozone is a specialized deodorization tool—not a cure-all for every odor or indoor air quality problem.
In limited circumstances, an unoccupied-space ozone treatment may be considered after the underlying work is complete.
Other times, the correct solution is drying a wet building, removing contaminated materials, improving ventilation, replacing damaged components, or calling a qualified restoration professional.
This final chapter points you toward those additional resources and explains where ozone fits within the larger world of restoration, indoor air quality, and emergency cleanup.
Think Beyond the Ozone Generator
If you’ve made it this far, you’ve probably noticed a consistent theme throughout this guide:
Successful odor removal is really successful problem solving.
Professionals don’t begin by asking, “How do we get rid of the smell?”
They begin by asking:
- What caused the odor?
- Is contamination still present?
- Has the building been dried?
- Can the material be cleaned, or does it need to be replaced?
- Is ozone even the right tool for this situation?
Those questions usually lead to better long-term results than immediately reaching for an ozone generator. For a practical example, see Ozone After Flooding: Miracle Cure or Temporary Cover-Up?
One Final Reminder
If you remember only one principle from this guide, let it be this:
Correct the cause first. Remove the odor second.
Ozone should be considered only after the underlying problem has already been solved—and only when the space can be kept completely vacant and isolated from occupied areas.
When Ozone May Be Considered
Ozone may be considered as an optional finishing step when the contamination has already been removed but a lingering odor remains. Results vary and should not be guaranteed.
Examples include:
- Residual smoke odor after thorough cleaning.
- Lingering pet odor after enzyme treatment.
- Musty smells after a building has been completely dried.
- Vehicle odors after detailing.
- Rental property deodorization after turnover cleaning.
In each of these situations, ozone is acting as a finishing step—not as a substitute for restoration.
When Another Solution Comes First
In many situations, another restoration method should take priority before ozone is even considered.
| Problem | First Priority |
|---|---|
| Standing water | Water extraction and structural drying |
| Active mold growth | Moisture control and mold remediation |
| Pet urine | Enzyme cleaning and source removal |
| Smoke residue | HEPA vacuuming and physical cleaning |
| Dust and allergens | HEPA filtration and cleaning |
| High humidity | Dehumidification and moisture control |
Knowing which tool solves which problem is one of the biggest differences between temporary odor relief and permanent restoration.
Choosing the Right Tool for the Job
If you’re unsure where to start, begin by identifying the problem—not the equipment.
| If You Have… | Start With… |
|---|---|
| Standing water | Water extraction and structural drying |
| High humidity | A dehumidifier |
| Dust, pollen, or pet dander | HEPA filtration |
| Smoke residue | Physical cleaning before deodorization |
| Pet urine | Enzyme cleaning and source removal |
| Lingering odor after cleanup | Choose a source-appropriate deodorization method; consider ozone only for a controlled, completely unoccupied treatment |
The most effective restoration projects rarely depend on a single machine. They succeed because the right tool is used at the right stage of the process.
How Restoration Tools Work Together
One of the biggest misconceptions homeowners have is believing there is a single machine that solves every odor problem.
Professional restoration doesn’t work that way.
Instead, restoration specialists combine multiple tools, with each one solving a different part of the problem.
| Problem | Primary Tool |
|---|---|
| Standing water | Extraction equipment |
| Wet building materials | Air movers and dehumidifiers |
| Dust, soot, mold spores, or allergens | HEPA filtration and air scrubbers |
| Pet urine contamination | Enzyme cleaners and material replacement when necessary |
| Smoke residue | HEPA vacuuming and detergent cleaning |
| Lingering odors after cleanup | A source-appropriate deodorization method; ozone only when a controlled, completely unoccupied treatment is appropriate |
Notice that ozone appears near the end of the process—not the beginning.
When Ozone May Be Considered
An ozone generator may be considered only when:
- The contamination source has already been removed.
- The area is completely dry.
- The room can be completely vacated.
- The space can be isolated from occupied areas.
- The remaining problem is a lingering odor rather than active contamination.
Meeting these conditions does not guarantee that ozone will be effective or safe for every material. Follow the manufacturer’s instructions and applicable rules.
When Ozone Is NOT the Right Tool
Choose another solution first if:
- The building is still wet.
- Mold is actively growing.
- Dust or allergens are the primary concern.
- People must remain in the building.
- The odor source has not yet been located.
- The contamination is hidden inside walls, flooring, or insulation.
Attempting to solve these problems with ozone alone usually leads to frustration because the real issue has not been corrected.
When DIY Should End
Homeowners can resolve some odor problems through source removal, cleaning, drying, and ventilation.
However, certain situations are better left to trained restoration professionals.
Consider calling a restoration company if:
- Fire damage is extensive.
- Mold covers a large area.
- Sewage contamination is present.
- The structure has suffered significant water damage.
- Odors repeatedly return despite proper cleaning.
- You suspect contamination inside walls or HVAC systems.
- You live in a building with shared ventilation.
Professional restoration companies have specialized equipment, inspection tools, and experience that homeowners typically do not.
What the Major Health Agencies Recommend
Throughout this guide—and especially in Chapters 3 and 4—the most directly relevant guidance comes from the U.S. EPA, which states that no federal agency has approved ozone generators for use in occupied spaces, and the California Air Resources Board, which recommends against consumer ozone generators except for controlled industrial applications that prevent harmful exposure.
- Remove contamination before attempting deodorization.
- Do not use ozone in occupied spaces.
- Ventilate thoroughly after treatment.
- Do not rely on odor as your safety indicator.
- Protect vulnerable people and pets from exposure.
For flood and water-damage cleanup, use the EPA’s flood-cleanup and indoor-air resources. The CDC’s disaster-cleanup guidance covers contaminated materials, sewage, and other hazards that ozone cannot correct. For mold, see the EPA’s Mold Cleanup in Your Home.
A Simple Decision Framework
Before reaching for an ozone generator, ask yourself these questions:
- Do I need cleaning?
- Do I need drying?
- Do I need filtration?
- Do I need restoration?
- Do I need professional help?
- Is ozone actually the correct tool?
If the answer to any of the first five questions is “yes,” address those needs before considering ozone.
If those problems have already been corrected and the only remaining issue is a persistent odor in a space that can be fully vacated, isolated, and ventilated outdoors, ozone may be considered as an optional finishing tool.
Chapter Summary
Ozone generators are only one possible odor-control tool among many, and public-health agencies caution strongly against exposure.
The most successful restoration projects don’t begin with ozone. They begin by identifying the source of the problem, removing contamination, correcting moisture issues, cleaning affected materials, and restoring the environment before using ozone as a final deodorization step.
Understanding where ozone fits within that larger process helps homeowners make better decisions, avoid common mistakes, and recognize when professional assistance is the safest and most effective solution.
Next Chapter: Final Safety Checklist and Quick Reference Guide brings everything together into one easy-to-follow resource you can review before every ozone treatment.
Chapter 20 — Final Safety Checklist and Quick Reference Guide
If Something Goes Wrong
If something doesn’t seem right during or after an ozone treatment, stop and work through these simple steps before considering another treatment. The related guide Ozone Generator Didn’t Work? explains why a returning odor often points back to source removal.
| Situation | What To Do |
|---|---|
| Someone enters the room during treatment | Move them to fresh air without sending another unprotected person into the space. Call 911 for severe symptoms and seek medical advice for persistent or worsening symptoms. |
| Eyes, nose, or throat become irritated | Leave the area and continue ventilating before attempting re-entry. |
| The original odor returns | Look for remaining contamination instead of immediately running another treatment. |
| The room still smells like ozone | Increase fresh-air ventilation and allow more time before re-entry. |
| The generator appears to malfunction | Do not enter immediately. Follow the shutdown, ventilation, measurement when available, and re-entry procedure before inspection; have damaged electrical equipment serviced professionally. |
Quick Decision Guide
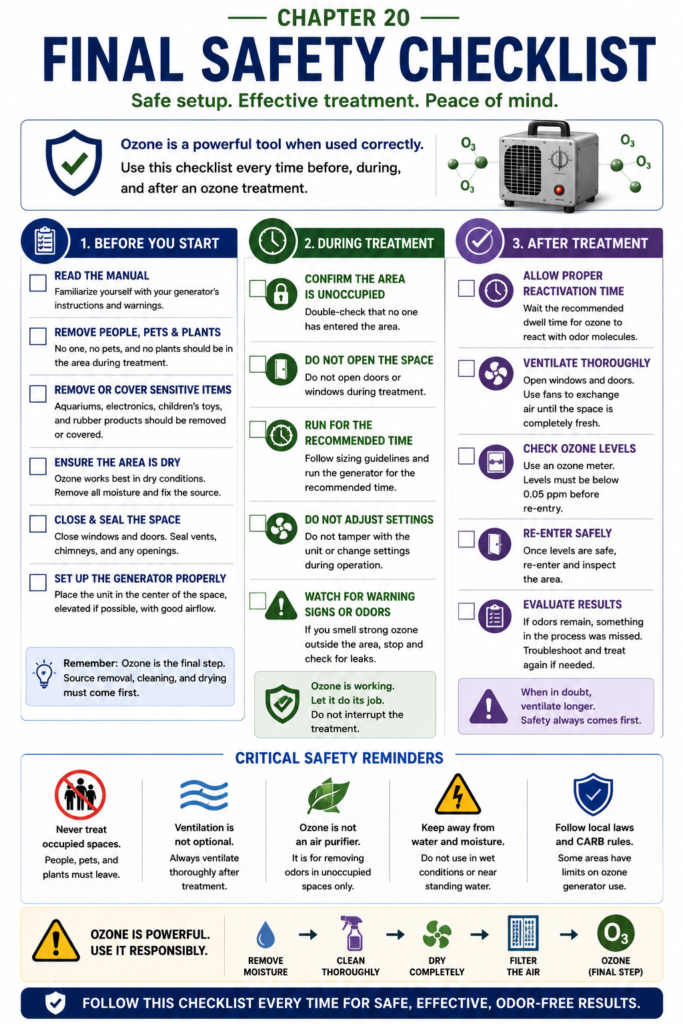 Before using an ozone generator, ask yourself these questions. Also review How Long to Wait After Using an Ozone Generator before planning shutdown, ventilation, and re-entry.
- ☐ Has the source of the odor been removed?
- ☐ Has the area been cleaned?
- ☐ Is everything completely dry?
- ☐ Can everyone leave the treatment area?
- ☐ Can the space be ventilated afterward?
- ☐ Is ozone really the best tool for this situation?
If you answered “No” to any of these questions, solve that problem first before using ozone.
Final Thoughts
Ozone generators are sometimes used as finishing deodorization tools, but results vary and exposure can harm health.
But the most important lesson from this guide is that successful odor removal rarely begins with ozone.
It begins with understanding what caused the odor, removing the contamination, correcting moisture problems, cleaning thoroughly, and restoring the space.
When those steps have been completed, evaluate whether any finishing deodorization is still needed and whether ozone is appropriate for a controlled, completely unoccupied treatment.
Throughout this guide, one principle has remained constant:
Remove the source first. Use ozone last.
Follow that principle, respect ozone’s hazards, and choose the safest approach whenever uncertainty exists.
Thank you for reading The Complete Homeowner’s Guide to Ozone Generators. I hope it helps you make informed, safer decisions whenever odor problems arise.
Quick Decision Guide: Should You Use an Ozone Generator?
START HERE
⬇
Can you identify the source of the odor?
⬇
NO → Find the source before doing anything else.
YES ↓
Has the source been physically removed or cleaned?
⬇
NO → Clean first.
YES ↓
Is everything completely dry?
⬇
NO → Dry the structure first.
YES ↓
Can everyone leave the treatment area?
⬇
NO → Do not use ozone.
YES ↓
Can the area be sealed from occupied spaces?
⬇
NO → Consider another solution or professional restoration.
YES ↓
Ozone may be considered as an optional finishing treatment; follow the manufacturer and applicable rules.
Warning Signs That Mean “Stop”
Stop the treatment and reassess the situation if:
- The room is still occupied.
- The building is still wet.
- Someone develops eye, nose, or throat irritation.
- The generator begins smoking, sparking, or overheating.
- You discover hidden contamination.
- The odor keeps returning after multiple treatments.
These situations usually indicate that ozone is not the solution—or that the restoration process is incomplete.
Emergency Exposure Reminder
If someone is accidentally exposed to ozone:
- Move them to fresh air immediately.
- Do not allow continued exposure.
- Monitor for coughing, chest tightness, wheezing, pain with deep breathing, or shortness of breath.
- Call 911 for severe breathing difficulty, collapse, blue or gray lips, confusion, or another life-threatening symptom.
- Seek medical advice if symptoms persist or worsen. The NIOSH Pocket Guide for ozone directs inhalation exposure to fresh air and medical attention as appropriate.
Protect These Materials Before Treatment
- Natural rubber.
- Leather.
- Artwork.
- Photographs.
- Important documents.
- Collectibles.
- Sensitive electronics.
- Houseplants.
- Aquariums.
The Biggest Lessons From This Guide
If you’ve read this manual from beginning to end, you’ve probably noticed several ideas repeated throughout almost every chapter.
That repetition was intentional.
These are the principles that matter most.
- Odors almost always have a physical source.
- Cleaning is more important than deodorizing.
- Drying is more important than deodorizing.
- Filtration removes particles that ozone cannot.
- Ozone should almost always be one of the last restoration steps—not the first.
- More ozone is rarely the answer.
- Health and safety always come before odor removal.
One Final Thought
Ozone generators have earned both enthusiastic supporters and harsh critics.
The truth lies somewhere in the middle.
Used incorrectly, ozone can damage materials, create health hazards, and leave homeowners disappointed.
In limited controlled applications, it may change some odor-causing compounds after proper cleaning and restoration, but effectiveness varies and material or health risks remain.
The difference is understanding what ozone can do—and just as importantly, what it cannot do.
Hopefully this guide has helped you make that distinction.
Thank You for Reading
Thank you for taking the time to learn about ozone generators, their limitations, and the public-health precautions surrounding them.
Whether you’re dealing with smoke odors, pet odors, flood damage, or another difficult odor problem, remember that successful restoration almost always begins by fixing the source—not simply treating the air.
Following the principles in this guide can help you avoid preventable exposure, recognize when ozone is the wrong tool, and prioritize source removal and professional help when appropriate.
Remember the guiding principle that has appeared throughout this guide:
Remove the source first. Use ozone last.
Stay safe, restore thoroughly, and let good restoration practices guide every odor-removal project.